I know you guys love a good rug project and I guarantee this one will not disappoint.
I love sisal rugs. They are a fantastic way to incorporate natural elements into a room.
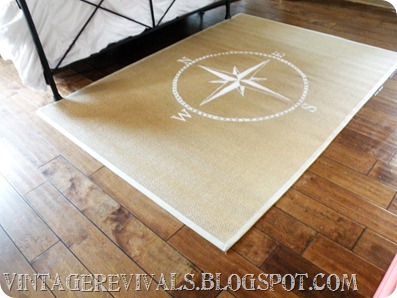
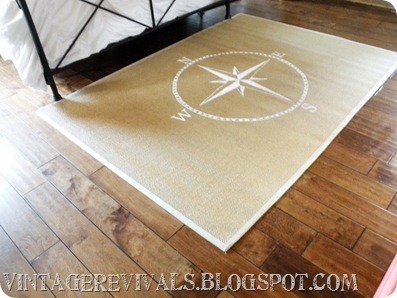
But guess what? They can be kind of blah. So I figured out a way to Mandify it. I am sort of feeling a bit of Nautical-ness and what is more perfectly nautical than a compass? Um…nothing.
I bought the rug at Ikea. It was $79.00 (this is where you turn you head and cough) Pretty expensive but…sometimes its necessary to spend a little bit of mulah for AWESOMENESS. And I have been SEARCHING for one for a month and $79.00 was the cheapest price I found.
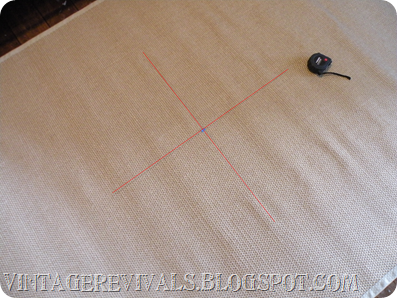
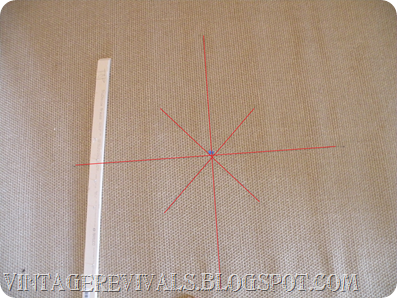
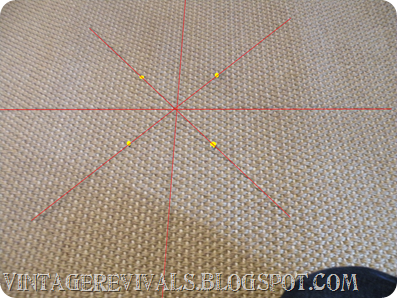
When drawing on my rug I used a pencil that didn’t show up wonderfully in pictures so I photoshopped the lines so that they would be more clear in pictures. The photoshopped lines are not exact, the actual lines on the rug are. Don’t judge me for not spending more time on picture perfection.
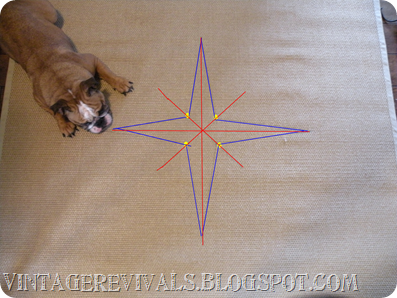
Start by finding the exact center of your rug. Draw 2 perpendicular lines that are the same length. Mine are 32 inches long.
Next you are going to draw 2 more lines (see picture) My lines measure 17” (just a little over 1/2 the length of the long lines).
Measure 3” up and mark it. (Marked with the yellow dots)
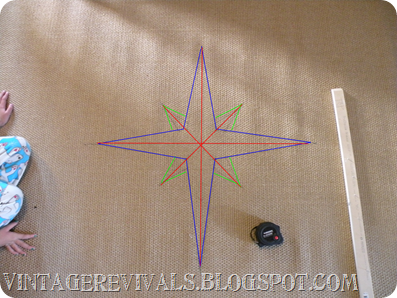
Then you are going to connect the tip of your red line to each of your marks. (Blue lines)
Next you are going to measure from the inside of each blue line 2” and mark it. Then connect the tip of the shortest line to the marks you just made. (green lines)
Once you have all of your lines drawn take a small paint brush and trace all of your lines. (Sorry no pic, I am lame)
I used Decoart’s Stencil Paint in white.
It is awesome for a project like this because it’s a really thick paint that is designed to stay where its put!
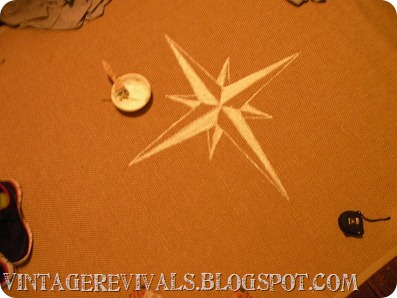
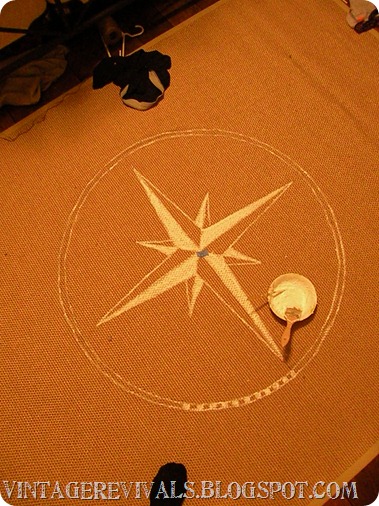
Once you have traced each of your lines you are going to fill in the left side of each point (every other space).
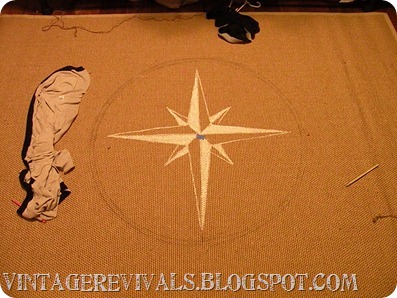
Pull out your pencil, a small nail and a piece of string (I used jute because it doesn’t stretch) Find your enter point and hold your nail there the entire time! Stretch your string out and use your pencil to draw a circle around your star. Then you are going to extend your string out 3/4 of an inch and draw a second circle.
Paint along your lines. Then I went back and free handed each of the small squares. They aren’t perfect, but guess what? Don’t care.
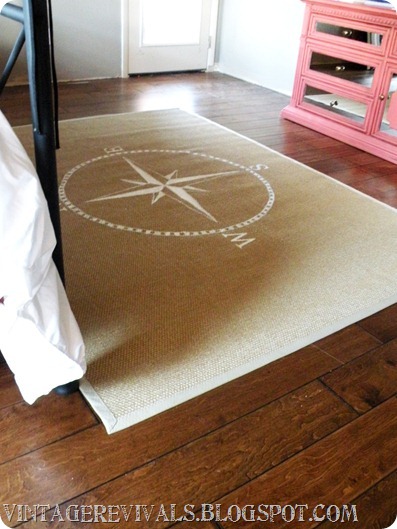
TaDa!!
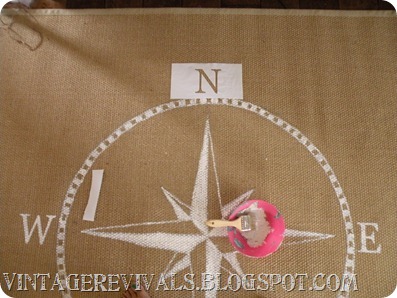
For my letters I cut the out on my Silhouette with regular old vinyl. Position it so that is is centered on your star tip. And the right distance from your circle.
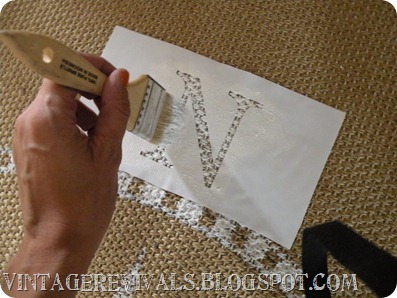
Then stencil it on.
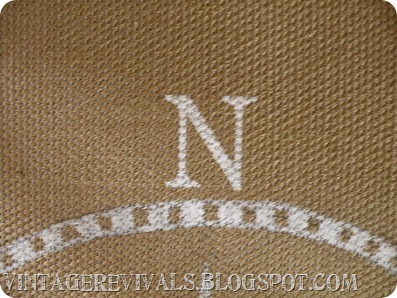
Notice there was NO bleeding, even with the huge fibers. That is because its FREAKING AWESOME paint. Oh and its water based (most stencil paints are oil) so it doesn’t jack up your brushes. And cause its water based it matches the Americana paints perfectly!
Ps. I did not receive this paint free. I bought it with my…well my husbands hard earned cash. I loved it, the end.
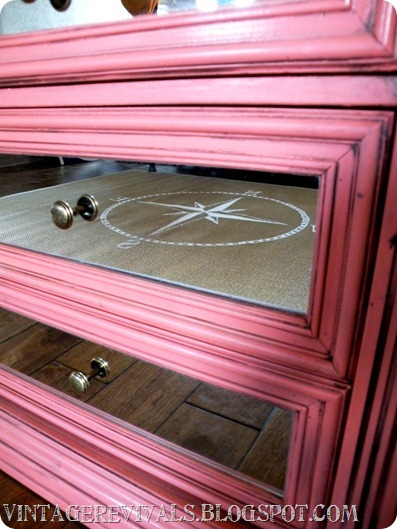
Here are a few more token shots.
If you missed the tutorial for the coral dresser you can read all about it here.
I can’t wait to show you what else I have been working on for my bedroom… So exciting!!!! EEEEEEE!






the question is… does it accurately point towards N,S,E and W? ’cause that would be awesone. really though, I love it.
That turned out awesome!! I have that rug from Ikea and need to do something like that ~
Thank you for showing us such wonderful inspiration!
xoxo
Lori
Mkay, I like the rug a lot but I LOVE your dog. Holy crap I wanna snuggle him/her.
Rug *is* super cute though.
Spectacular! absolutely spectacular…
super cool! and look at me commenting! yippee!
Brilliant!!!
Love it! I’m into compasses lately. I found a cute compass ring on etsy and gently suggested hubby buy it for me for our anniversary. Guess what I’m getting?
Love this! Super cool idea.
I love your blog, I’m always stalking it & getting inspired! I used your tinfoil night stand as inspiration for the cabinet I just made, you can see it here: https://mrsgrinder.blogspot.com/2011/05/i-promised.html
I had a lot of trouble getting the foil to harden up, it’s probably not going to be very sturdy, but I just plan on using it more for display. If you have any tips on how to make it more durable, I’d appreciate it 🙂 xox
that looks great, i love the compass. it reminds me of that poem…he was my north, my south, my east, my west…that they recite in 4 weddings and a funeral. no? oh, and 79 bucks? yowza! glad you’ve got the skills to make it work, i would definitely not start off there myself.
I love it! very well done Mandi!
xoxo,
Amy
I likey!
I love it’s guts! ;o) Great job!
Wow!! Sooo impressed, LOVE LOVE LOVE!!!
You are just such a clever person. well done and thank you for sharing all your clever projects and ideas with you.
Lovely! Great idea!
How does the paint wear? I mean with time because it is not meant to be stepped on and vacumed and so on??? My only consern…
Look forward to the next project!!!
AMAZING {as usual!}. Seriously, you are so talented. I wouldn’t worry too much about the wear and tear of the painted rug – it only adds to its charm 🙂
EEEEEEE is right!! One, I absolutely love how clean and simple your rug looks! Two, can’t wait to see your bedroom makeover! And three, I totally can’t wait for GNO!!
* Nancy *
FYI- a 6′ x 9′ sisal rug can be found for just $50 at Walmart.com and shipped to store for free. I would love to do a similar project but I’m not sure if a sisal rug would be a good choice for a nursery. Any thoughts?
Love it!!! Can’t wait to see the rest of your room 🙂
What a great idea and I love the simple color palette and cleanness of the look!
Hey Breezy!
Thats good to know! I wouldnt use it in a nursery. Sisal is REALLY rough and would hurt once the baby started crawling on it!
Love your guts
mandi
This turned out awesome!!! Although most of your projects tend to be. Thanks for sharing and giving me a little inspiration!!
Wow girl! You never cease to amaze me. I felt so bad that I was not able to go to dinner the other night! Darn guitar recital!
This is so great. Amazing what you can do with a little paint. Well done. Thanks for sharing!
What the??? Who are you? Hahaha, how do you come up with these amazing things? Can I just say I since reading your blog I was inspired to buy my first thrift store item: $25 couch. She’s got great bones, but the pattern is a super sketch. So I’m gonna have my amazing mother-in-law re-apolster(sp?) it to amazingness. Please tell me that was a good plan, cuz so far no one else thinks so….eeep! Wish me luck.
LOVE! Oh I love this rug, to die for! I just have you say how much i love you, I wish I lived closer to st george, up here in logan or I’d so be joining the girls night! You really are amazing, you are so real and I love your blog, it is so funny and fun to read. You make my day and people are lame when they leave rude comments. keep up the good work!
Wow! Where do you come up with this awesome stuff????! I don’t know what else to say, you ARE amazing!!!!
How super fantastic is that? Well I’ll tell ya, its so super fantastic, and I love it! Great job!
Megan
What an amazing project and a fabulous tutorial! Really, you explained it so well and with such patience!
Your room is really coming together! I love the rug. makes me even more sad I didn’t win the room makeover! 🙂
This comment has been removed by the author.
Crazy awesome project! LOVED your tute as well! I had to natter about you on FJI facebook this weekend for SNS 83. 🙂
https://www.facebook.com/pages/Funky-Junk-Interiors/175378011140#!/photo.php?fbid=10150258196576141&set=a.192514281140.164586.175378011140&type=1&theater
Donna
Now that’s cool!
Holey moley, what a great project! Love the result and a fabulous tutorial!! Might make some myself…- I am very much into “Nautical” at the moment, and have just done myself a Nautical Shadowbox, have a look if you want, below is the link.
https://moderncountrylady.blogspot.com/2011/05/nautical-box-what-to-do-with-shadow-box.html
I love your blog so I am your latest follower.Would not mind a follow back !!
Have a great weekend!!
The rug Mandification is awesome! You go girl (again!)
Christine
http://www.designbyrebirth.blogspot.com
I’m loving this rug -just fabulous!!
You are a neverending source of fabulous projects!!! I have an old jute rug in my dining room I’m hoping to jazz up with a stencil. Someday.
I LOVE this! Coming over from ThriftyDecorChick, and so glad I did!
LOVE this tutorial! I love the compass roses but I have been scared to try it. I will be doing this when I have time. Thanks! ~ Amy
I just found this via casasugar… love it! I might have to borrow this idea for some new throw pillows I have in the works. thanks for sharing!!
I haven’t visited your site in eons (life got in the way of leisure blog viewing). But you are one of my favorites! This compass sisal rug is amazing. You and rugs have a sweet partnership in the creativity arena! Thanks fot sharing the tutorial!
Found my way to your blog through Red Hen Home. I’m about to use your tutorial on my ‘functional’ coffee table and will be posting about it and linking back to you soon. Thanks for the great tutorial!
I love your rug – I really do!!! I linked it to my rugs post too today – I just have to keep this project for myself as well!
I tried your project on a Berber carpet, and it worked GREAT! Granted, not as great as yours, but thanks to your wonderful directions I now have a rug for my “Traveler’s Theme” master bedroom! Kudos, and THANKS!
BTW, here’s my blog so you can check out my rug:
https://www.theunusualcrafter.blogspot.com/p/painted-rug.html
What a great design! I was looking for the perfect design, but was only finding Moroccan inspired ones that just don’t match the rest of the room. Thanks for the inspiration, I’m making my new rug this weekend!
What a great design! I was looking for the perfect design, but was only finding Moroccan inspired ones that just don’t match the rest of the room. Thanks for the inspiration, I’m making my new rug this weekend!
I just found you. But, I can guarantee you I won’t lose you! I am signed up now so I don’t miss a single thing. I am definitely going to do this project and thanks for the heads up on the stencil paint. It’s so nice to meet you!
I just discovered this and my heart is skipping a beat! Or two! Or three!!!!