You guys are in for a treat today. I am pretty sure that I have had 4 people guest post on Vintage Revivals in its entire existence. What can I say. I am a control freak. Sometimes there are just people that you meet that you instantly love everything about that make you want to shout from the rooftops. Jeran from Oleander and Palm is that girl for me. Jeran I love you and I dont care who knows it!! She has got FANTASTIC taste and is one of the sweetest people I have ever had the chance to meet. So without further adieu, meet Jeran!
I’m so honored to be here on VR. How cool is this? Let’s start with, I’m a huge fan, because I am. Every time Mandi puts something together, I’m blown away. She knocks it out of the park every stink’n time. You know what I’m talking about, that’s why you are here. You too love her “out of the box”, thrifty thinking mind. This Christmas when I saw the Geometric Wreath tutorial, I ran (well drove really quickly) to Walmart to stock up on straws and wire. I had to have this wreath in my life. And it is, it’s in my living room, and it makes me happy every time I walk by it. Around Valentine’s Day I started playing around with trying to make a heart version. I tagged Mandi in my picture and she commented back right away. After making many, many versions, I think this is the best and easiest one to make. Anyways, to make a long story short, I’m helping to share how make a Himmeli style heart for your home. It’s soooo perfect in Macie’s Boho room.

So, there are lots of steps, but its really simpler to make then you think.

1. You are going to start with good old cocktail straws and a piece of wire (20 gauge) about 2 yard long. 12 of the straws you will cut in half and the others you will leave whole (except for one little guy).
2. Start by threading 3 small straws onto the end of the wire and twists the ends tight together to make a triangle.
3. Add 2 more small straws, make sure to pull them over the twisted ends of the wire.
4. Take those 2 straws that were just added and bend them into another triangle attached to the first triangle. Twist the end of the wire to hold the triangle shape
5. Thread the wire back through the last straw added.

6. Add another small straw to the tip of this triangle.
7. Use this last straw added to form a pyramid shape. Be sure to twist the end of the wire at the end of the join to hold the shape.
8. Add 2 more small straws to the tip of this pyramid shape.
9. Bend these 2 straws to make another triangle coming off of the pyramid.
10. Thread the wire back through the last straw added.
11. Add another small straw and attach it to form to back and back pyramid shapes.
12. Now add another 2 small straws and bend them to make another triangle shape.

13. Ok, stay with me…. thread the wire back through the last straw added so that it comes out at the point of the newly formed triangle. Now add one more small straw and close the shape to make structure that looks like 3 pyramid joined together. You are 1/2 way there!
14. Repeat steps 1-13 and make another tri-pyramid shape just like the first one. (Don’t hate me, you’re going to love this geometric heart when it’s done.)
15. Now the fun begins, your little heart is going to start to take shape. Woohoo, get excited! Ok, now place the two shapes side by side with the wire ends on the bottom, against the work surface, join the two shapes together with a small straw piece. From center back of one to the center back of the other.
16. Now you are going to need 6 full length straw and one the has about 1 cm (it’s my Canadian coming out, just less then 1/2″) trimmed off.
17. Add 2 long straws to the wire.
18. Bend them to make a point for the bottom of the heart. Twist the wire in place to hold this shape.

19. Now, this might not happen to you, but I ran out of wire length. It’s an easy problem to fix, just twist another length of wire the the end and you are good to go. The join will be hidden inside the straws.
20. Thread the wire back through the last straw added so that the wire come out at the tip of the bottom of the heart.
21. Add another long straw and join it to the center of the first heart hump (yes, that is a technical term).
22. Now thread the wire through the short straw at right beside it so that it comes out at the center of the heart (right in the middle of the 2 heart humps).
23. Add the straw that is just slightly smaller to this center spot. Twist the end of the wire around the bottom tips of the other straws and then add another long straw and attach it to the top of the heart again. It’s a lot of up and down here, you can see it taking shape though.
24. Thread your wire through the small straw again so that you can add another long straw and attach it to the bottom point of the heart.

25. And FINALLY you can add the final long straw and attach it to the back of the heart! Yay, you did it! Trim your wires and pat yourself on the back. I’m so proud of you.
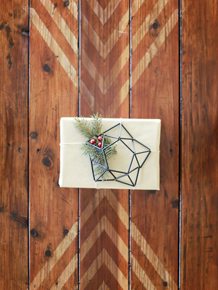
I painted one of mine copper (because copper anything is awesome). You can of course make your heart bigger or smaller, just follow the proportions and make the smaller straws half the size of the longer ones. Happy himmeli heart making!


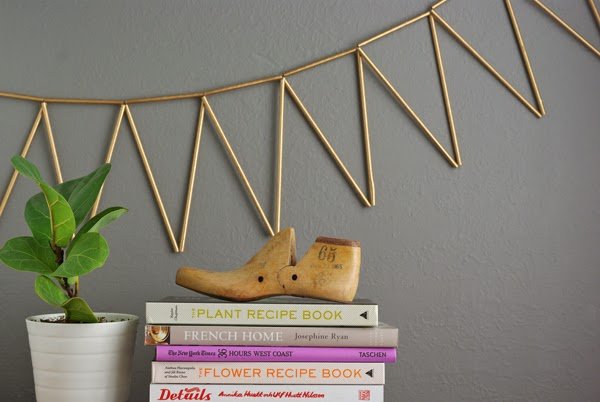
Me again! For Macie’s Himmeli Heart I actually made it out of 1/4” brass tubing (you can find it here)

Now before you go, let me steer your click in the right direction. You absolutely need to pop over to Oleander and Palm. Here are a few of my favorite posts:

And trust me when I say, there is SO much more where that came from.
See you guys tomorrow!


Hi girls! Amazing tutorial! You know I’m in Himmeli Heaven right now. Approximately what size heart does this make? I think I need a giant one in my bedroom!!! Obsessed! PS I LOVE Jeran and Oleander and Palm!! Too much talent between the two of you ladies! xoxo
Love it! I was wondering if you used the same gauge of wire for the brass tubing or was it something a little thicker?
It’s hard to believe this is made out of straws. It looks amazing! Going to give this a try:)
Hello Mandi,
since I found your blog I am a big fan of you and your projects. You inspire me so much, that I decided to give it a try and start a blog on my own. And I looove these himmelis. I used one of your pics here, is that ok?
https://www.handgem8.de/2014/04/himmeli-tutorials/
My post says that I fell in love with your wreath last december and today there is finally! another tutorial about them. Yeah! 🙂
Cheers from Germany!
Nicole from handgem8.de
Love these! I’m going to try to make them soon. If they turned out well I might used them as decoration on my wedding later this year. Fingers crossed! HA!
Luuuurve this! Trying to pin it but no images are pulling in. Just me?
You would. You would make something this awesome. That’s all I have to say right now.
RARELY do I comment on posts, and I follow Em Henderson, Jenny Komeda and lots of other terrific bloggers. THIS has got to be ONE of the best…and I’m going to lift your ideas for an office in our mountain home. It’s just perfect. You nailed it, lady!
Obsessed with these! Can’t wait to try it!
https://fringegamestrong.com
Love this tutorial, thank you for posting! Quick question on the one for Macie’s room – what length tubes did you use as your “long” pieces? I love the relative scale and want to do something similar in my guest room. Also, same question as another poster above – does the same gauge wire work with the brass tubes?
Do you think it’s possible to update the tutorial or make a video of this? I’m totally lost after 21. don’t really get where to thread the 1cm straw. Thanks in advance.
May I know what paint did you put on the straws to make it in copper colour?
Hi, I love these. Are they very flexible once made or are they sturdy? I’m wondering if they can stand on their own on a table or whether they really need to be mounted or hung to retain their shape.