Dudes! We are overhauling a 1972 Bell Travel Trailer! Follow the entire series from the beginning here!
Hooray!! The little Nugs that could is chugging along!
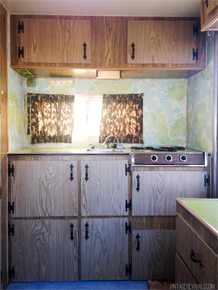
One of the elements that just couldn’t survive the overhaul (besides the blue carpet) was the lime green Formica countertops. In the right place they are AMAZING but the conclusion came about that there could only be a few design stars, and the countertops just didn’t make the cut.
Working within the confines of a trailer makes things different. One of the biggest factors that needs to be considered is adding weight. I knew that I wanted to save my added weight allowance and use it elsewhere (like the floors!!) so I needed something lightweight that had major transformation powers.
A concrete overlay countertop was just the ticket. Now, I know what you might be thinking. Yes it is concrete, but it is only about 1/8” thick. And yes it is durable. (We will get into that in another post!)

For the last year or so blogland has been abuzz with talk of Ardex Feather Finish and its magnificent countertop transforming powers. After doing a little internet sleuthing I found out that Ardex Feather Finish is made by a company called Henry. Do you know what else they make (among other things)? Henry Feather Finish that is sold at Home Depot.
I couldn’t find an exact yes or no answer to if they were the same, so I called Henry and asked. This was their response:
“ Technically, no, they are not the same. As far as using them, and their performance, they are the same. In a blind test, the manufacturer wouldn’t be able to tell you which is which. “
YESSSSS! Best news ever!! While Ardex Feather Finish and Henry Feather Finish aren’t exactly the same their performance is! (You can find it in the flooring isle at HD!)

The process I used is from the original concrete wonder, Miss Kara Paslay. (She has a great FAQ here if you are attempting this project!)
When we bought it, The Nugs had 2 faucets. The one on the left went to the outside water hook up, and the one on the right was connected to the water tank inside the trailer.
They had to go. It was like a faucet fiesta. The blue switch box powers the small electrical pump that pumps water from the tank…that had to go too.

Taking them out left 2 holes that needed to be patched. After securing a piece of wood on the underside of the countertops, we filled the holes with wooden dowel and screwed them down.

We sanded the edges to make sure that they were flush with the countertops.

And drilled a hole for the single handle faucet that we were planning on installing. (This one) The faucet saga is a whole different blog post, so we will just leave it at …To Be Continued.

The biggest warning that Kara gives when installing concrete overlay countertops is that the surface needs to be SOLID. The situation with our countertops was that they were totally solid, but the top layer that was the actual Formica was loose in a few spots. We used our staple gun to secure it nice and tight.

The countertops also need to be roughed up a lot. I used 40 grit sandpaper and obviously went to town. Making sure to get all of the smooth finish off of them.
After all of the dust is cleaned off the real fun begins. The Feather Finish has the consistency of firm pudding. It was at this point that I tried to do a Bill Cosby impression and Court just gave me a blank stare…so there is that.

We spread the first layer with a trowel and then switched to a plastic putty knife. We liked the putty knife better.

Lay down a few thin layers, sanding down the high spots in between. Get as much of the dust cleaned up as you can between layers.
We found that the more layers we added, the more color variation we got. I am not sure why, but if you want something that isn’t mottled with different shades of gray, you will want to keep that in mind.


Here is the third layer going on:

When it was all said and done I gave it a good sanding with 400 grit sandpaper. It is so smooth, it feels like glass.

Sealing concrete is different than sealing concrete countertops. The most important thing to take into consideration is that because it is countertops, where food will be prepped, the sealer needs to be food safe. Forever ago when I was planning this for my kitchen, (don’t worry, I haven’t left you guys in the dark, I am still rocking the beige) I ordered Cheng Concrete Sealer and have just been hanging onto it since.

While sealing, I learned a few things. 1. Southern Utah heat + the need to keep the concrete wet the entire time is definitely a 2 person job. One that I didn’t do so well. I can tell where the concrete absorbed the sealer differently in a few spots. Next time I will make sure that Court can help me. Also, the sealer made the concrete significantly darker. Which is fine, but I sort of loved the lighter color better. So keep that in mind too.
All in all, new updated countertops for less than $50 is a huge win!!


Good morning! It’s gorgeous! I have a question: what about the edges along the front and sides? Any tricks for making those transitions look smooth and even? It seems like gravity would present some challenges. Please tell me I’m wrong…?
Such a good question!! We are reinstalling the original aluminum trim so we didn’t have to worry about that part, but check out Kara’s tutorial (I linked to it in the post) she talks about edges!
xo
m
Thanks, hot stuff!
Wonderful! Love all of the ambitious updates you are taking on in The Nugget! The grey grout and concrete countertops are so fabulous together!
Thanks Rachel!
So excited that you are doing a Glamper! It’s on my list of things I desperately want, but do not yet have. One question, with the road vibrations that a trailer goes through are you worried about the tile or concrete eventually cracking? Hope not, because they are so beautiful 🙂
Love them! Are you concerned with the movement from traveling?. I have been considering the Ardex finish for our kitchen counters but we live only a block from the train tracks and get some decent movement in our house. I think I remember the product not being recomended for heavy movement surfaces? Beautiful job as usual:)
Hey, I read your blog on Feedly and lately half of the pictures in every article appear squashed to about an inch height. I can see them fine here on the site though. Just an FYI!
I’m so glad you found and shared this alternative product! I’ve been wanting to try the Ardex feather finish but the thought of running all over town or ordering it online was holding me back. Home Depot, here I come!
Wow. Great idea! Few questions,,,,,could you do this over plain old plywood?? Could you add some recycled glass to get the look of Vetrazzo or Ice Stone countertops?? I was just thinking that this could be a good substitute for the more expensive, labor intensive concrete countertops. I have done the real stuff on a smaller scale (using the recycled glass. Although it goes in upside down in the mold and gets flipped over and sanded when dry). Your thoughts??
This is great. Pictures and steps are helpful. We actually ordered Ardex feather finish already. But I wanted to know if anyone’s tried to apply this on to an existing bathroom vanity sink? I’m not sure if it’ll work the same way or even possible.
Wow! You really inspire me! I can’t wait to do home DIY’s like this!
https://www.fashionablyspeakn.com/2014/08/meet-cast-stylish-comfort.html
Thank you for being so in depth with your tutorials! Could you please post a picture of the countertops in the camper? I’d love to see the entire project!
Hey Abigail! I will pe posting one really soon, I didn’t get an after shot before I installed the faucet and that sucker gets a post all it’s own! Thanks so much for following along!
xo
m
Such a great blog post. I didn’t think about a skim coat of concrete as a durable open for counter tops. Stellar idea…cost effective too. I have to say your post from yesterday, re: your little one cracked me up. As a mom of 3, I’ve had many moments where I laughed through my tears. Hang in there. Cheers!
It’s looking good!!! I love concrete countertops, but am really scared to do them myself. This makes me want to try!
Thanks for doing the leg work for me! I’ve wanted to tackle refinishing the counters but if I can’t find something easily then I ain’t gonna do it! I know, lazy but hey, I am what I am!
I’m loving the progress you’re making, you’ve inspired me to get to work!
Next time try an actual floor covering supply place for the Ardex. We own a flooring store and hubby uses Ardex all the time for floor prep on concrete.
Michelle which Ardex product are you suggesting for a countertop? is the Ardex product to replace what Mandi used or to prep the surface?
We really want to use Ardex in our Airstream but we are concerned it will crack with any flex. Any advice?
Can’t wait to see this all come together!
Im so glad you chose concrete for the countertop! Im dying to see it all together, so hurry up already!!! Muah;)
Maybe next time try laying a wet towel or piece of burlap over the parts you aren’t working on – that’s what they do to cure concrete slabs, etc.. Then you can roll it back as you progress.
GENIUS!!!
why use the wet towel/burlap on the surfaces your not covering? is this like using the “blue tape”?
Also, Mandi can you explain what the (pre-existing?) glazed surface is? The one in the last and second to last photo — cream dots on grey background? was that a pre-existing tile? I can’t visualize a tile that large .
Also, I was doing some research online about the concrete countertops. one professional said it tends to stain and get pricked easily. I can’t find the website right now. But i found this instead which has a lot of info on sealing to make it: food safe, acid-proof, scratch proof etc.
https://www.concretecountertopinstitute.com/blog/tag/sealer/
Oh, I see you have a whole post on the “glazed surface” it is the backsplash mosaic tile. sorry, I don’t know how to edit my earlier post.
Is the sealer necessary? I would love to do this in my office on plywood, but love the pre-sealed look. What do you think?
Hi! I was hoping to also do concrete countertops for my pop up camper but I was wondering if you’d recommend it as we’d be moving the countertops and table quite often when setting up and putting away the popup. I know you mentioned that there was a post about how durable it is but I’m having some trouble finding it. Second, how long did you have to wait in between layers? And lastly (I’m very new to all this remodeling!), but do you think it would be possible to do if I’m going to be sanding it by hand? Thanks so much!
Hi! Late to the party, but wanted to say thank you so much for this cute idea and how-to. I’ve done your faux concrete on the countertop and the dinette table in our ’64 canned ham, and they are both adorbz. They are working perfectly with the mid century modern vibe I am working towards in the camper, and I would have never come up with this process. I’d have rejected concrete out of hand due to weight, but this is just perfect. Thank you, thank you, thank you! Kara
Hi there! My husband and I absolutely love what you did with your camper! We have a vintage camper we are redoing ourselves right now as well, and I am considering doing concrete countertops as well. I have a question for you about them if you don’t mind? My husband is concerned that with the trailer moving, that they may crack of break? Have you had any issues with your countertop since you’ve installed it? Thank you so much for your time! Hope to hear back from you 🙂
Hi, just another fan here, but I did these on the counter and dinette table in our camper, and they seem to be holding up well. Our dinette top gets tossed around a fair bit, as the supports for the dinette bed involve the table top being removed and stuck some where. So far no cracks in either the counter or the dinette, aside from a few on the dinette edges during the install phase. I filled those with the DAP for concrete, and it blended well. Anyhow, it looks cute as a button, I went Mid Century Modern for our theme which this natural surface is perfect for. We’ve had some challenging travel already, so I’m feeling more confident that this will hold up over time. Good luck!
You are my Inspiration 300 miles down the road. I live in Northern Utah. Before I found “my” trailer (last week) I had the Nugget on my pInterest inspiration board . I have been looking for 2 years. I got a 1973 Terry Travel-Pak Trailer for $800. I bought it from the lady up the street. It sounded like they needed the cash asap and sold it way below what I had seen on local classified ads for trailers in WORSE condition. She said her family had also out grown it. There is some serious cosmetic issues with it and a little water damage but all in all the lights work- I haven’t had time to test the rest. She said they used it last summer and everything worked but they never tested the shower. She assured me the water and gas and stove all worked. We just had a mega rain storm and everything seemed dry! As she lives up the street in the small town I live in…if she lied…well…toilet paper and eggs at their house (Just kidding) When I am in St George (which is pretty often) do you offer private tours? I have a feeling I am going to make friends with your RV Store guy Jim. Basically I just want something to go camping in that isn’t a tent, but making it my own has been fun. I painted it white with the 2x Rustoleum white and it is a nice shade and covering, but I am going to experiment with interior latex paint…because that nasty 1973 faux wook is awful! Just the one wall done it is all ready brighter.
I am going to try the cement counter top.
I have hard wood flooring left over from another flooring project.
I am going to turn the table into a map (bought a wall sticker of the USA that I will put on and the put a clear coat on it. This is because the camper my familly had as a kid had a map on it. The Orange is going and a fun color map is on its way! So many fun ideas.
The only thing I am worried about is wiring. I found some cute new lights at the thrift store and Not sure how to do it a trailer camper. I have done it for a house light but…I will figure it out! Thanks for the inspiration! I I think I could print out your website and use it as a camper maker over guide book! I will be back for more insight, help and prayers…yep might need all!
Some reviews I have read of Cheng’s Concrete Sealer said that it stains really easily. What has been your experience with it so far? Thanks!
Hi there- Love all your hard work! I’m remodeling a 1971 Aristocrat Lo-Liner. Just wondering how your concrete counter tops and table top have withheld? Love the look and the cost!
Hi Mandi! My husband and I just bought our first house last Thursday.. and today during my kids nap I did my first layer of Henry FeatherFinish on our kitchen counters. I already love it 🙂 I was wondering how long you let the concrete dry between coats? It seems to be drying quickly (visually) and I don’t want to wait 24 to do another layer (ugh I’m the worst at waiting) but I will if I have to. How long did you let the concrete dry before doing another coat? Thanks!!
Please email me ‘cuz I’m reading your blog over a year after your post and wonder if you are blogging anymore! Now that you have lived with your Nugget for a while, is the concrete counter top cracking? I noticed you had no answer/comments to the questions about this… above. I am re-doing a ’62 Lil Loafer and would like the very small counter top to have some pizzazz… but if it starts splitting from travel movement, … well, no amount of good looks makes up for that! What can you tell me? Brenda
I love this! How are the concrete counter tops holding up over time? Any cracks, weight issues, etc?
Hey Dustin!
They are doing great! Not a problem at all!!
I am about to try this. How much time did you give between coats. Are you happy with how they held up?
I just finished doing the counter and table in our little Smokey. Over all, I am pleased…..I guess? It went well until the sealer. I used the Cheng Concrete Sealer, but it does not dry glossy or smooth. I’m very disappointed in that. Think I will need to get some GST water based acrylic sealer (as used here: https://karapaslaydesigns.com/diy-ardex-concrete-countertops/ and hope that I can put it over the Chengs. 🙁