Hey everyone!! Hope everything is going so great in your lives right now!! I have got a fun little update for you today that I seriously put off for YEARS. So if you find yourself in the same boat that I was in, here’s hoping to give you just a little motivational shove. 😉
My kitchen has been this ever-present ongoing thorn in my bum. I’ve even gone as far as trying to spray paint an orange backsplash…if you’ve never witnessed my WORST DIY idea– click that link. You’re in for a treat. The problem is that I would love to just rip the entire thing out and start fresh, but that’s not going to happen. So I didn’t really do anything cause it was just too sad to not do everything. Tell me I’m not alone in this insane thought process.
We basically lived like cavemen. Our kitchen has looked like this for YEARS.
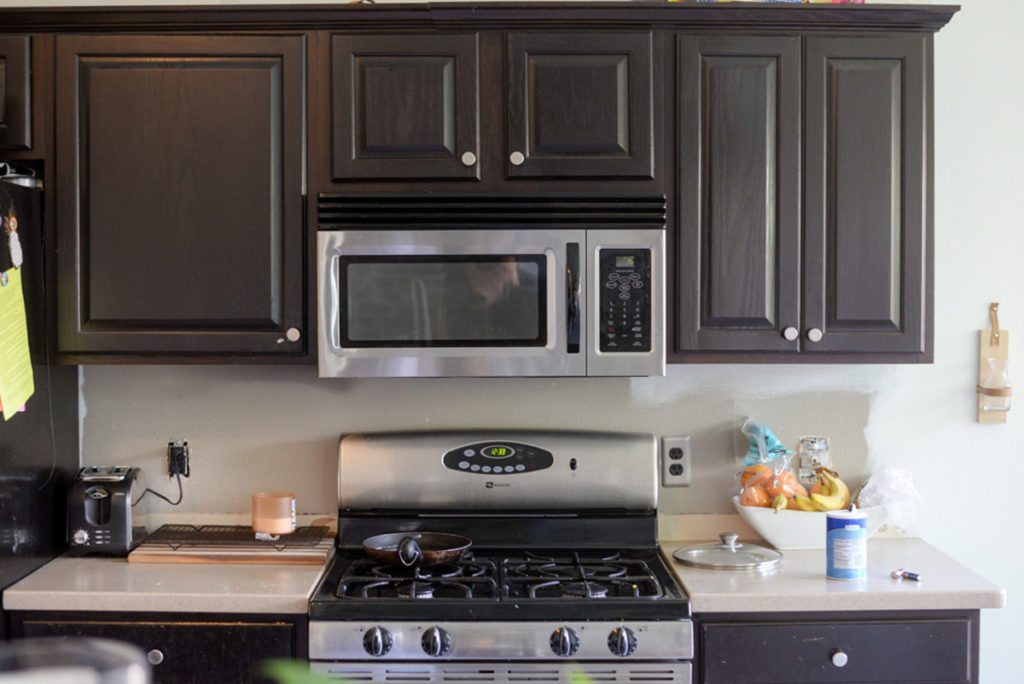
One day, I decided that it was time, that I’d had enough hate in my heart for this freaking room and I needed to make some simple changes to get it on the right track. You guys. WHYYYYYYAAAA did I not do this sooner?
We’ve got a few spots in the house with rockin’ tile. The Laundry Room is amazing, and so is the bathroom. So the kitchen (which is the most obvious place for killer tile) was just feeling so left out. There were 2 things to keep in mind while I was getting ready to do this project. 1. It had to be SUUUUUPER budget friendly. 2. It had to massively up the kitchen game. One night I got a wild hair after the baby went to sleep and I was on a mission. I threw on a sweatshirt (because its easier to do that than to put on a bra) and went to Home Depot in search of budget tile that would blow my socks off.
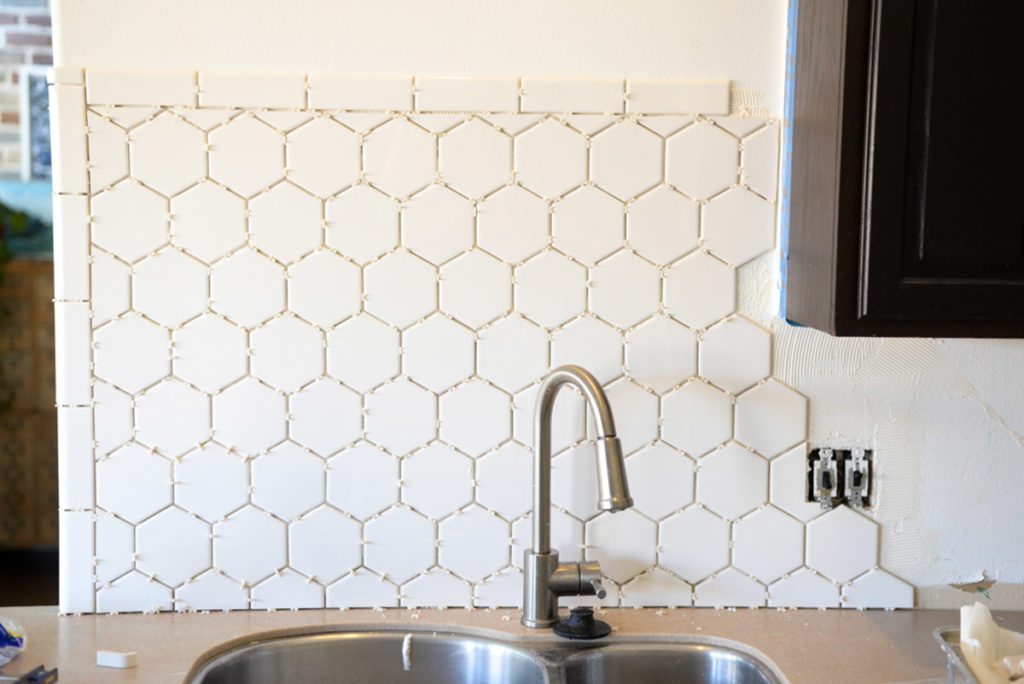
Guess what? I found some. #homedepotdoesitagain This white hexagon tile was exactly what I needed. Paired with crisp white grout it was going to make all of my kitchen dreams come true.
You should know that laying tile is one of my favorite projects to work on and one of Court’s least favorite. When I told him what we were doing that day, he literally stood like this for 5 minutes. Complete and utter defeat…just staring at the wall.
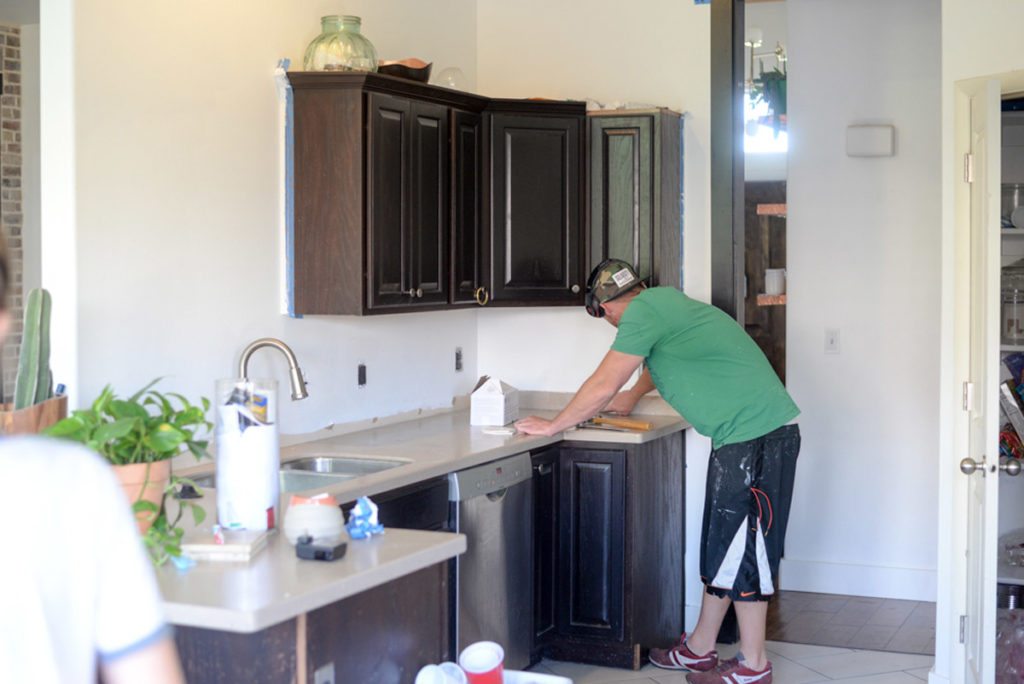
Poor guy, he hates the precision of it, which means he banishes himself to the tile saw to make all of the cuts and I get to do the dirty work. We make a pretty great tile laying team.
Ok so I got my tile, and I came home and got to work first thing the next day. The biggest hurdle was figuring out how to finish it off. Do you just leave the tile? Do you end it before the curve of the corner? After? Right in the middle?! ARGH!!!! I ended up with a few styles of bullnose subway tile and LOVE how it looks! We used a rounded corner piece and it was exactly what the tile Dr. ordered.
Instead of going to mortar/thinset route like we did in the bathroom and laundry room we used mastic (the same kind we used installing the brick in the living room) and it made things so fast and easy.
I started laying it by placing the corner pieces vertically, and set a 1/2 tile at the countertop line. We used 1/8″ spacers, and honestly the biggest lesson that I learned was to put your drain stops in before you take the spacers out. I was seriously fishing those little jerks out of my disposal for days.
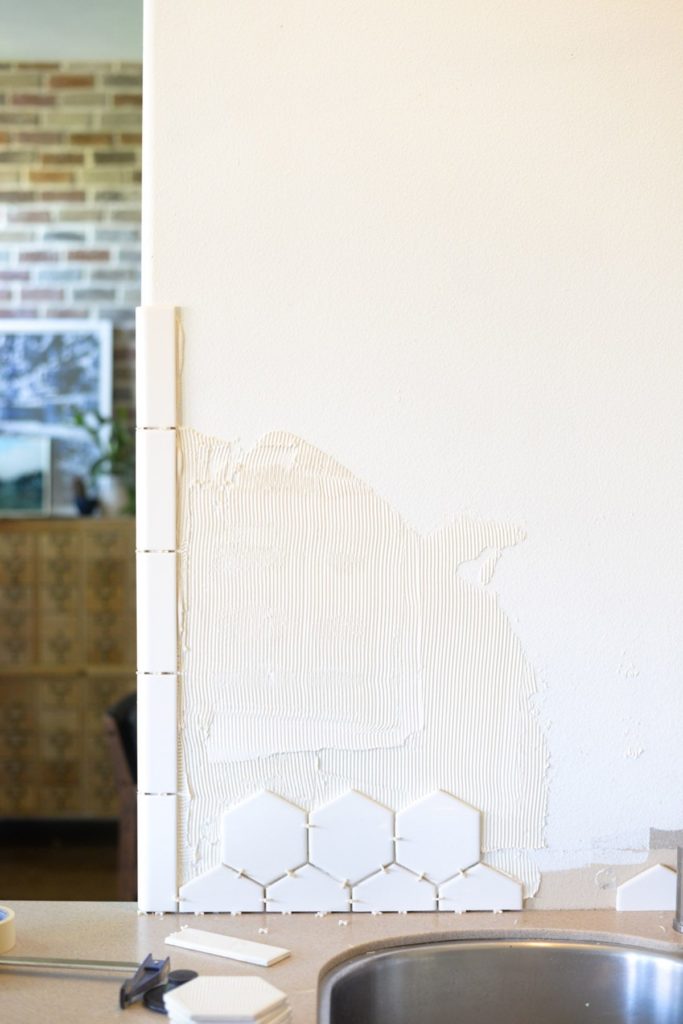
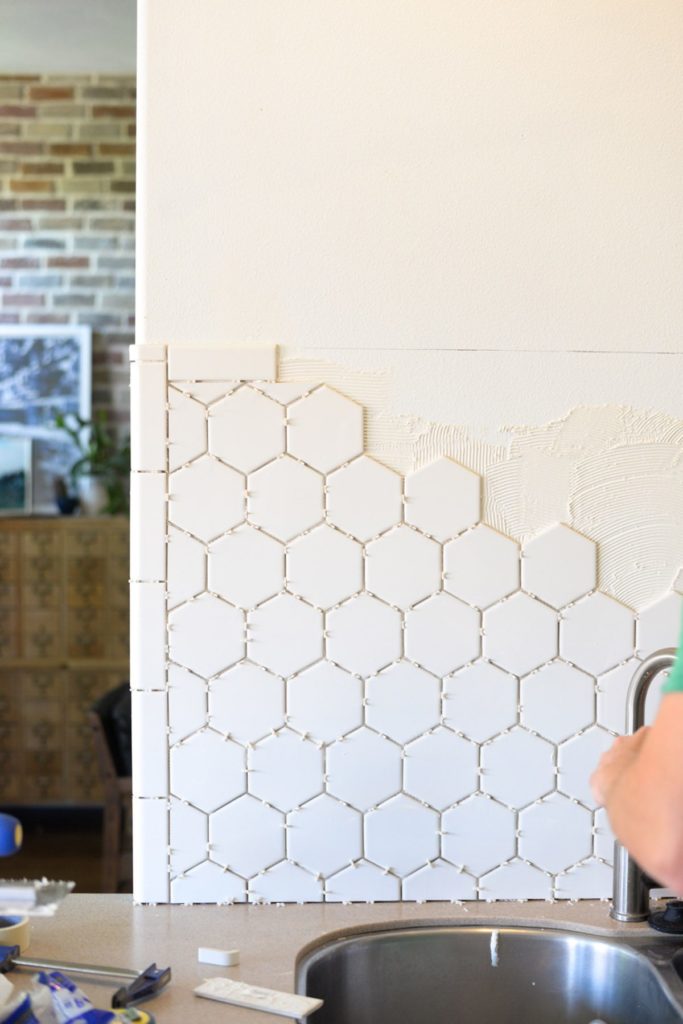
Like the way tile laying usually goes, I started at the bottom and worked my way up. I didn’t know exactly beforehand where I wanted the tile line to end, I just knew the approximate area and that I needed to end at the top of the hex tiles. After I knew the height, I used a level and marked where the line was to place the horizontal subway tiles.
Court was feeling really happy about the perfect cuts that he made.

Looking great!!
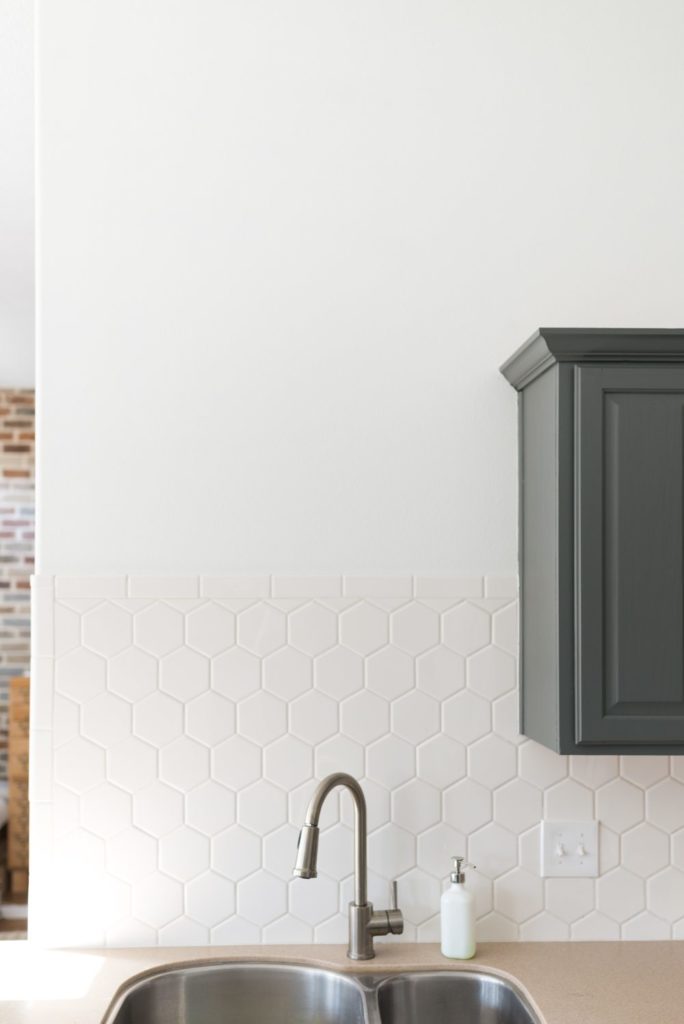
After the entire backsplash was installed, we grouted it with Fusion Pro in Bright White. This is the part of the lesson where I grab your face in my hands and say “LISTEN TO ME. If you hear nothing else, hear this!!” Fusion Pro is your best friend. I recommend this type of grout 100000%. It comes premixed and is a million times easier to use than normal grout. It also is stain resistant and doesn’t need to be sealed. So basically its a dream. We didn’t use it on the tile in the bathroom and its the biggest regret that I have. You can see some of my favorite colors here and get all of my tile laying tips here.
Whenever I finish a project like this that is so massively impactful and adds so much to a space I wonder why I didn’t do it sooner, especially when the entire kitchen backsplash cost less than $200. HELLO. That’s basically one aimless trip to Target. Don’t do that, do this. I promise you’ll be so happy that you did!!
Stay tuned for the cabinet update…
I love how simple the backsplash is- nothing too gaudy but still fun.
And plus if you guys are still thinking about moving- what a simple task that buyers will love!
Wow, Mandi, I never knew I could love a tile so much! Looks amazing, great job!!
Love it! Just went tile shopping for an upcoming bathroom Reno and almost went with hexagon but was worried about filling in on edges. Yours looks fantastic, shout out to Court!
SO pretty!! I love the creaminess of the color, it looks very soft and inviting! Is that a weird thing to say about tile? Great job! I love hexies! My favorite shape!
So nice! What do use to cut your tile?
Fantastic! I love the tile! You both did a great job!
“So I didn’t really do anything cause it was just too sad to not do everything.” I’ve tried explaining this to my husband a million times! If it can’t look like what I’ve envisioned in my mind, what’s the point?!!!?
Nandi, long time reader, but Imhave never commented. Can I say I just love you? Yes this is weird and slightly stalker-ish, but your like one of my favourite bloggers. Down to earth, a bit crazy (in a good way) and just really talented. The work/ tile looks awesome. Thanks for not losing your ‘voice’ as your blog grows. Your sponsored posts are like the best- they never seem pushy or unauthentic. I love your style too and your courage.
Anyway take care,
Lovely! I am *dying* to tile the back splash in our kitchen, but we’re planning on redoing all the cabinets so it’s been put off 🙁 I’m torn between doing a hex tile like this, or a skinny subway tile… or the unicorn that is a small, elongated hex tile I see on Pinterest but can’t find.
I think it looks great! In the future I recommend mitering the corners of your border! It unfortunately looks a bit accidental/not thought out :/
Lovely finished project! Be proud!
About that rounded corner piece…is it glazed on the end that lands around the corner? If so, WHERE IS IT FROM??? I’ve been going through a lot trying to find specialty tiles and have found a couple of good options (eclectic-ware.com is great for vintage stuff) but nothing like what you show here. I’m a big fan of hex tiles too and agree they are a great budget alternative to subway tiles. One note — if you want to make installation easier use a mesh mount version (wayfair and others have it). Just did this on a bathroom floor and it was a pretty easy install. Thanks for all your amazing project sharing!!
love this !
Mandi,
This looks great.
How long does it take for the temple prints to ship? I ordered back in July and I haven’t received my picture yet.
It looks so good. I love the colour of the cream/white how its so bright for the kitchen yet so timeless. Very good job!!
Kinda gives it a honeycomb-like look. It does look nice for a kitchen. Great job!
high shine paints Nepal
where is this tile from?! i looked at home depot!
Your work looks amazing! Can the Fusion Pro also be used on the hexagon tile sheets?
Absolutely!
hi, is it matt or gloss tile? And what size is it? It looks great!