I am seriously so excited to show you guys how my 16 yr old SIL Ashy’s room makeover turned out! I am SO in love with it I want to move in and camp on the green couch!!
A really cool thing about this room is how little we spent on it. The entire room makeover cost less than $1500. Daaaang!! (It doesn’t hurt that all of the amazing furniture was thrifted.)
There were a few challenges that we faced in this room. The biggest one being that it needed to be functional for as many teenagers as possible. It is a really huge room, but there was a lot of wasted space. Because the room was so big, and there was only one light source, we needed to brighten it up. Also, closet doors. When we replaced the flooring a few years ago we refused to put the bi-fold doors back on because they were just too ug. So we needed to come up with a solution for that.
You know when you see a beautifully styled picture on your favorite blog or in a magazine and you look at it and you are like “Yeah, but HOW?” I feel like I do that all. the. time. (Emily Henderson I am looking at you.)
Now. I am not claiming to be any sort of styling expert but I thought it would be fun to show you guys what I go through to get a shot.
One of my most favorite projects as of late is the Sherwin-Williams 2015 Color of the Year wall. Also, I just need to put this out there, some of you guys are diehards. Yes this is in my house, not that is not my floor. It is actually the gorgeous Millstead Vintage Oak flooring that I got to put in The Nugget before I realized that it just wasn’t a great idea. I love it. And if I didn’t already enjoy to flooring we have (and my marriage) I would be tempted to put it in my entire house.
So here is the process of the shoot!
Cool right?!
I found the AMAZING settee on Craigslist a few months ago for $50-ish. The faux leather that is on it is in the worst kind of shape. Its moved past being beautifully worn to being just gnarly.
When the leather was too dark, I thought it would be fun to give it a paint job. (Because it needed to be reupholstered anyway, and so what have I got to lose?) I didn’t use my fabric painting technique because it was leather, and yes it feels painted but look at the color!! Its so good!
The giant print on the wall is one that will be in the shop (opening this week!!) I had it printed at my local copy store in black and white for $3 and then colored in the lines with colored pencils.
One of my favorite last minute touches is the wind farm throw from Crane and Canopy. It is SO soft and graphic and just all around amazing. They are known for their inexpensive high quality bedding, but have so many other great things too! (Christmas gifts anyone?!)
I have a cool story about the green square painting. A few years ago I found a really good couch (this one) and dining room chairs (these) on CL. When I went to pick them up the seller had 2 mid century paintings that were so pretty. This green one and a rust and orange colored pinwheel. I loved them both, but only had enough cash for one. I chose the pinwheel and had kicked myself ever since for not going back for the green one. Fast forward to a few months ago, guess what was at the thrift store for $8? The green painting that was left behind! Cue freaky music.
Anyways, I love seeing stuff like this, so I thought that maybe you guys would too! Questions? Leave them below!
Happy Monday you guys!! I hope your Thanksgiving weekend was awesome!!
So we have a really fun thing happening next week that I get to chat about today. Have you ever seen the TV show Chopped? I will admit, having been a contestant on TLC’s Craft Wars, reality competition show are really hard for me to watch, and Chopped just so happen to be the first one that I saw after making a fool of myself on national television. I have a little Craft Wars PTSD about it. Its fine.
The premise is that the contestants get a basket of randoms and then they have to one dish using all of them. Sounds simple right? Until you get Chocolate Mousse, Mustard, and Goose Testicles.
Well, I have teamed up with a few of my DIY girlfriends for a DIY Mystery Supply Challenge. We all go and buy the same 4 supplies and then flex our creative muscles and make something awesome.
Our ingredients are Clear Glass Ornaments, Fake Snow, Ribbon, and a Sharpie Paint Pen and ornaments are the name of the game.
Definitely not goose testicle horrible. I’ve been working on the project idea, and I am pretty excited about it!! I was a little stumped about it, and just kept thinking to myself “Snow inside the ornament, give it a little doodle, and hang it by the ribbon. Keep it simple stupid.” But OF COURSE that cant happen. Should be fun!
Posts are going live on December 8th so stay tuned!!
Happy Thanksgiving friends! I hope that you are spending time with the people that mean the most to you (and eating lots of delicious food!)
I just wanted to pop in for a sec, I am SO excited to be one of the few that get to share the Cricut Explore Black Friday deal!!
You guys. If you are on the fence about an Explore or a Silhouette Cameo, let me save you the trouble, because I have used both for years. Guess what? I gave my Cameo away. The Cricut Explore is SO much better. (You can read this in-depth post about why I switched to Team Cricut).
Cricut has come up with an AWESOME Black Friday deal that blew my mind.
The best selling Deluxe Bundle that retails at $365.95 is marked down to $229.99! But wait there is more!! When you use the coupon codes below your final price will be $214.99 AND free shipping!!
The project possibilities with this machine are endless, so join the club wont ya? These coupon codes are good through Monday Dec. 1 or until supplies run out!
Get your Cricut Explore here!! And share this post with your besties (promise you will want to do that, otherwise they will be lining up at your house constantly to use yours!)
I know that The Nugget has been revealed so this post may not interest some, but I still have a few more tutorials to finish up before we can shut this series down!
One of the first things that I knew would need to be replaced was the moulding on the outside of the trailer.
On my trip to Jim’s RV I found out that it was actually called J trim. It is sort of like a mini rain gutter that runs along the entire outside frame of the trailer. It also covers up where the aluminum sheets are stapled together.
We needed (6) 8’ pieces to go around the outside of the Nugs. This was the first thing off the trailer, and the last thing on, and I may have cried tears of joy when we were finally at that point.
Attaching the J Trim was pretty simple. Even though its made out of aluminum, it didn’t seem very bendy, so I was nervous. We started by putting the entire top center piece on. Then we cut a small piece to reinforce the second pieces so that they could sit flush and still be bent. The best way that we found to make the curve was to screw and then bend it to the next screw. Doing this made it a really controlled process so that we didn’t get any kinks or major problems. (We put the putty tape along the outside of the trailer for this part, not on the J trim.)
Lets just talk about screws for a minute. One of the biggest cosmetic problems that trailers can have are rust marks from screws. I knew I didn’t want to put the plastic trim on that covered the screws (I love the look of just the screws!) so that meant that I needed something with superior coating to prevent rust. When we were at Home Depot we came across these Teks roofing screws that had a sealing washer on them. This was a major win. Any sort of hole that you put in a trailer is not your friend, but these screws would be sealed off twice, once with the washer, and again with the putty tape.
Right smack dab in the middle of the painting process we decided it would be easier to tape off actual windows than giant gaping holes…also the 2 day storm that was rolling in was super good motivation.
Court cleaned and polished the windows using ultra fine steel wool (0000) and brake cleaner, I could not believe how much prettier they looked!
First I put all of the little corner pieces of aluminum moulding inside the windows, this is what trims them out from the inside. Then we covered the inside of the window (where the screws go) with Putty Tape. A trick to working with putty tape is to keep it as cold as possible. Store it in the fridge until you are ready to use it, because when it isn’t cold this stuff is like working with Satan brand bubble gum.
Next step is to put the window on and screw it into place. Start with a screw in the middle of each side and work your way around. Don’t get overly zealous on the tightening front, just make sure that they are even and tight.
When you screw on your windows the putty tape will ooze out. Just use a clean razor blade to trim it off. Make sure that its clean, when it starts to get gunky its hard to get a clean line.
We had to improvise a little when it came to the kitchen window. Because we added cement board, and the tile, the interior trim piece was too far away to reach the window.
We cut long strips of aluminum sheeting and covered the entire inner frame of the window.
Then we put the moulding and the window back on. You would never be able to tell that there was a little bit of finagling happening because the trim reaches (just barely) the window.
One of the first things that I was excited about was replacing the lights on the trailer. Don’t these little teardrops look so much cuter than the old ovals?
Because we had to replace the entire backside of aluminum I could place the back tail lights where ever I wanted. I decided to move them up a little higher.
And really, The Nugget’s backside did break the internet or at least the blog (sorry Kim.)
I used my Cricut Explore to make the little sign by the door, and the big Nugget logo on the back. I have plans to put the Bell logo back on the front, just waiting for the outdoor vinyl to arrive!
If you are just tuning in, you are in for a treat. Almost everything in The Nugget has been DIYed and has a tutorial! Whether you are looking for inspiration for a trailer that you are working on, or ideas for you home, get ready for an awesome project avalanche. All of the projects in The Nugget have been linked at the bottom of this post! If you want to follow the series from the beginning, start here!
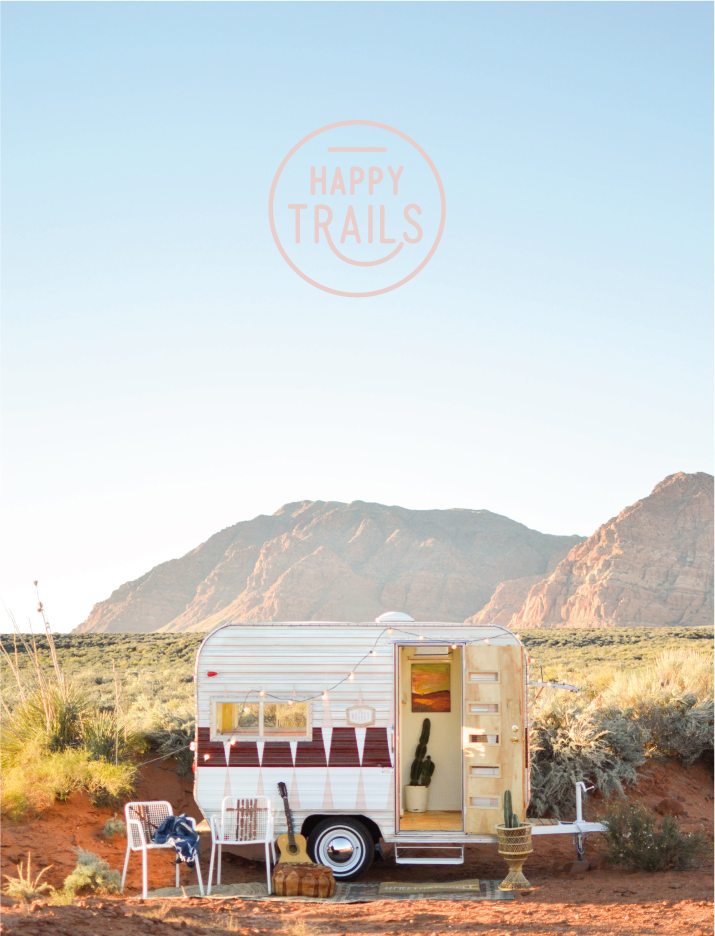
I almost don’t even know where to begin this post. Are you ready to finally meet The Nugget?
Just a little reminder of what it looked like 4 short months ago.
I cannot believe that I am FINALLY at the point with The Nugget series that I get to talk about exterior paint!! Holy CRAP!! This is the best day ever!!
I am a huge believer in finding inspiration all around you, and you never know when it is going to strike. Looking at pictures of vintage trailers online I realized that the ones that I loved the most had a mix of bright colors and aluminum. Of course I wanted to do a bold pattern (because its me) but I was having a hard time finding something that was busy, but not too busy. This is where the “finding inspo all alround you” comes in to play. One of my favorite #colddeadfingers diehards Katie linked up this picture of some thrift store scores.
Do you see the amazing Thermos pattern? The one with the diamonds?! It was exactly what I was looking for! (Thanks Katie!!)
We did a few color mock ups in Photoshop and everything was just feeling so light. I swear that has been the biggest reoccuring problem that I have had with this project. So at the last minute I decided to go less desert than my original plan so that I could use some color to ground the dang thing.
I debated paint choice back and forth the entire time that we were renovating the interior. I wanted to do something that was attainable for the budget DIYer. Taking the trailer to an automotive paint shop was not even an option because $$$…$$$$$$. And also $$$.
Here is what I came up with. Exterior Paint with the right primer TOTALLY would work and be so budget friendly it isnt even funny. But I wanted the finish to be super high gloss. So my next thought was to use Exterior Paint like Behr Marquee and put a high gloss protective coat on it. Then I thought that maybe using spray paint would be the answer (Rustoleum makes a high gloss automotive in Black and White) but I would need about 5000 cans of it and it doesnt have all of the colors that I wanted. So do you know what I did? I asked my friend Josh who is a professional painter and knows all about all of the things.
He told me that he had painted a few trailers with Exterior paint and that it did work, but needed to be touched up –> redone in about 5 years. Suck. He then said that Automotive paint would be the best, most durable option, and that it would give me the finish that I wanted. Suck again. THEN he told me that he had a HVLP sprayer for automotive paint that he would let me borrow if I wanted to DIY it. Sweet!!!!
To prep, we stripped off all of the paint (most came off with Citristrip but some stubborn spots needed Airplane Stripper which is the heavy dutiest of heavy duty. Court did all of that scrubbing because he is the husband of the year. Then we cleaned it REALLY well, and I taped everything off so that Josh could come.
He told me that Automotive paint has the worst kind of over spray that that I needed to mask off everything that I didnt want paint on. He wasnt joking. I thought I was done taping off in the pic below, but I ended up taping off the entire top section too and I am so glad that I did.
All of the automotive supplies we bought at a specialty paint store.
First we sprayed the clean metal with automotive primer (gray)
Then once that was dry, Josh sprayed it with automotive paint. It took a few coats, but it looked AMAZING.
(It was at this point we put the door and windows on because it was SO much easier to tape them off than to tape off gaping holes.)
We started by putting down the white first, then we built the other colors on top of it.
The next step was taping off all of the triangles that we wanted to stay white. I figured out the measurement distance and marked and taped and cut and marked and taped and cut. The most frustrating part about the entire thing was that I couldnt figure out a way to prevent bleeding. I tried ScotchBlue, and masking tape, and automotive masking tape and it didnt matter, because of the texture in the faux wood and the ridges in the aluminum the bleeding just kept happening (its ok because we fixed it!)
Instead of using gray primer for the burgundy stripe, we used rose primer. Red is a hard color to paint with, it takes a lot more layers to get full coverage, so using a rose primer helped that quite a bit. This side of the trailer was the test side. Everything was done a day beforehand on it so that I could make sure that 1. I could figure out what I was doing, and 2. that I liked it. We didnt want to have another tile fiasco on our hands.
You can see the texture and miniscule gaps in the picture below.
This is where I took over the painting. You.guys. it was so cool!! WAY easier than I thought it would be. Just a word of warning though. Sometimes you make unintentional messes and you get automotive paint on your hands…and it doesnt come off for 2 weeks. SO just wear gloves if you go this route. Alrighty?
In the picture below you can see the storm that came rolling in and put the painting out of commission for a few days, and if you look closely you can see the bleeding. To touch it up we used lacquer thinner and Q-tips and just sort of wiped it off. It worked best if we did it pretty soon after the painting, before it had a chance to cure.
Round 3 was the light pink. Again, lots and lots of taping and masking.
My awesome sister Amy got assigned the job of touchup.
Also, won’t you be my neighbor?
Lets talk about the tires. Court scrubbed all of the rust off of the old wheels and I sprayed them with white automotive. We replaced the actual tires and both of the bearings because I wanted to make sure that it was safe. We found the moon caps here and they were EXACTLY what I was picturing. In the pic above it looks a little wonkfest because it was just leaning against the hub.
It was at this point that we left for Pinner’s Conference in Salt Lake (about 4 hours away) while we were there Jamie my AMAZING assistant started the final round of paint, goldish copper metallic pinstripes on all of the diamonds.
And guess what? That is all I am going to show you today, because tomorrow is the big reveal!!
Questions? Leave them in the comments and I will do my best to answer them!