Guess what you guys?! My sister is getting married! Yes, the other one!
You might remember that Miranda was married in March (you can see the post about her wedding here) and now it’s my sister Amy’s turn.
Amy and Stephen (or Stevie as my girls like to call him) are the cutest couple in the world. They were really good friends before they started dating and I take great pride in the fact that I called this marriage years ago.
It’s going to be a backyard wedding in mid June and I am seriously excited about it!
Cant wait to dish all of the deets, and put our budget wedding tips to good use!
*All pictures in this post are taken by the amazing Avi Stoddard
Happy last day of school!!!! (At least for my girls anyway.) The freedom that summer brings is somewhat intoxicating, wouldnt you agree?
I thought it would be fun to share some of my most recent summery purchases. There is an obvious but unintentional theme happening. Apparently this year summer is going to be pink, orange, and yellow.
I am mighty in love with this mason line. You can find it at Home Depot by the rope and chain. The possibilities are endless. I am thinking something absolutely Macra-mazing…
These little melamine bowls from Target have found their way home with me more than once. I love the pattern on the outside, it reminds me of the Matterhorn at Disneyland. (i.e. summer!) And I mean, they are adorable little containers that you can use for ANTYTHING.
I have been working on a few projects using my Cricut Explore. The idea for these leather bound notebooks came to me at 3:32 one morning and they turned out exactly the way I was picturing them. The entire thing, start to finish was made with my Explore, except binding them, you will have to do that on your own. *please note the mason line!
You can see some of the leather notebook Make It Now projects here. I will have a tutorial coming up soon!
Have a fantastic Thursday, I am off to buy my weight in Otter Pops…
I feel like the luckiest girl in the world that this is my life. I am so grateful for YOU, because without your love I would pretty much be writing to myself, and that just isnt as satisfying.
Start by drawing or tracing your letters onto the 2’x4’ sheet. (You can project the image below, or you can save it and resize it in a photo editor!)
I used my favorite clear fabric ruler to make sure that the lines were straight. That thing needs to be buried with me.
Once you have your lines drawn, jig out the outside shapes.
Make sure that the lines on the inside letters are clear and easy to see.
Tape along the outer edge of the letters (I always use this technique to seal the tape for a perfect line!)
To paint the inside of the letters I we used black Sharpie Paint Pens, left over from the Faux Wallpaper Sharpie wall.
Peel off your tape and admire your handy work!
To mount these to the wall, I used small finishing nails that I nailed through the black part of the letters into the wall. Then I touched them up with the paint pens.
The more I use my Cricut Explore, the more I think it should be legal to marry a machine of your choosing. You guys. I am OBSESSED with it. Jamie and I have midnight conversations about it nightly (blogger hours mean that you know your bestie is going to be up way past midnight and it is totally kosher to call them.)
I have shared my reasons for loving it waaaay more than the Silhouette Cameo, today I thought it might be kind of fun to share some behind the scene hacks that I have found that have made my exploring even cooler.
Hack #1 Upload Your Image As A PNG.*
(Please note the asterisk, if you have the capabilities of uploading as an SVG that is better, but if you don’t, PNG is the way to go.) We are working on a post all about creating SVG’s, so keep an eye out for that!
When you are creating your image, start with a transparent background. Create your guts out, and save it as a PNG file. Then when you upload it into Design Space, you don’t have to “weed” the image, everything is already removed for you!
Hack #2 Pen Options Abound The pen holder that comes with your Cricut Explore is created for a specific type of pen. The downside is that because it is a new product, the color options that are on Cricut.com are sort of limited. You can rig something that will hold other pens, BUT why would you do that if you can draw with pens that fit perfectly and come in a rainbow of colors? American Craft Slick Writers have the exact same pen tip as the Cricut pens. Boom.
Hack #3 Peel Your Mat Off Your Project, Not the Other Way Around. Those diehard Cricut-ers might know this, but it changed my life. When you are using a new mat that hasn’t been “seasoned” i.e. gunked up yet, peeling paper off if it often results in this:
Yuppers. Curly paper.
Instead, flip it around and peel the mat off of the project.
No curls = No tears of anger.
Hack #4 Cleaning Your Mat
So, remember when you were and loved getting sticky hands out of the gumball machine? Remember how bummed you were when it was covered in dust and hair and would no longer stick to the ceiling? Same idea, different generation. The more you use your mats, the less tacky they become. If you “wash” them they are reusable for longer. Using lukewarm water with a little bit of soap and small circular motions, rub your fingers over the mat. This will get rid of a lot of the residue. Let it air dry. I have been cutting a lot of leather lately and this has saved me time and again.
Hack # 5 Layering The Smart Way Back in January, I was getting frustrated while cutting my wooden business cards. The problem was that the outer edge was being cut first, before the detailed logo. This is a pain because it doesn’t have the stability* that it needs to cut small details if it is wiggling around. After playing around with it a bunch I figured out that the program will cut from the bottom layer up. *This isn’t a huge issue unless your mat isn’t very sticky.
Follow along, I promise this will make sense.
This is what your project looks like in Design Space:
When you start cutting, this happens. (The outline first)
Because the bottom layer is the outline.
BUT!
If you swap that layer and put it on the top (you will do this right before you cut, so that you can still design) it will cut the outer layer last.
Hack #5 Just Keep Cutting, Just Keep Cutting Just Keep Cutting, Cutting, Cutting! This epiphany was REVOLUTIONARY for me this weekend. In fact this one tidbit of info inspired this entire post.
Sometimes when you are cutting things that are a little bit unconventional like wood or leather you need an extra boost to make it all the way through the material. Settings in Design Space will let you run 5 passes at a time, but what if that just isn’t enough? What if you need 7 or 11 or 100 to make it through the material? You might want to sit down for this one.
You can run as many passes as you need. When you hit the “C” on your machine that signals it to start cutting. When it is done, the load/unload arrow starts flashing indicating that your cut is finished and your mat is ready to be unloaded. BUT if you hit the “C” again it will cut your design again. The mat has to be manually unloaded, if you don’t unload it it will cut your design in the EXACT same path as the first round. And you can hit that “C” as many times as you want.
Can you see why my obsession just keeps getting deeper and deeper?
The Cricut Explore is on sale right now with a bundle of my favorite tools, snatch one up before they are gone!
Now. I know what you are thinking. I thought the same thing (and verbalized it A LOT).
Cricut? Like the scrapbook paper cutter that makes things in cutesy fonts and pastel paper? No thank you.
Cricut? Like the company that only lets you create with predesigned cartridges? Nope, I like to design things myself, thankyouverymuch.
Cricut? Like the pinnacle of Mormon Housewife-hood? ( I can say that, I’m Mormon.)
Cricut was not my friend. Cricut was something I was super judgy about.
Let me give you a little bit of a back story on the whole situation so you know where I am coming from. I have this friend, we will call her Mallie…because that is her name. We met when Vintage Revivals was 3 months old. At the time she was the PR girl for Deco Art. We got to know each other so so well and I completely love her. About a year and 1/2 ago Mallie moved to Utah (from back east) to work for Cricut. I was pretty sure that we would have to not be friends any more about it. Then just over a year ago while I was in Salt Lake, I met Mallie and a few other amazing people for lunch to talk Cricut. She basically told me that even though she could tell me NOTHING about the new machine, or where the new CEO was taking the company, that I needed to trust her and get on board.
Up until this point I had been pretty hardcore Team Silhouette. There were issues that I had with the software, and the machine, and the company in and of itself, but not anything huge enough to willingly give it up for Cricut (me being judgy again). But it was Mallie, and I knew she wouldn’t lead me astray. I fought with it for a while. Finally after realizing that there were a lot of places that Silhouette was coming up short and that there did have to be something better, I took a huge risk and stopped posting about Silhouette completely so that I could give the blog a chance to breathe. (I didn’t want to tell you to buy a Silhouette, then the next week tell you how fantastic a Cricut was.) So a year later, here we are. If the Cricut didn’t change my mind, then I could go back to blogging about Silhouette and no one would notice.
In September I had a chance to go to Cricut headquarters to get a sneak peek of the Explore and the new user interface Design Space. You guys. I literally started to cry while I was there because everything was just SO GOOD. They had exceeded every expectation that I had ever had. They had addressed every concern and problem that I had ever encountered with a machine. They had taken ideas that were so far ahead of where anyone else was that, well, it was beautiful (insert sob).
Cricut knows the way that they are perceived (not unlike the way that I used to feel about them) but they are changing in massive ways.
So I would love to share with you the 10 things that converted me completely. Please keep in mind that I have both the Silhouette Cameo and the Portrait and have had my Explore since December. So I have had a good amount of time to really test it out. And I have werked it.
1. The Cricut Explore Is Just A Tool:
The most perspective changing thing that I discovered (hands down) was that the Explore is no longer in the same class as their previous machines or as Silhouette’s. The Explore is a just tool. Just like a saw, or a drill. You aren’t limited to what you can make with a drill, the Explore is the same way. No longer will projects be defined by a specific look because that is what you are limited to using. You can use it to create on virtually any material (more on this next!) and you are not limited by what they tell you you can make with it.
2. Cutting Materials That Will Blow Your Mind: I love to push things. I don’t know, its just my nature to go as far as I can. When they told me that I could cut leather, wood, extremely thick fabric, and about 50 other materials I was like, GAME ON CRICUT. And that is exactly what I did. Check out my business cards. Awww yeah, they are cut out of 1/32” Birch Plywood.
I used sticker felt and my Cricut Explore to make a custom stamp that I used in Macie’s Bedroom Makeover. Just a little something that I had never seen before. This was totally new territory. I went to Joann’s and bought sheets of really thick stiff felt that had an adhesive backing. The Explore cut it like butter.
3. The Machine is Intuitive and Simple:
One problem that I had with the Silhouette was having to manually adjust the speed, and pressure, as well as adjusting the blade length on the dial. The Explore has the Cut Smart system that senses the pressure that the material needs, changes speed based on the design and has one dial that has presets for everything from lightweight paper, to poster board. There is also a setting for a Custom Cut. In the Custom Cut drop down menu there are materials listed that you have never dreamed of cutting. Or you can create your own by setting the pressure and the # of times you re-cut it. Speaking of re-cutting (this is a simple thing but I just had to share it with you!) when the Silhouette does multiple passes on an image it cuts the entire image and then does it again, and again. The problem with doing this is that it frequently gets out of alignment and your project is ruined. When the Explore cuts multiple passes, it cuts the same section of the design multiple times before it moves on to the next. Genius.
4. User Friendly Design Interface:
So Simple. Always up for a challenge, I can usually figure a difficult task out, and if something is too simple I feel like I don’t have the ability to really create something spectacular (does that make sense to anyone else? Bueller?) Design Space is so simple Ivie my 10 year old can use it, but I don’t feel like they have dumbed it down and lost any of the abilities that I want. It is simple and fantastic. Design Space is a web-based software. This means that all of your projects are stored in the cloud. No crying over losing files if your computer crashes.
Design Space works in Layers like PS, but it is SO simple. I think I have used the word simple about 15 times in the last paragraph. If you look closely in this picture you can see how quick it is to change something from Cut to Write or Score.
5. Cut Wirelessly AND From Your iPad:
This is HUGE!!! All of the machines have a port for a wireless adaptor (you can buy it here). Cricut has also developed an app for Design Space so that you can cut and draw, exactly like you would on your desktop on your iPad. This is the great thing about having a web based software, all of the updates are automatic and the app will be free to use.
6. You Don’t Need A Cartridge EVER AGAIN!
This was kind of the deal breaker for a lot of people, you could only create what was already created. That is now dead in it’s tracks. You can upload JPEG, PNG, GIF, BMP, SVG, & DFX files for FREEEEEEE! If you are the happy owner of a Cricut cartridge or 73 good news, there is a port on the Explore that you plug them into and you also have the ability to upload them to your Design Space account and they will be saved on there forever! You never have to plug in the cartridge again! If you have already linked your cartridges to Craft Room they are also linked to Design Space (just se the same log in when registering your Explore!)
7. Drawing! The Explore comes equipped with a dual carriage that has a spot for cutting, and a spot for writing or scoring. and when I say writing, I mean writing. The pen just clicks in and any image that you upload can be changed from a cutting project to a writing project with one click. I love that I can create a font in my own handwriting and the Explore can sketch it out. Check out the detail on the this leather notebook. The entire thing (minus the stringing) was make with my Explore!
8. Storage!
Being a messy creator I am ALWAYS misplacing tools. Taking the Gold Medal for best idea ever, the Explore has 3 different compartments for your tools. The cup on the top, the large storage on the bottom will hold all of the Cricut tools, and the small one on the right has a magnet for your blades so they never roll away. One other bit of fantastic engineering is that the Explore is up on legs, and your mats will slide right underneath and out of the way.
There are about a million other reasons that I love the machine, but the one that I am most excited about involves YOU!
9. Make It NOW! For REALS!! Cricut has asked a handful of extremely talented bloggers (Gabby from Design Mom, Kim from TomKat Studios, Emily, Nicole, and Jenna from Small Fry, Kelly from Studio DIY, Amy from The Idea Room, Rachel from Handmade Charlotte, Jen from Tatertots and Jello, Jen Goode, and myself pssst! I don’t know how I was included in this group) to create projects exclusively for Design Space using their new tool Make It Now. We do all the hard work, all you have to do is pick a project, click the Make It Now button, and load the materials that you are cutting. Everything is cut, sketched, scored, and sized to create the project EXACTLY like we have designed. How cool is that?! I will have more info on this in a few weeks when the first projects roll out!
10. Ashish:
No I didn’t sneeze. Ashish is the CEO that has changed everything for Cricut. His passion and excitement are like nothing I have ever seen before. He makes things happen that are only a dream. He thinks that everyone should have the chance to create and is doing everything in his power to make that possible. He truly listens to feedback. In fact, while I was at ALT, I was sitting by Ashish at dinner. They had announced the Explore the day before and were getting a lot of feedback from customers who were upset about not being able to cut SVG files for free (they were part of the new subscription plan). So he decided that it needed to change, and made me pinky promise that I wouldn’t tell anyone before he could, that SVG files were going to be available for anyone in Design Space to cut for free. Its like Cricut is run like a small town business and not a huge corporation. It is amazing and really fascinating to watch.
Phew that was a lot of words. I just want to make sure that you are equipped with the information that you guys need to make an informed decision.
The Cricut Explore on sale right now! Check it out here, What are you waiting for?! Get your cute butts over there now so that we can be Cricut buddies!
I am completely and utterly in love with my Explore and I cant wait for you to get one too!
Make sure you come back tomorrow, I am spilling all of the hacks I have learned with my Explore!
Everyone loves a good simple planter. Its just impossible not to. I thought it would be fun today to show you 3 different techniques (and chat about the good and bad of each) for paint dipped planters. *Spoiler alert, only one of them is actually dipped… You can check out this post to see a few sources for hanging planters.
First things first, you need something amazing to paint. I love these simple hanging terrariums from Target (couldn’t find them online but they do have them in store). The succulents don’t look incredibly fake (win) but the dirt is not going to be your friend. It is really dark and as faux looking as Heidi Montage. Insert the reason for the paint dipping project.
Technique #1 is the act of actually dipping it in paint.
The pro of doing this technique is you can you any color on the planet, and it is a great way to use paint that you already have on hand.
The con is that it is easy to get a little heavy handed and the dry time is much longer.
Fun tip is to use a straw over a bowl to let it drip dry.
Technique #2 involves painters tape, a paper towel, and a can of spray paint.
Start by stuffing the paper towel inside the opening of your terrarium. Don’t get all stuffing crazy, you just need to cover the hole not pack the fake succulent for a trip around the world.
Tape off the line that you want painted. Then cover the rest of the planter with tape, just to prevent overspray.
Pro for this technique is that you can paint higher on the planter without worrying about filling the hole with paint.
Con is that you need more supplies and it can be hard to find the exact color of paint you are jonesing for.
Technique #3 is a mix of both. (The process showed up a little bit better on a different project, but the idea is the same)
Start by putting your piece face down (a cup is a great way to balance something that is unbalanceable on it’s own)
Lightly spray the bottom of the piece. DO NOT get heavy handed my friends. You will end up with drips instead of a light ombre. Keep your paint nozzle and arm perpendicular to the bottom of the piece and move in a circle around the outside. Repeat a few times.
Let your piece dry completely. When it has dried take a soft cloth or some tissue paper and run it over the entire planter. This will take off any overspray dust, but leave the ombre finish.
Pro of this technique is that it looks freakin amazing. Con is that there is more room for operator error especially if you are an overzealous spray painter.
I strung the freshly updated planters on some jute rope and made it into a banner of sorts.
Hey guys!! I am very excited today to be announcing all of the details for the 2014 Hoard Sale! If you are new to the party, here is the low down..
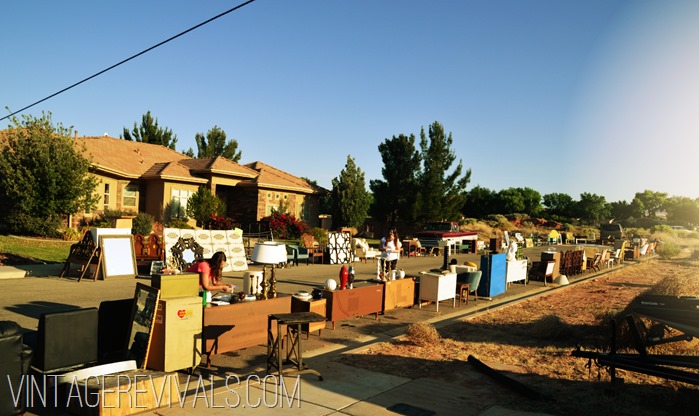
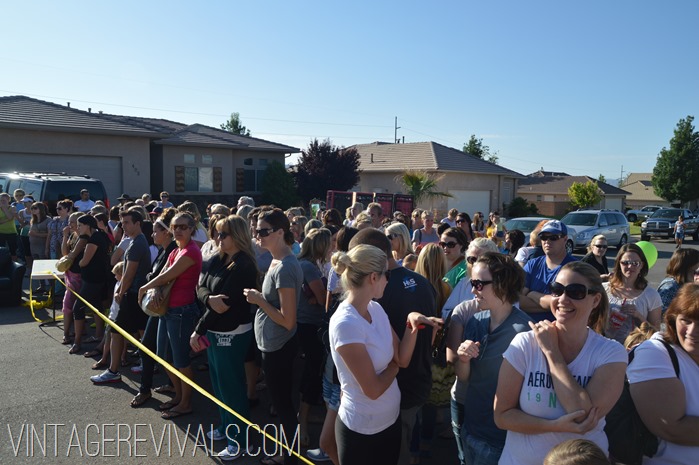
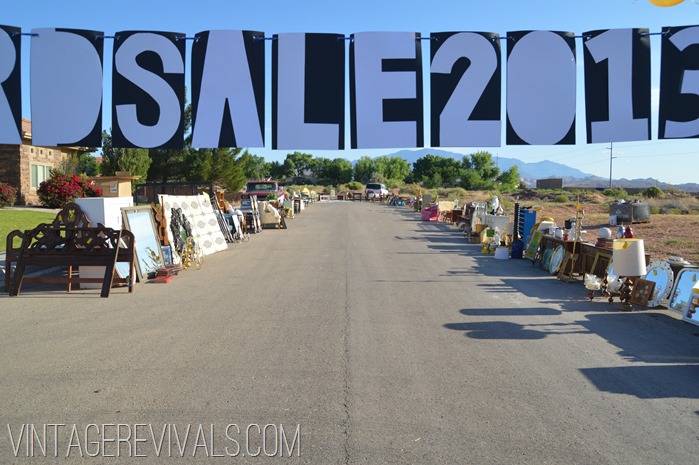
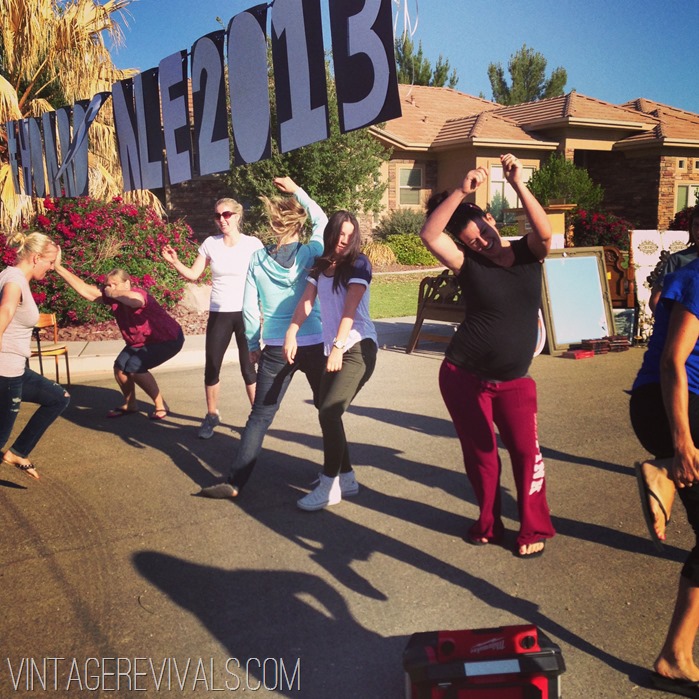
(All images are from previous Hoard Sales)
The Hoard Sale started about a year after the blog began. All of that thrifting had started to pile up So I threw up a few funny ads on Craigslist and had a little yard sale. Since that first sale, I have teamed up with Brooke and let me tell you, our furniture buying skills are legendary. Over the years it has morphed from a yard sale to an 8 AM party of Black Friday proportions. (You can see the posts about previous sales here, and here.)
There is basically a street full of amazing furniture and home decor. Nothing else. No clothing, no baby toys, no weird medical equipment. Just really cool furniture. Some was bought specifically for the sale, some you will recognize from the blogs, and some was bought with great hopes and dreams in mind that just haven’t come to fruition.
We are selling chairs, dressers, tables, lighting, art, books, knick knacks, headboards, Basically if you can put it in your house we will have it.
The festivities will kick off Saturday May 31 at 7:30 with the dance off. Oh yes. The dance off. A handful of willing participants groove their guts out for a chance to be admitted into the sale early. It. is. AWESOME. Also, my neighbors love it. The sale itself will start at 8 AM.
You will want to be there early I promise.
Here is a little video we put together from last year:
So because I don’t want to post my address on the internet, if you are interested in coming please submit your email address below and I will be sending out an email with all the deets.
The sale is in St. George Utah and unfortunately none of the items can be sold and shipped.
It would be almost impossible to photograph the entire selection of furniture that will be sold, but I really want you to get a glimpse of a few pieces. Follow along with #hoardsale2014 to see some of the treasures!


")