Happy almost Mother’s Day friends! I thought it would be fun to pay a little tribute to my mom today. I think it is safe to say that I have the best mom in the entire world. Literally every person that comes in contact with her, completely LOVES her.
Like she really is a saint.
For me, it took becoming a mother to fully appreciate the sacrifices that my mom made.
Babysitting other peoples kids, just so she could stay at home with us.
Making our happiness her utmost priority.
Making sure we had clean clothes (its harder than it looks folks)
Loving me, even when it seemed I was making a really bad choice. Spoiler alert: it turned out pretty great.
I am so grateful for a mother who is one of my greatest friends.
An example of faith and commitment to her beliefs.
A mom who will run her 13th St. George marathon, just to make sure that my sister Amy didnt give up on her first. (she finished by the way, with my mom cheering her on the entire time.)
A mom who replies “ Well, I loved you first” to the question of if I am her favorite daughter. (which I totally am BTW.)
A mom who is the best, because she learned from the best.
A mom who every.time. I left the house as a teenager said “Remember who you are and what you stand for!”
And most importantly…
A mom who will STILL defend these haircuts as cute.
Which makes me wonder about her taste level, but absolutely not about her love for us.
I look at my mom and it is so easy to see why she is loved, she brings out the best in people by loving them first.
Mom, there are a million more reasons that I can list why you are amazing. Thank you for teaching me how to be a mother. Thank you for loving me when I am a little bit unlovable. Thank you for being the person that is a constant light in this increasingly darker world. I hope to be 1/2 of the mother that you are.
You guys, this tutorial is an easy one! Get excited for amazing lighting!!
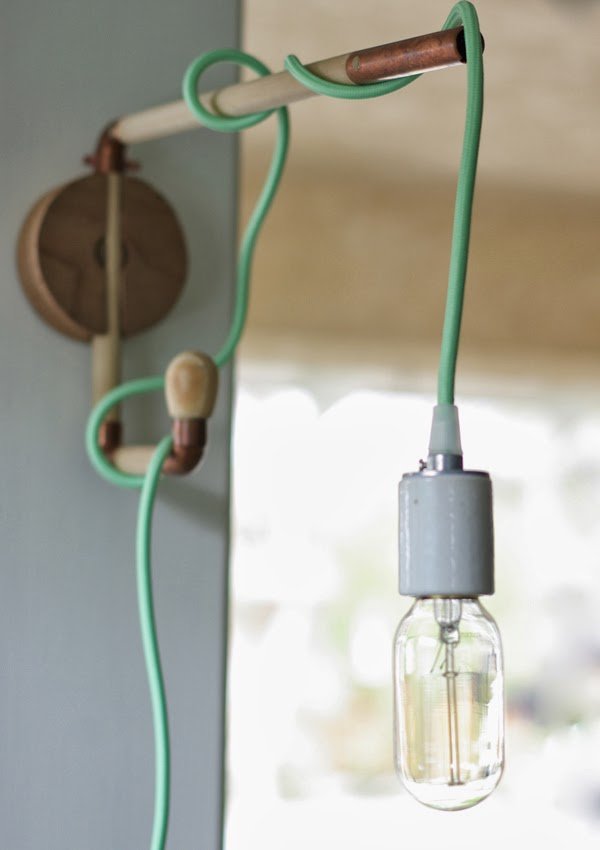
This little hang out corner of Macie’s Bedroom was just itching for a really great statement light. Keeping with the laid back boho theme of the room I thought that a bunch of swaggy lights would be perfect. I was totally inspired by these halo lights that my girls over at A Beautiful Mess created last year. But of course like all things that inspire, its fun to make it your own. And wood and brass? Best combo ever.
FYI: You can find some of the supplies at Home Depot. The brass tube can be found in the plumbing section but the longest length that it comes in is 4”, if you want something longer you need to order it from Grand Brass. You can also buy the light sockets and plug at HD.
If you are ordering from Grand Brass you will need to um…tread lightly? Their website is really hard to use, so I have linked everything that I have used in the supply list. If you venture off of the beaten path make sure that you check the measurements of everything before you hit purchase. Otherwise you will end up with a few things that don’t fit together. Like me. Whoopsie.
Start by taking the cap, pipe, cup, and socket end (the metal part of the socket)
Assemble them with the cap on one end, the socket on the other and the cup in the middle, with the open end facing the socket.
You can leave it like this and enjoy the crap out of it.
Or you can attach the halo (halo, halo.)
For this we are using the outer ring of the embroidery hoop (the one with the metal tabs)
Basically you are just going to glue the tabs to the brass pipe. To hold mine in place while the glue dried I wrapped it with a little piece of leather (of course it was leather), but you can be a patient soul and just hold it if you want.
Hang it up and let it dry (that way it will dry straight!)
Make 1, 5, or 32. It is amazing however you group them.
In Mace’s room, we had a light fixture that we removed and had a perfect spot to hardwire them. But if you don’t have that option it is still awesome!
Sorry for the radio silence the last little bit, I have been out of town for the last 2 weeks. First I was in London with Cricut, and then 3 days later Court and I left for Chicago.
Let me tell you a little story, a story about a wife who always seems to fail when it comes to the gift giving department. I try really hard, and usually over think it and end up completely to the left or right of my target. Remember this? Awesome example.
This year I was DETERMINED to not let that happen again. I thought and thought and thought about something that he would love, I saved my pennies, and I closed my eyes when I hit the purchase button.
Christmas morning Court opened a series of seemingly unrelated stuff. A jar of peanuts, a bag of Cracker Jacks, some gum, and a toy bat. (Can you see where this is going!?)
Then he opened a present that had this little note inside:
This is a story of Christmas redemption Of one wife, who has hid this secret, without exception.
So it begins, and here is how we’ll stort* Let me start off my saying how much I love you dear Court.
I know that this life isn’t what you want at all times, but I am SO VERY grateful that you are forever mine.
Though you may not have noticed all presents until now, have one simple gift in common, something I’ve always wished could be yours, but how?
So please look at your gifts and let’s make a quick list: A huge jar of Peanuts, a bat and a ball with a twist.
Newfangled Cracker Jacks (old ones are impossible to find) Wrigley’s Mint Gum brings up the behind.
So have you guessed yet? Do you know what this means? How about if I throw in a giant silver bean?
I know that you said you didn’t want to go on a trip. But just between you and I, you don’t need another rifle grip.
So, coming this May we are headed to Chicago To watch your beloved Cubbies play the St. Louis Cardinals!
Tickets to the game are not the end of my trick… We will be cheering them on from Third Baseline row 6.
The stress of this gift has been causing much strife, And if you don’t love it, well then, you’ll just have to find a new wife.
And because I don’t want your Christmas to end without toys, I also got you a pair of guns with exploding balls,
Perfect for my Christmas Boy.
Court has loved the Cubs his entire life and a trip to Wrigley was just what I had in mind. He wont admit it but I am pretty sure that I saw a tear in his eye when he saw the field.
So that is where we have been. Soaking up all that the windy city has to offer.
We have eaten EVERTYHING in sight.
Our favorite was The Purple Pig, it was amazing!
We also went to Kuma’s Corner for burgers. Again absolutely amazing, the environment was a little “we’re not in Utah anymore Toto” but the food was so good.
There was a donut shop right by our hotel that we went to every morning called Do-Rite Donuts. Our favorite was the chocolate glazed and the bacon maple crueler.
Other than eating (which was our main activity obvs) we went to a lot of the recommended spots.
The Bean (aka Cloud Gate) at Millennium Park was so cool! I mean, HOW did the artist even make it? Why is it so shiny? Did anyone else almost hit their head on it because the objects in the Bean are closer than they appear?
We took the rivers and lakes boat tour, it was freeeeeezing. And totally worth it.
We also enjoyed a few museums and a musical.
What post of selfies would be complete with out my favorite kind? You guys know that nothing in this world makes me happier than hilarious pictures, this one is my fave.
Needless to say, I have missed you my internet besties. Real life VR starts back up tomorrow! Man, I am glad to be home!!
Is there anything that we missed doing that you would recommend for next time?
Everyone loves a good accent wall amiright? But here is the deal. Painters tape and stencils can only take you so far. They leave a huge margin for improvement. The tool of a lifetime? Sharpie Paint Pens. How excited would you be if you could have the look of custom designed wallpaper for less than $10? That is EXACTLY what this project is all about.
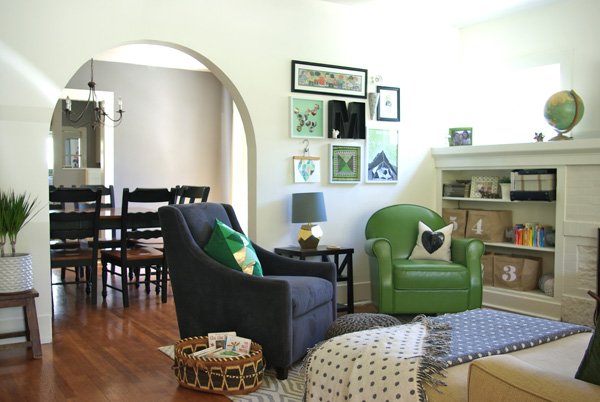
I first discovered this little nugget of love while I was decorating my living room. It was life changing. I have been itching to do another one ever since and Alicia’s office was the perfect spot. I needed something quick and easy that had an awesome impact. 3 cheers for paint pens!
If you are new to this project you will want to listen to this next sentence very carefully. DO NOT use a regular Sharpie. Like ever. You will curse my great great grandchildren if you do. You want an entirely different maker called a Paint Pen. Got it? Paint pens are your friends.
Doing this project again taught me a few new things that I am really excited to pass along!
In my first post I said that you should only use water based paint pens, and that was what I totally set out to buy…until I couldn’t find any black water based paint pens. So I thought “Self, lets just try it with the oil based pens…in an inconspicuous area of course.” Much to my joy it worked just as well as the water based pens AND you can totally paint over them (which I will show you in a minute!)
Start by finding the center of your wall, using a straight edge (I prefer a clear plastic cutting ruler, it wins every day of the week) draw a straight vertical line. Math and crunching numbers is my least favorite pastime. So I used a 6 1/2” fabric ruler for all of it. Pretty please use a level while you are doing this project!
Mark all of your vertical lines.
Once you have your vertical lines drawn comes the really fun part.
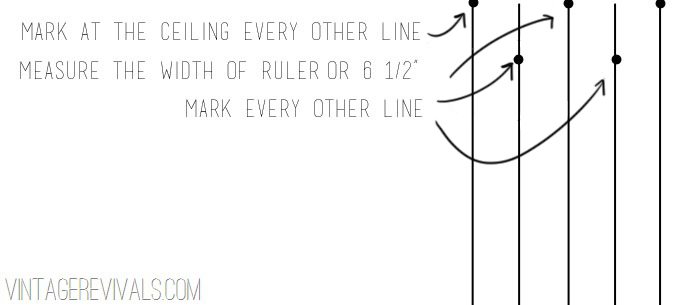
Mark every other line at the ceiling. This is going to be where the points of your pattern reach. Then place your ruler along the ceiling and on the opposite side of your ruler mark all of the lines that you skipped. That will leave you with a 6 1/2” space between marks.
Connect your dots.
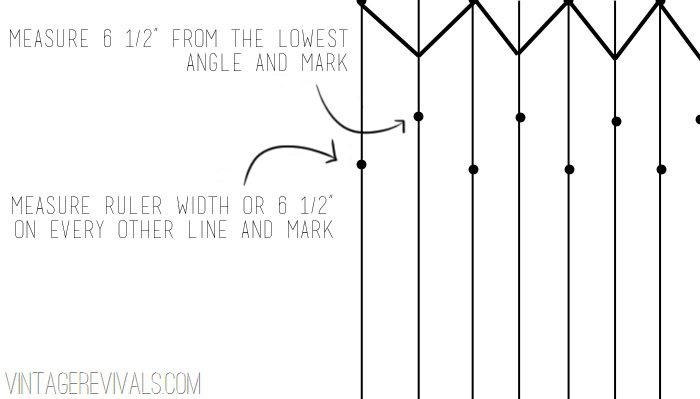
Once you have your entire row connected, line your ruler up at the lowest point and mark 6 1/2” down on the same line. If you do it on the other lines you will end up with chevrons. Then line your ruler up on those marks and mark on the opposite side of the ruler on the skipped lines.
Connect your dots!
Repeat repeat repeat!
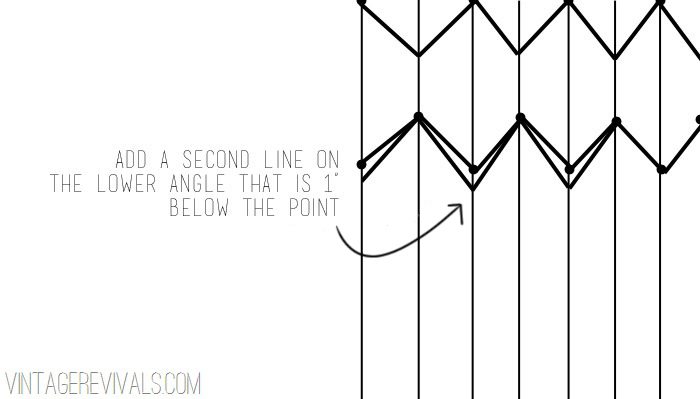
To add the second line, mark 1” down from the low point and connect it to the high points.
So easy, so cute!!
And because I never want you guys to think that it is always smooth sailing I thought it would be fun to share the entire process with you.
After I had drawn all of my vertical lines, I started making my points. Instead of spacing them 6 1/2” apart they were only 4”. I wasn’t loving it from the beginning, but sometimes you have to see how it is actually going to look before you give up on the idea.
Can you see how much more shallow the angles are? It just wasn’t my favorite. So I painted over them and started again.
When you DIY there is always trial and error. How sad would I have been if I had just continued with the first design knowing that every time I looked at it I didn’t love it? Its worth taking the time to make adjustments and fix it.
The look of custom wallpaper that is original, and removable and CHEAP! This project gets 5 stars in my book!
There are about a million other great ideas over at finditathomedepot.com, so head over there and check them out!
If you dont follow along on instagram then you might not know that I am in London. I know!!!! Its crazy right!? London!
After a few long flights and an airport mishap we arrived Tuesday afternoon and it is gorgeous! I am having a pretty hard time adjusting to the time difference, 7 hours is crazy! But I am doing my best. I was invited over by Cricut to speak at the UK launch of the Explore and we have been having an amazing time!
We did a little bit of sightseeing while hunting for food, and spent a few hours on Oxford Street shopping. (I am DYING to get back over there!) I found the most flattering pleated skirt of my entire life and I need to go and see if they have one in every color of the rainbow!
We have laughed until we cried at the British girls doing an American accent. It is SO weird to hear them mimic it!
The event just wrapped and it was incredible to meet an entirely new group of women. It is so exciting to see people’s faces light up when they see the way the machine works and when they understand that it is changing the way you can create.
I also want to shout from the rooftops that the interview that I did with Target is on The Bullseye View blog today! I am chatting about finding inspiration and why I think all DIYers need to be Fearless! Come over and say hello (in my mind I just said that with a British accent. It was really good. That was also British. I cant stop!)
I am hoping to get a tutorial up tomorrow for the Sharpie Wall, we will see if the jet lag wins the war tonight.
Do you Londonites have any suggestions for amazing vintage shops that I can track down? I would love to find some treasures while I am here!
I am so excited to finally share today’s room reveal with you guys! When my friends over at P&G and The Home Depot approached me about this project I knew that it would be an experience that I would never forget. Keeping the fun projects in this room under wraps has been really hard, but now we can be besties without any secrets between us again.
If you remember from the behind the scenes post earlier this week, this was a whirlwind makeover. Like 3 days start to finish. That was a first. Also I just realized that there are probably 5 people that are actually reading this part of the post, everyone else has already scrolled down for pictures. So lets join them, shall we?
This space in my MIL’s house was an extra room that really served no purpose other than a second guest room that was never used. We decided to turn it into an office and make it a really beautiful and functional space.
Here is where it began once we had cleared everything out.
And this is what it looks like now:
Alicia really needed a large linen closet, what she had was this guy. Womp womp.
You guys are in for a treat today. I am pretty sure that I have had 4 people guest post on Vintage Revivals in its entire existence. What can I say. I am a control freak. Sometimes there are just people that you meet that you instantly love everything about that make you want to shout from the rooftops. Jeran from Oleander and Palm is that girl for me. Jeran I love you and I dont care who knows it!! She has got FANTASTIC taste and is one of the sweetest people I have ever had the chance to meet. So without further adieu, meet Jeran!
I’m so honored to be here on VR. How cool is this? Let’s start with, I’m a huge fan, because I am. Every time Mandi puts something together, I’m blown away. She knocks it out of the park every stink’n time. You know what I’m talking about, that’s why you are here. You too love her “out of the box”, thrifty thinking mind. This Christmas when I saw the Geometric Wreath tutorial, I ran (well drove really quickly) to Walmart to stock up on straws and wire. I had to have this wreath in my life. And it is, it’s in my living room, and it makes me happy every time I walk by it. Around Valentine’s Day I started playing around with trying to make a heart version. I tagged Mandi in my picture and she commented back right away. After making many, many versions, I think this is the best and easiest one to make. Anyways, to make a long story short, I’m helping to share how make a Himmeli style heart for your home. It’s soooo perfect in Macie’s Boho room.
So, there are lots of steps, but its really simpler to make then you think.
1. You are going to start with good old cocktail straws and a piece of wire (20 gauge) about 2 yard long. 12 of the straws you will cut in half and the others you will leave whole (except for one little guy).
2. Start by threading 3 small straws onto the end of the wire and twists the ends tight together to make a triangle.
3. Add 2 more small straws, make sure to pull them over the twisted ends of the wire.
4. Take those 2 straws that were just added and bend them into another triangle attached to the first triangle. Twist the end of the wire to hold the triangle shape
5. Thread the wire back through the last straw added.
6. Add another small straw to the tip of this triangle.
7. Use this last straw added to form a pyramid shape. Be sure to twist the end of the wire at the end of the join to hold the shape.
8. Add 2 more small straws to the tip of this pyramid shape.
9. Bend these 2 straws to make another triangle coming off of the pyramid.
10. Thread the wire back through the last straw added.
11. Add another small straw and attach it to form to back and back pyramid shapes.
12. Now add another 2 small straws and bend them to make another triangle shape.
13. Ok, stay with me…. thread the wire back through the last straw added so that it comes out at the point of the newly formed triangle. Now add one more small straw and close the shape to make structure that looks like 3 pyramid joined together. You are 1/2 way there!
14. Repeat steps 1-13 and make another tri-pyramid shape just like the first one. (Don’t hate me, you’re going to love this geometric heart when it’s done.)
15. Now the fun begins, your little heart is going to start to take shape. Woohoo, get excited! Ok, now place the two shapes side by side with the wire ends on the bottom, against the work surface, join the two shapes together with a small straw piece. From center back of one to the center back of the other.
16. Now you are going to need 6 full length straw and one the has about 1 cm (it’s my Canadian coming out, just less then 1/2″) trimmed off.
17. Add 2 long straws to the wire.
18. Bend them to make a point for the bottom of the heart. Twist the wire in place to hold this shape.
19. Now, this might not happen to you, but I ran out of wire length. It’s an easy problem to fix, just twist another length of wire the the end and you are good to go. The join will be hidden inside the straws.
20. Thread the wire back through the last straw added so that the wire come out at the tip of the bottom of the heart.
21. Add another long straw and join it to the center of the first heart hump (yes, that is a technical term).
22. Now thread the wire through the short straw at right beside it so that it comes out at the center of the heart (right in the middle of the 2 heart humps).
23. Add the straw that is just slightly smaller to this center spot. Twist the end of the wire around the bottom tips of the other straws and then add another long straw and attach it to the top of the heart again. It’s a lot of up and down here, you can see it taking shape though.
24. Thread your wire through the small straw again so that you can add another long straw and attach it to the bottom point of the heart.
25. And FINALLY you can add the final long straw and attach it to the back of the heart! Yay, you did it! Trim your wires and pat yourself on the back. I’m so proud of you.
I painted one of mine copper (because copper anything is awesome). You can of course make your heart bigger or smaller, just follow the proportions and make the smaller straws half the size of the longer ones. Happy himmeli heart making!
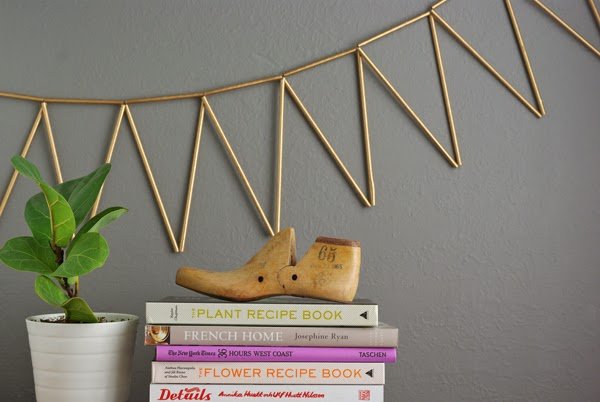
Me again! For Macie’s Himmeli Heart I actually made it out of 1/4” brass tubing (you can find it here)
Now before you go, let me steer your click in the right direction. You absolutely need to pop over to Oleander and Palm. Here are a few of my favorite posts: