This is the 2nd post of a 2 part series! If you want info about installing brick inside your home, you’ll want to check out this post!

One of the perks of having friends that do this stuff is that they were able to come over and help me learn the right way to do it, instead of fumbling my way through for the first little while. It was sort of refreshing!
Once all our brick was installed, it was time to grout.
When you are grouting brick, your best friend is a brick grout bag and a chip brush (you know the kind that you get at Home Depot for $1.50?)
(Another really important tip is to make sure that you are using sanded grout. We’ll get into it more in a second but its kind of a big deal.) The grout that we used was Polyblend Sanded Grout in Antique White. You can find this at Home Depot for around $15 a bag. We used 13 bags for the entire living room.

When you are mixing 13 bags of grout, you will most likely want to invest in a grout mixer. Its basically a giant beater that you attach to the end of a drill. I cant even imagine how much arm muscle it would take to hand mix that much grout.
The key to this entire party is the consistency of the grout. If you mix it too thick you wont be able to squeeze it out of the bag. If you mix it too thin it is a huge waste because you lose most of it out of the bag when you are tightening it.
The right consistency is somewhere between a Frosty and that gross frosting at Costco they put inside their cakes.

Then you just go to town.

I feel like it worked best for me to work in medium sized sections and fill the horizontal spaces first, then go back and fill all of the verticals.

That totally looks like a Frosty right?!
After about 15 minutes check your grout. You’ll know its time to shape it when it barely yields to pressure under your fingertip but is still wet. Depending on the temperature and humidity of your house this can take anywhere from 15-45 minutes. Just keep a close eye on it and you will be golden.

Don’t use your fingertips to smooth it (unless you are wearing gloves!) the combo of the tough texture + lime will make your hands hurt for days.
The best tool for the job is an inexpensive chip brush. (As you are using it, the handle will wear down to the perfect shape.)
Ok so your grout is ready, all you do is hold your chip brush at an angle and swipe it over the grout.

This is where your inner artist comes out. You’ll totally develop a technique depending on the look that you are going for. I wanted ours to be messy and full, but still have a slight indent. If you want it to be full and flush with the brick, you’ll hold the brush vertically and swipe it with the side of the handle.
This is what it should look like after the swipe.

See all of the rough edges? THAT is why you want to use sanded grout. Flip your brush over and brush all along the grout. Because of the sand, it will crumble away, unsanded grout will just smear.

If you are doing this and you can see lines in your grout from the brush it is still too wet and you need to let it dry a little bit more.

There is a pretty good sized window of time between when you are actually applying the grout and when it is ready to shape. If you work consistently you can work in a circle of applying the grout and shaping.
It took me about 6 hours to get 1/2 of the large wall done by myself.

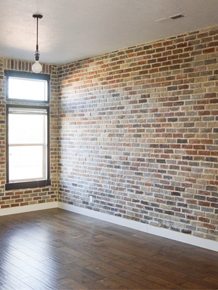
Once Court was home, he grouted and I shaped and it took the rest of the day to finish all but 1 section close to the ceiling. (You can see it in this picture)

Once you have everything grouted step back about 4 feet from the wall and look to see where you eye spots a problem. If you are looking at it up close under a microscope you will see a million things. But if you step back, you’ll see the things that really need to be addressed.
Mark those spots with painters tape so that you can fix them all at the same time.

Most of the spots that were marked in the above picture needed more grout along the edge of the brick. If you happen to have a spot that needs less grout, using a wire brush attachment on a dremel or polisher is a fast and easy way to fix it.


The original plan was to whitewash it (that’s why the brick is so many different colors, I used an assortment of leftovers that Quickstone had on hand to keep the price down) but I’m torn now because I LOVE the natural color. But it is seriously dark. I need to see how it looks with the couch (yes, I made a decision! stay tuned!) and what happens when the room starts coming together.
So what are your thoughts? Light or Dark?


I was loving everything about this until you used the word “gross” and “Costco Cake” in the same sentence. Now I’m highly skeptical of your taste… 😉
Gabby, youre right! “gross” and “Costco cake” don’t belong in the same sentence. Their frosting is the better than any other bakery around here and we go 90 miles to get to Costco. The description of its consistency is right on and works well, just didn’t need the word “gross” in my opinion.
Please leave it dark! I love the variation, it’s so tortise shell meets pralines & cream
It would be really hard to make a call on whitewashing vs. natural without seeing the room put together. I do think it looks really cool now, buuuuut I can imagine that going from white walls to brick feels a lot darker and maybe more closed in. I’m a horrendous decision-maker, so my strategy is always just to wait. You can paint it at any point, but “un-painting” ain’t gonna happen.
I agree with Brittany. I’d like to install one on the wall my fireplace sits in and then white wash it, allowing only a little brown to show. But I am someone who LOVES a picture on Wayfair, orders it, and is tired of it within 3-4 months and wants something else. How soon would I get sick of the shabby chic brick fireplace? Who knows.
I love it!! So worried for when you tired of it though, that’s going to be hard to come back from!!
Gosh. I am such a fan of brick that trying to choose between whitewashing and natural is like making me choose a favorite child. I agree with what Brittany said about giving it a little time. I think this natural brick will be a definite change for your bright taste. So I say you live in it for a while. But eventually I think you’ll end up whitewashing even if it’s years down the road.
PS. I’m obsessed with this whole living room makeover. OB. SESSED. I am such a city girl and my husband is a mountain man and I’m so scared of giving up the awesome architecture in the city for a house in the burbs. but this makeover is totally making my dream seem like a plausible reality. So thanks, Mandi. DIY queen and marriage counselor.
I kind of like the natural color! I think the variation is interesting. I’m not the one living there though, so I can’t wait to see the rest!
Dark! I love the natural color. It’s gorgeous just the way it is.
honestly, initially i was like ‘why in the world are you re-doing your living room AGAIN?’ i still kinda feel that way (it is newly remodeled, looks awesome, and why waste all the time, effort, and money to re-do it all, ya know wastefulness in america). but….now that’s its in progress i really like it! i also love loft spaces so of course its going to be beautiful. i can’t wait to see the reveal!! and i voted for your little blog!!!
Please for the love of all that is holy, do NOT whitewash it! I feel like all the pictures you shared on your inspiration post had natural brick since that is what made it feel most like a loft. I personally absolutely love the look and I thjnk it makes Th e room feel cozy rather than sterile.
But that is just my opinion (albeit a rather strong one)
Maaaaan, you’re good. Everything you touch turns to gold, so I won’t even try to weigh in on the brick decision. You will know what to do. I do have a question though! How did you cut the brick at the top of the wall to be so skinny?
I vote to leave it the nature color! You can always brighten it up with accessories, art, and plants. It looks great!
Honestly, at the moment I’m not a huge fan of the brick colour because there’s so much of it. I liked the idea of adding texture to the space and I’ll be honest that I thought you’d just be doing the outside window wall based on the inspiration photo you used. An interior wall, not shared with another unit, probably wouldn’t have been brick in an “original” house so to me it emphasizes that the brick is fake.
I would see how the room looks put together before white washing since you wont be able to undo it. I like the idea however of white washing the interior wall to cut down on the amount of dark brick and leaving the window wall as is. It’ll help bring the room back closer to the original inspiration. Plus it’ll give the texture you want but lighten up the room. If you don’t like the combination or it still looks too dark then you can always finish white washing everything.
I think if just one wall was brick, I would leave it dark, but since the whole room is bricked, I’d whitewash. There were a bunch of whitewashed brick walls in your inspiration post (contrary to what an earlier commenter said), and they look amazing! I feel like there are maybe too many tones in this brick to keep as is? But do what you gotta do, obviously.
I hope you whitewash, it’s a bit too busy otherwise. But I do love everything you do so I’m sure you can make the room look great either way!
I know it might feel different in person than in the photos, but the brick color looks so great in the photos. I hope you don’t whitewash it.
Oh, I like it the way it is now. I say ~ leave it like it is ~ move all your furniture in and see how you like it for a few months. If you don’t like it ~ whitewash away!! 🙂
I think if you had done just one wall in brick, the natural look would be fine. It is really pretty! But I think that with both walls in brick, you will be forever thinking, “It is SO dark”. So I would whitewash it, which I think will look awesome as well.
I’m still waiting to see the Nugget light tutorial that you promised us…sigh. LOL please can you squeeze that in this week?? PRETTY PLEASE and thank you Mandy!!! 🙂
I LOVE natural brick, but these colours make a weird zig-zaggy pattern to me. Like the brick is a mosaic and you got it positioned JUST off or one piece is upside-down. There’s SOMETHING that looks wrong to me, and if I didn’t know it, I would immediately think, “That’s fake brick.” (But maybe it’s just cuz I’m seeing it in photos and not irl?). I think that’d go away once it’s painted white. So yeah. That’s my vote!
I love, love, love it how it is! It doesn’t look too dark, and I think if you have good lighting in the house and decorate it well, it won’t be a problem. I do like whitewashed brick, but something about natural looks really, really great with the wood floors.
Cannot wait to see what you guys decide. I would say bring furniture in to get the feel of the room, since once you white-wash you can’t go back. Either way it’s such a great transformation. It looks so awesome!
Do yo have any extra panels or partial panels of the brick? I’d love to see how it would look with a wash.
This is a great tutorial, and ventures into deeper creative waters. (Which is one of the signs of a true artist.) I agree with the comments that support NOT whitewashing. It would be adding a layer of “intentional” on top of a veneer. (If that makes sense?..) To me, the appeal is the actual brick material, in it’s natural state.
While some might question things like the home’s architecture, style, and cohesiveness with the rest of the home, it all comes down to a space’s connection with emotion. Many buildings in famous cities have interiors that contrast with the exteriors, and there are countless reasons to explain why. (Like zoning, or neighborhood association rules.) It’s also a matter of perspective. If it is looked at from an architectural origin standpoint, then ok, so what. BUT, if you look at it for what it is, you see an inspirational evolution of a home.
I consider this a beautiful wall resurfacing. Beautiful upgrade, and great DIY.
Please, please don’t paint over that gorgeous brick! use some white accents and bright greenery and it will look incredible!!
I love what you’re doing! Your blog is seriously so inspiring
Natural. 100% Natural. I actually think it’s gorgeous and I’m normally drawn to rooms that are light and airy. But this natural brick has the feel of the loft space you are looking for, while still feeling cozy yet somehow light and spacious all at once. I think it adds incredible interest to the room and I 100% would not change it.
Right now, I’m thinking you’re a little insane. Once you finish this room, I’m sure I’m going to be saying that you’re a genius. Can’t wait to see what you do with this.
Paint so it can smile at your furniture friends and not drown them. I agree that it is way to dark. If you did have those tall lofty open ceilings it maybe would work, but I wouldn’t leave it as is in this space.
My vote is to white wash. I think you can tell you bought mis-matched brick, I also just really love the more subtle texture of white brick walls. Love that you’re always thinking outside of the box & can’t wait to see the room all done. I’m hoping to see the green chesterfields in there 🙂
Omg please leave the brick! You can always brighten up the room with more cool light fixtures!
I’m only saying this because I am so over whitewashed brick. It would be trickier but I think it feels loftier this way. Lofts are dark and tiny and cramped and they have all the personality shoved in one room. That’s the loft charm. They know they’re dark and they own it. Whitewashed brick, at least in my city, says that you’re either a rich Pinterest perfect family in the expensive part of town with all the old charm renovated right out of your house, or you’re so old that you and your house have been together since before the city was even born.
Um… Can you not have both?. Like having the long wall white and the window wall left natural?. I’m sure I saw one of your inspiration photos something similar or maybe I imagined it but anyway I think you can have the best of both worlds!. Can’t wait to see how it ends up!
White wash that bad boy. Natural can be great, but a nice white wash will brighten things AND still leave the natural colors coming through for that perfectly imperfect look.
I’m kind of loving the natural look, it makes your windows pop! Are you able to photoshop it white and give us an option? Either way – I’m sure your living room will look amazing, you never disappoint!
I’m on Team Whitewash. The texture is very cool! But it looks really dark to me, and kind of busy, particularly with your dark floors. I think when it’s whitewashed, it would be the perfect amount of texture without bringing the room down 🙂
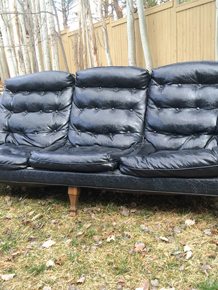
Also, going by the link, did you pick the black couch? ‘Cause if so, I’ll drive from Iowa to Utah to get that green set…J/K (but not really?!) Looking forward to seeing it all put together!
Although I absolutely love it, I, too, wondered what’s going to happen if you change your mind. Hopefully that won’t happen for a long time! 😉 Please leave as is. When I think loft, this is what comes to mind. Not that I’ve seen all lofts, however, any that I have in person or in print have all been in the natural brick state. That is part of what screams loft to me. Can’t wait to see it all come to fruition.
Mandy, your style is fearless. It says so at the top of your home page, and it really is true. This transformation is amazing. Keep going!
(No idea on the whitewash issue, by the way. We have only attempted to paint a brick fireplace, which we hated. But whitewashing is different. Good luck!)
Leave it!
I love the idea of a thin whitewash…so that the color would peek through subtly but it wouldn’t be so dark.
Love! Personally I would white wash it, only because it blends in with your wood floors. If your floors were darker or a rustic gray I would leave it as is. 🙂
whitewash for sure! It will look amazing!!!
The room has the loft feel with the natural brick. I think you should style the room then decide, but post pictures and we can vote ! Katie from bowerpower blog did a wash on faux brick. Check out her reveal.
Leave it for now and if you want to whitewash it later you can.
I love the dark mixed brick, and you can always go back and white wash it later if you want an easy change in the space.
I’m on the natural team! By buying leftovers I think you achieved a nice utilitarian, lived in palette. It’s somehow more believable that it might be real brick, vs a brick veneer.
Hey, do your pro friends have any tips on getting rid of brick veneer, if it ever comes up for anyone?
whitewash for sure! It will give you a light and bright palette to do anything with!
Wow, this is an amazing idea! It would never come up to my mind I could eventually have bricks in my room. Very original and thank you for the tutorial, I have been doing great DIY experiments recently and it is the biggest relax for me so maybe the next time I feel like changing my place, I will go for bricks. I would chose the classical brick color without mixing but this looks great as well. Thanks for sharing!
Cheers,
Kris
I LOVE the WHITEWASH!!
Light or Dark? I would either live with it for a while-at least three weeks-before deciding whether to whitewash, or work some photoshop magic to get an idea of what it would look like light. Because you can’t un-whitewash it if it turns out you like the dark better.
Do your plan and bring in the couch and see how you feel.
If you just did the one big wall I would say leave it. But since you did the window wall too I am leaning towards white wash. But then I didn’t see the couch decision yet. Loving it either way.
I have no opinion. Just catching up and letting you know I think it looks very cool.
love it natural, but you always know what you’re doing so I’m sure whatever direction you go will look fantabulous!!!!
Oh, gosh. I would be torn too. How about keeping it natural at first until you are ready for a change? Knowing you, you’ll want to redo the room in a year or two. Then you can whitewash it.
Also, is grout for aesthetic purposes only or does it serve a practical purpose?
Both! My husband is a brick mason, and the grout you see is what glues normal bricks together. I think, in this instance, it’s kind of like grouting tile, since they’re thinner than normal brick (he’d call them pavers or faces) The grout helps secure them to the wall a bit more than what was on the back holding them, and helps them stay together, so even if one was loose, it’s locked in, pretty much, to the bricks around it. It could still come out, but would have to be pried, pretty much. HTH 😉
I love the natural tones. I say leave it, see how you like the vibe once everything’s in there, and decide later if you want to change it.
It’s so beautiful as it is, leave it until you tire of it and then white wash it.
I am dying to find out what you did. Please let me know!
WOW I just read your story and I just wanted to tell you how proud I am of you for sharing that and for finding your strength in the lord. I have had many experiences close to the monster of addiction and have lost friends and family to it, permanently to death and otherwise alive but so so lost. I think it is so beautiful you shared your story of survival and revival, not many people have that courage. I am so happy for you and your beautiful family, and what you have built, so inspiring, real, and refreshing!! So often struggles like this are swept under the rug and ignored which just builds on the shame an addict is carrying and often medicating, it continues the cycle, so amazing for you to of put it out in the open and shared the hope that is your family’s victory!! God bless you!!!!
I have been looking for this project for two years now for my apt. Glad I didn’t find it because I’m buying a house now. I’ll touch base again when my project is done. Thanks!
I just found this project as I am about to put a thin brick wall in my basement.
I appreciate your sharing your experience with this project.
Please tell me what you did with your base boards. I cannot tell from the pictures.
Is the thin brick flush to them (i mean did you leave the base boards on and assuming the thin brick is the same thickness just put the brick right above the base boards)?
Or did you install the brick to the floor and install the baseboards over top the brick?
I am trying to decide what is best for me and am considering both options. My baseboards and brick are he same thickness (1/2″) .
Thanks, I hope to hear back from you.
We left the baseboard on and installed the brick flush with it. You could do it either way!
I would greatly appreciate a picture of where the bottom of the brick wall meets your baseboard.
Does having the brick and baseboard flush with each other make it less believable that the brick has always been there?
I am trying to create the look that I exposed an original brick wall or exposing the basement foundation wall. If I have the base board and brick flush with each other I am worried that the brick will look cosmetic. What do you think about that?
On the other side of the coin, my baseboards are perfectly level and I could use them to keep level lines to build the brick up from. So much to consider…
Please respond and again would be soooooo thankful if you could include a close up picture of where your baseboard and brick meet.
Thanks,
Trevor
I know this is an old post but would you have any ideas about painting brick. We added porch and the brick is discolored in several places due to someone cleaning it with wrong product. I like the farmhouse look so wondering if just painting it white after priming or some type of antiquing. I can’t find anything online.
I know that this happened years ago but for me is new and I love the whole bricks wall idea . Can you please send me the list of the supplies you used? Thank you in advance.
I just came across your website and love how this turned out. Now I need to go search for your recent additions. I was wondering though, why use grout instead of mortar mix? Is it easier?
How about doing this on a floor????
I loved this article! It is so helpful and I can totally relate because you compared the consistencies to frosting and a Frosty…! Thank you for the setep-by -step and the pictures. Now that it is almost 4 years later. what did you end up doing with the brick? It is so beautiful I love it natural. You could always whitewash later ,right?