If you’ve been following along with Tyler’s Scandi Sanctuary Makeover you are well versed in the dilemmas that I faced with the design. The biggest one being the bed and the fact that it had to live in front of the window. This made headboarding (i just made that word up) a little bit harder because 1. It couldnt block the light. 2. It had to be strong enough that the bed could be pulled off of the wall and the headboard could still be leaned against. And 3. It couldnt cost a million dollars but it needed to look like a million bucks. Simple.

The first step in this journey was to find some seriously amazing wood to build with. Pine from Home D just wasnt going to do, so I ventured into the unknown world of the lumber yard and bought some gorgeous Maple. This type of wood has a few different names (possibly depending on where you are in the country?) I’ve heard it called Wormy Maple, Colorful Maple, Ambrosia Maple. Fun fact, the wood itself doesnt grow this way. Its a regular maple tree that becomes infested with Ambrosia Beetles that burrow into the wood and bring bacteria that stains it. Pretty sweet right?
First things first, when you’re building this headboard you first have to decide how tall you want it to be. Seems a little obvious but just go with me. Because it pitches in the middle, you get to decide just how steep of an angle you want by how much taller the center board is than the side boards. Because I kind of made it up as I went I can show you exactly how we did it, so if you want to customize yours a little more than you’ll know just how to do it!
Start by determining your size. Mine was for a king size bed and the original plan was to make it 48” at its highest point and 40” on the sides. (we’ll chat a little bit more about the change of plans in a minute, it doesnt effect the actual tutorial)
I’m sure that there are some great mathmatical formulas to get the exact measurements and angles, but that’s just now how my brain works so I laid out the boards on the floor of my garage used painters tape to mark where they needed to live.
Next I measured and marked the dead center of the middle board.


Then I just laid one of the slat boards from the end board to the center line of the middle board, so that the top point of the slat board hit the center of the line I had marked.

Then I marked the angle on both boards so I knew what needed to be cut off.


Repeat on the other side of your center mark so that it makes a point. Cut off the excess.
Once you’ve cut your slatted board on the miter saw along the mark, your going to replicate that same angle (mine was 80 degrees, which means that I set my saw to cut at 10 degrees) on both ends of the board for as many slats as you need. I ended up using 8 boards.


If you’ve marked everything correctly, your slats should fit together and follow the point that you cut into the center board.

As much as I wish that I had done this project in a perfectly lighted garage, the reality is that we were building this thing at 1 am. So here is a little real life progress shot for ya…you are welcome.

To attach everything together we laid the slats face down on the ground (make sure that the good side is down!) and put our boards on top of them. After we had secured the first set of slats to all 3 boards and made sure that everything was straight, we spaced the slats and attached them with finishing nails, that way if anything was spaced wrong or wonky we could easily fix it before we permanently screwed everything together. That being said, we knew that our center was lined up based on the slats lining up on the edges of the outside boards, and against the spacers, but its still a teeny bit scary when you are nailing something together that you cant see…not going to lie.

Once everything was attached with the finishing nails and good to go, we secured it with countersunk screws and I wiped it down with Danish Oil.
Ok now for the real real life part. When I planned the height of the headboard, I may have guestimated the height of Tyler’s mattress. The only time I had seen it was when it was up on the massive storage base and was really tall. So I used my bed as a guide for where I thought everything would lie once it was on a box spring and frame. When we got everything moved in my heart sunk when I saw that their mattress was literally 1.5 times thicker than mine. It must have been a little bit like what the Princess and the Pea felt like when she gazed up at the top of that daunting GINORMOUS mattress pile. The headboard looked so teeny and dinky and you could see like 2 of the slats.
But we never give up right? Luckily when it was propped up on the bedframe it was the perfect height. Which would have been fantastic and we could have done that and called it a day in a normal situation where the bed is against the wall. This was not that. The bed had to be off the wall, which meant that I needed to find a way to not only stabilize the headboard but secure it so that it was strong enough to lean against.
Tyler came to the rescue after he went scavaging for some wood and found 2×4’s in the garage. It might not be the prettiest thing from this angle, but guess what. Its sturdy and no one sees it from this angle. 😉 Except now the entire internet has…but its real life sometimes.

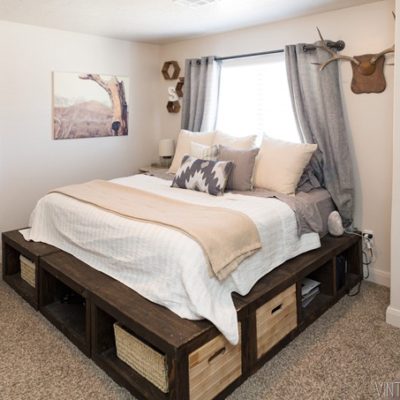
Want to see how much prettier it is from the front?


I’d say it looks pretty freaking fantastic for $70 and an hour of work wouldnt you?


Hey for some reason none of the pics in your post will load for me on my phone.
Hey Candi!
We launched a new site design last night and are working on fixing the little bug! Give us a couple of hours and it will be good to go!
xo
m
I think it looks fabulous!! And the real life is perfect too, cause that is just like my real life! I need to find a lumber yard close by…
Mandi! I think this project is so cute! I love that you kept the wood raw, but I love that this project would also look cute painted. Thanks for sharing such unique headboard project! Where do you get your inspiration?
Gorgeous!! May I ask you what kind of oil did you use? Is it shiny or matte?
Thanks!
Its matte!
xo
All i want to say is that you are my dream girl. Love all your projects, super talented and handy……amazing!!!!
tan
Looks great! Is it secured to the bed in any way? If not, wouldn’t it lean away from the bed towards the window if one were to lean against it (sitting up in bed)?
Hey Caroline!
Yes! Its secured to the bed frame!
This project is absolutely great! Love how the design looks so simple but beautiful, and it ended up being sturdy. Definitely worth a try to do this. Thanks for sharing this!