Hellloooo!! Ok so, I feel like it is so easy to get in a rut when it comes to things that maybe aren’t conventionally DIYed. Do you know what I mean? When I was working on the Laundry Room Makeover I found myself searching for a really fantastic towel rack that I could mount on the underside of the cabinet. Let me tell you, I found a few good ones…the problem was that they were SO expensive. Ugh, why?!!
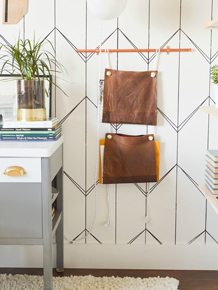
Per the usual, I decided to take matters into my own hands and pulled out my trusty staples, leather and copper. I think they are critical to a DIY MacGyver’s arsenal. You can make anything!

To make this project you’ll need:
Leather Scraps
(1) 24” piece of 3/4” copper pipe
(2) 3/4” copper caps
Grommet Kit
Screws
Trust me when I tell you, you‘ll want to get your grommet kit at Home Depot. Their prices are significantly lower than the kits that you can buy at the craft store.
Start by cutting your leather into 2” strips. The length will depend on how low you want it to hang, mine were 10” long.


Fold the leather in 1/2. Using your grommet setter (or if you want to technically correct tool you can use a leather punch) punch a hole in the leather 1/2” down from the ends.

Set a grommet in each side.
Next, fold your leather in 1/2 again and punch a hole 1 1/2” from the fold.

When it’s unfolded it will look like this.

Fold it back up and set 1 grommet through both holes to hold the leather together.

So easy right!?
To mount them I put screws through the grommets into the cabinet. **When you’re doing this, make sure that your screws aren’t too long or they’ll poke through! My cabinet is made from 3/4” MDF so I used 3/4” screws (because of the space the grommet creates.

To be completely honest I wasn’t sure how much weight this would actually hold (I was fully prepared to take it down if I had to) but it can hold a whole dryer full of my clothes no problem! Hooray for projects that are pretty AND functional!!


Check out the other posts in this series below!


love your day projects. You use plenty of copper. My question is: do you use a clear coat to keep the look, Polish, Polish, Polish, or go with the natural color that co,ex with time?
you with your ever clever, useful, trend-on ideas! this rules. gracias!!
this solution doesn’t work for my area but i have to applaud your idea!!!!!!
God. Total Mandi geniusness right there. LOVE IT.
Gustavo Woltmann loves DIY! This is a great blog!- Gustavo Woltmann
This is such a ridiculously fabulous idea I can hardly stand it. This is happening under ALL the cabinets in my less than functional laundry room.
Thanks so much :+)
Love it! Where do you find the scraps of leather?
I think this is one of the best ideas I have seen in a long time! I can’t wait to try it! I want to use it to hold coffee mugs in my kitchen by adding s-hooks to the copper pipe. I found your blog by accident and I am So Happy I did! Thanks for the great diy!
I’m going to make a paper towel holder. Less mess on my counter.