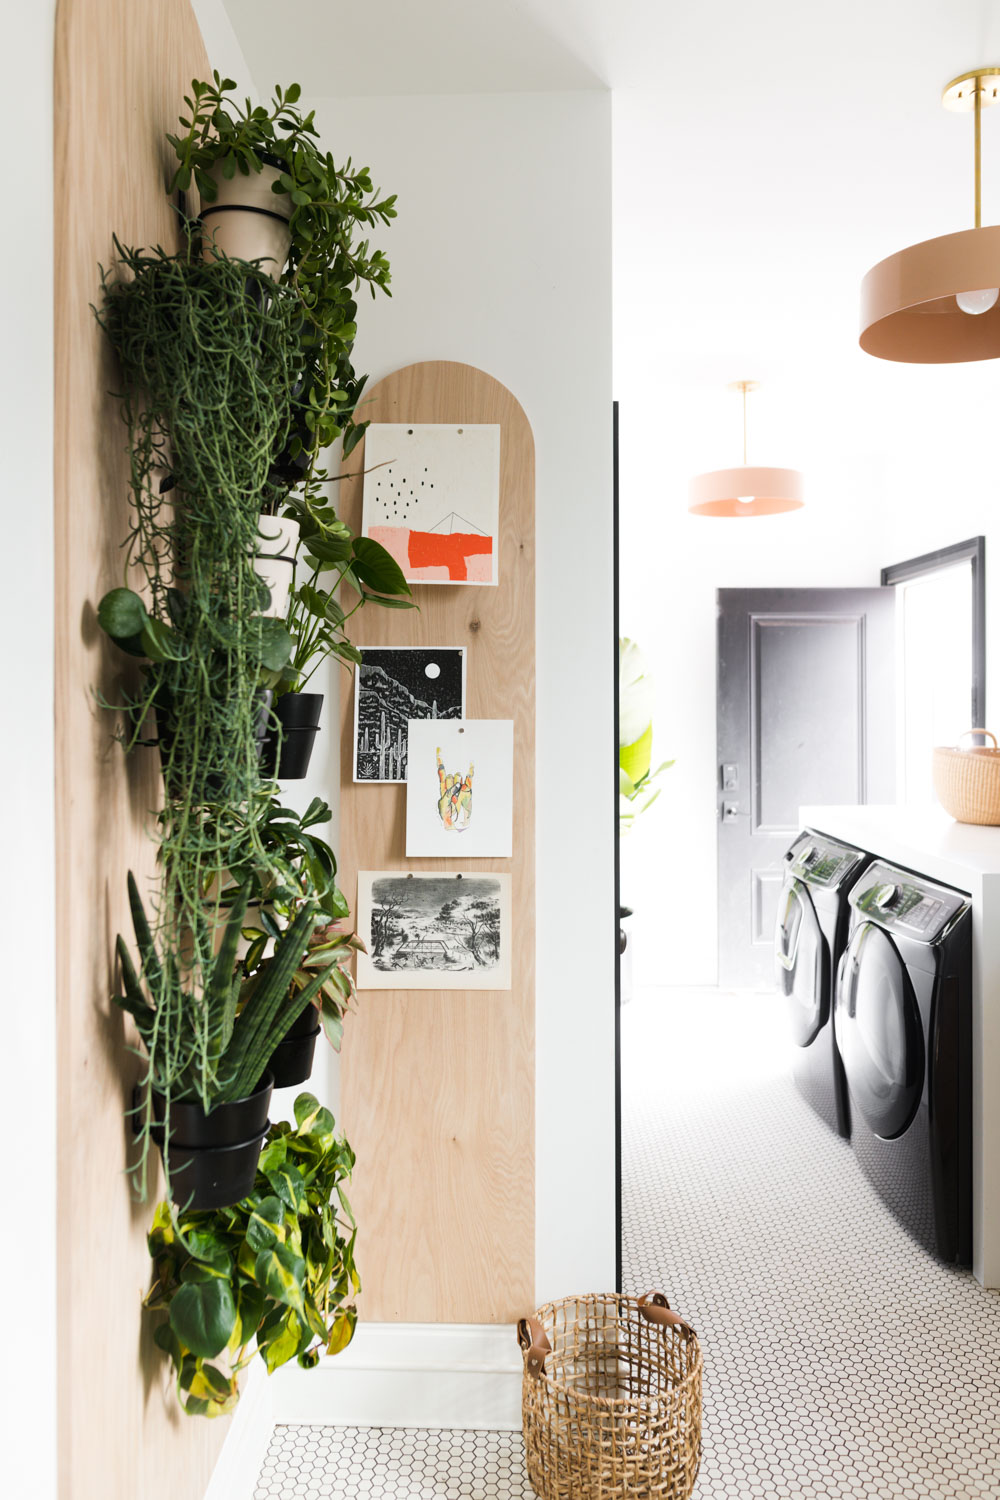
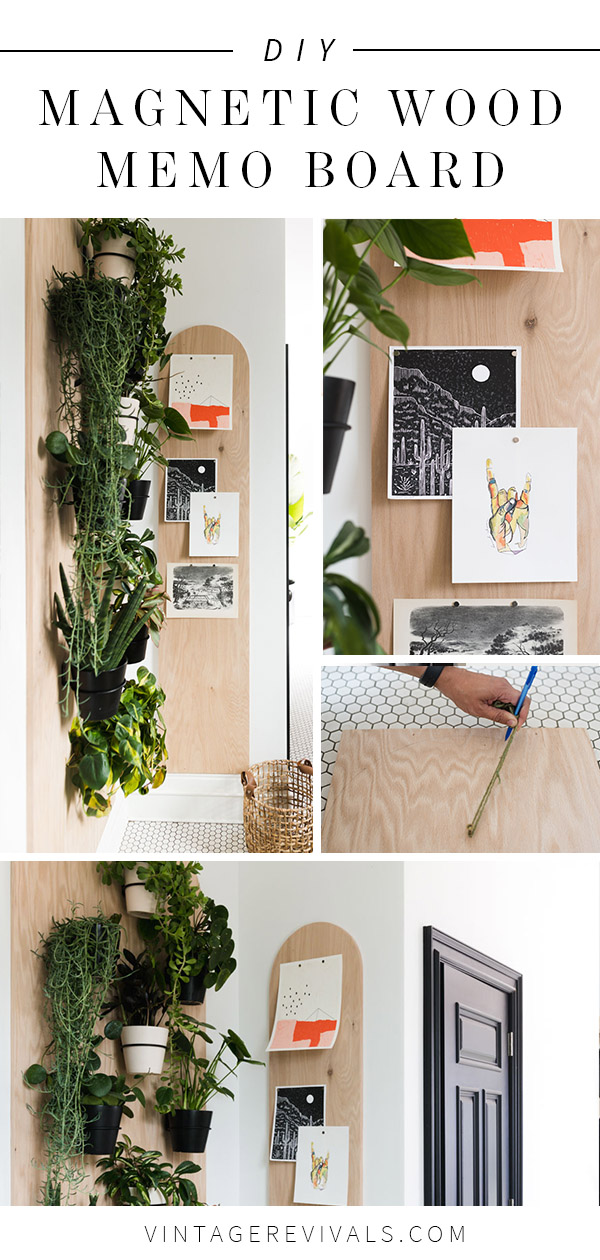
I am SO in love with today’s project, I want one in every room of the house.
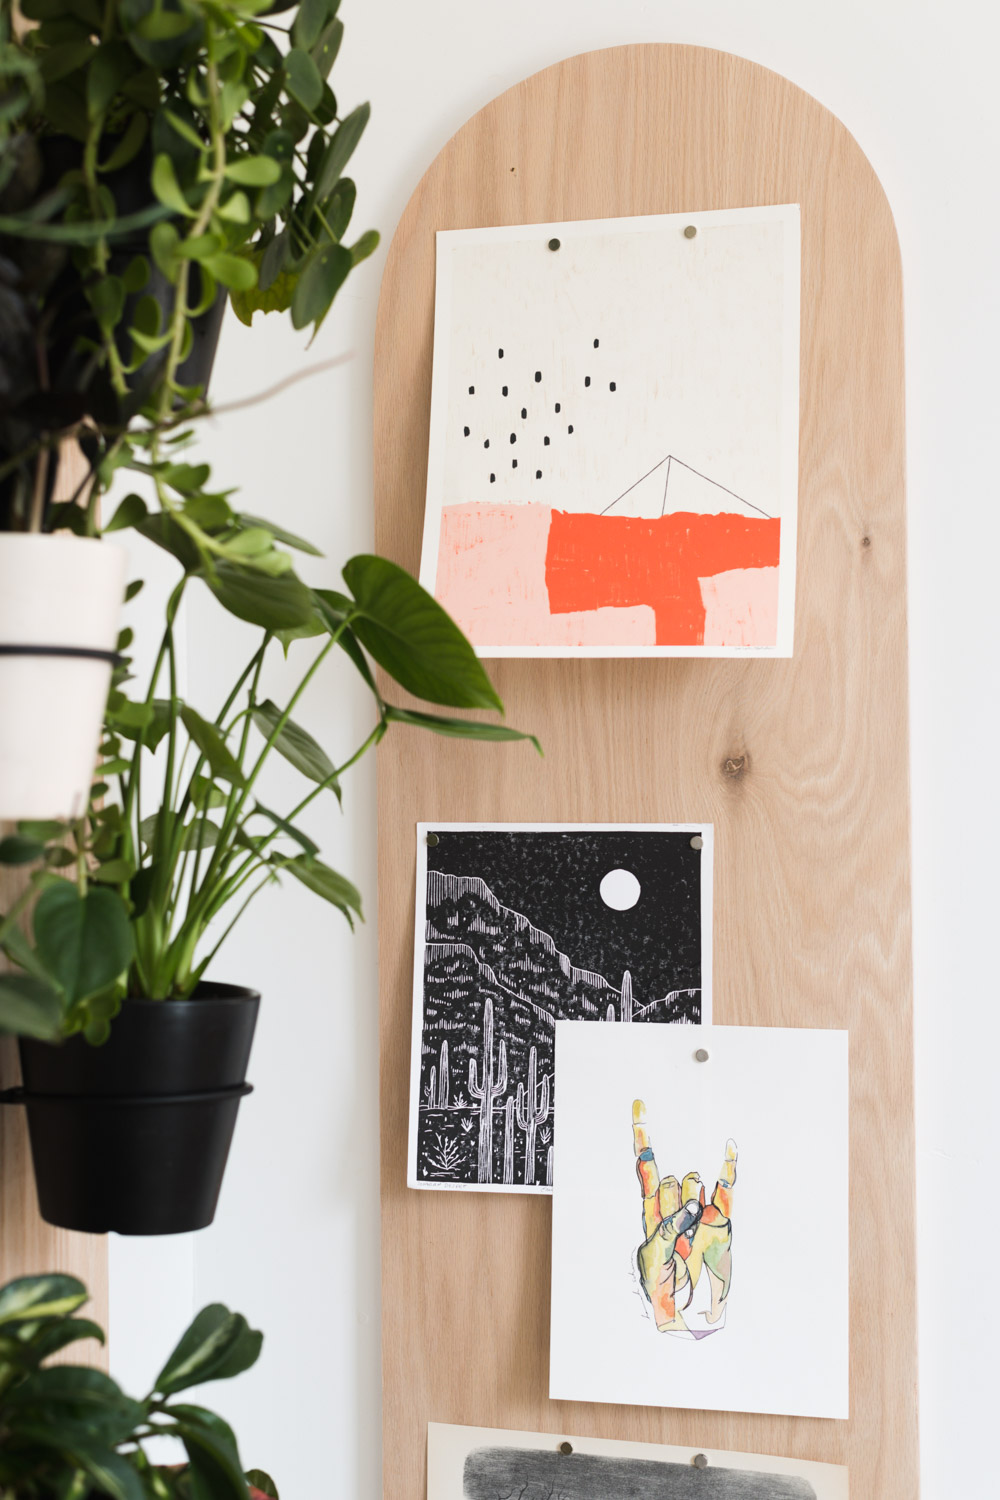
A magnet board that just looks like wood! Because it is!!
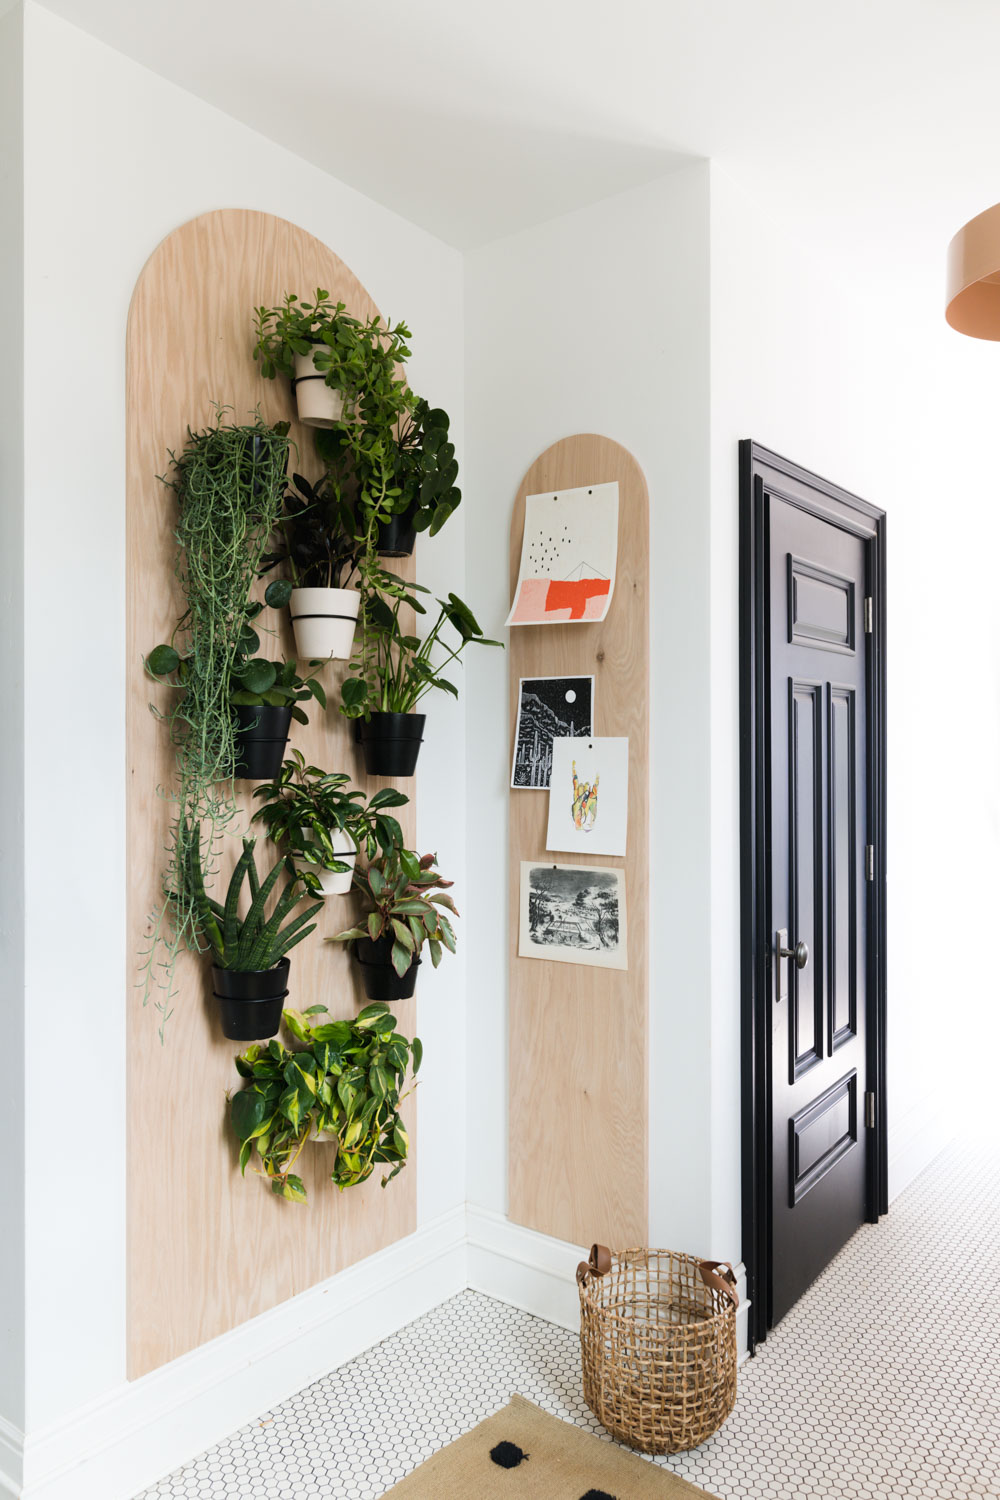
This is a moderately easy DIY and I think we’ll see it take the internet by storm! All you need to do this project is a piece of plywood, Neodymium magnets, and wood glue!
The great thing about this project is that the magnets are super top secret! You can literally put them in anything and no one would ever know, until you blow their mind by putting a piece of art on top of wood. This is a game changer people!!
Supplies You’ll need:
Plywood (mine is 3/4″ Red Oak)
Neodymium Magnets (mine are 10x3mm but you could use any size)
Wood glue
Pencil
Nail
String that doesn’t stretch
Drill Bit (7/16 if you are using 10x3mm magnets)
Jig Saw
Optional Supplies:
Drill Bit Stop Collar
Stud Finder
Painters Tape
Edging
How To Draw + Cut an Arch
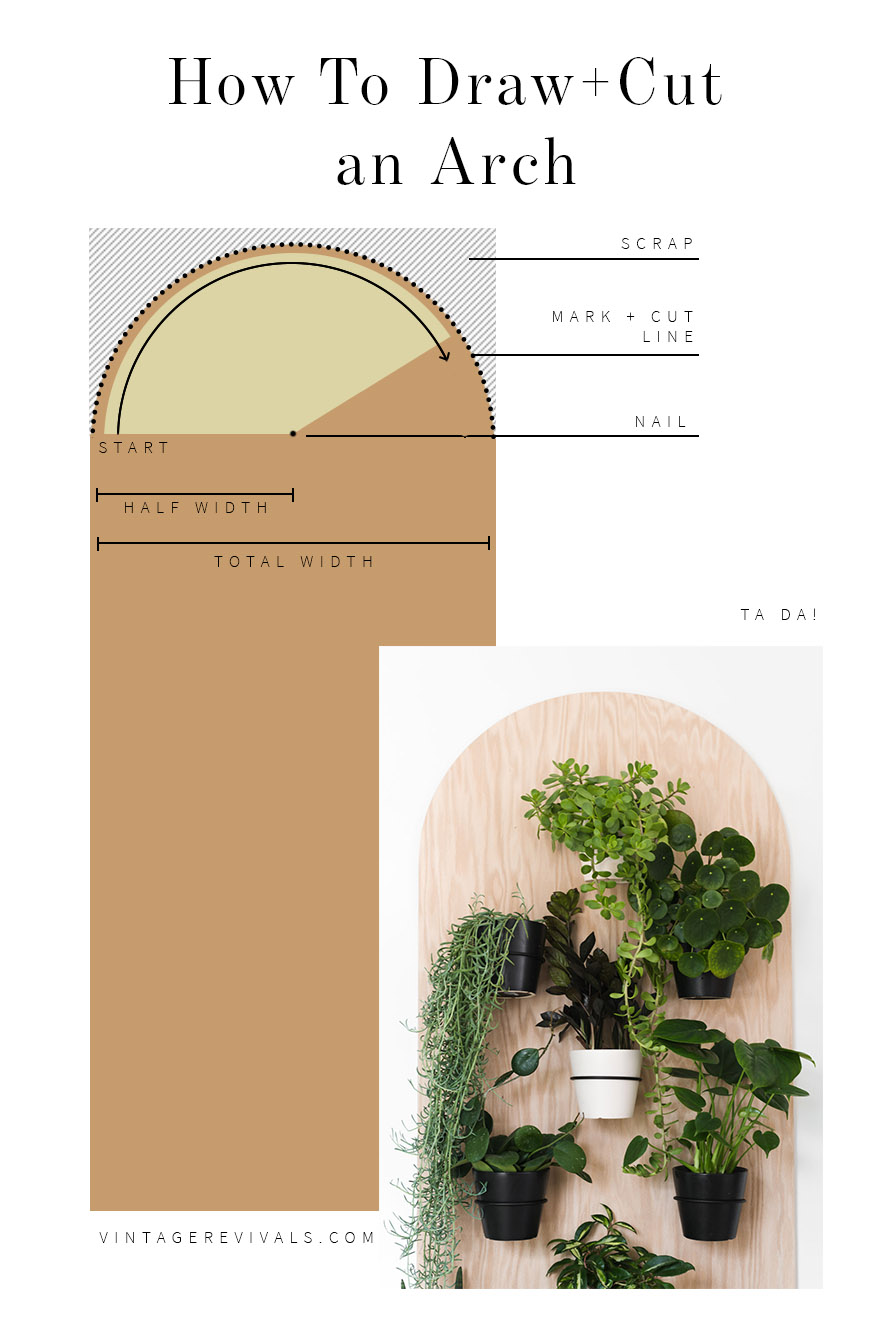
Cut wood width
To make my shape, I ripped a 3/4″ sheet of plywood long ways (or hot dog style if you remember that from elementary school!) into a 16 ” section.
Marking the Arch
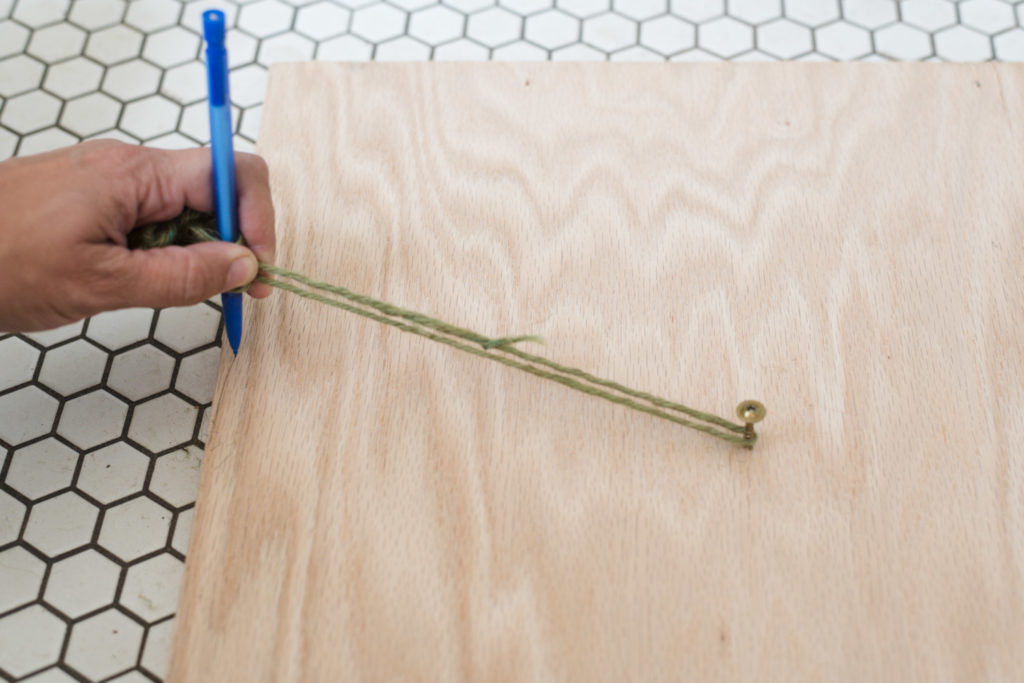
To make the arch, you are going to need a nail, string that doesnt stretch, and a pencil.
Step 1: Find the center of your width (my piece is 16″, so the center is 8″) and mark.
Step 2: Measure down (from the top) 1/2″ longer than the center measurement. This just makes it so that you can get a nice rounded top, as opposed to one that might be a little flat if you are going right against the edge. Mark.
Where these 2 points meet is where you’ll place your nail or screw. Dont put it all the way through the wood, just enough that it’s secure!
Loop the string around the nail. Not too tight, we want it to spin around the nail, not wrap around it as we’re drawing the circle!
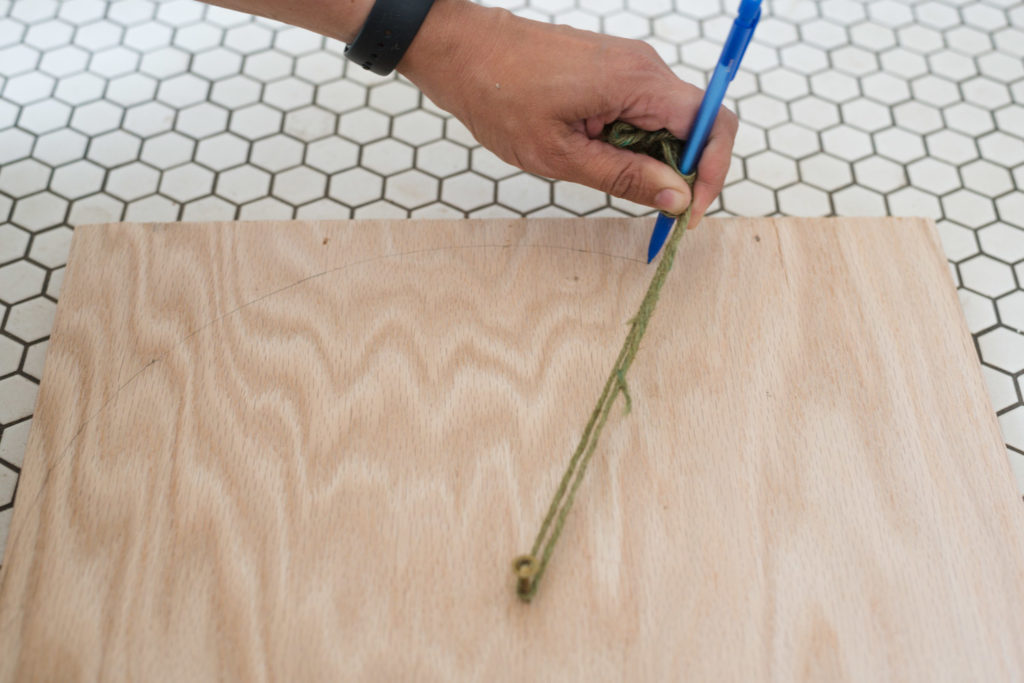
Hold your pencil vertical at the edge of your board, and tie the length of the string so that the pencil is just touching the side edge.
Holding the pencil firmly, so that the string is taut, slowly draw a 1/2 circle on your board. Make sure the string is evenly tight the whole time or you’ll end up with something wonky!
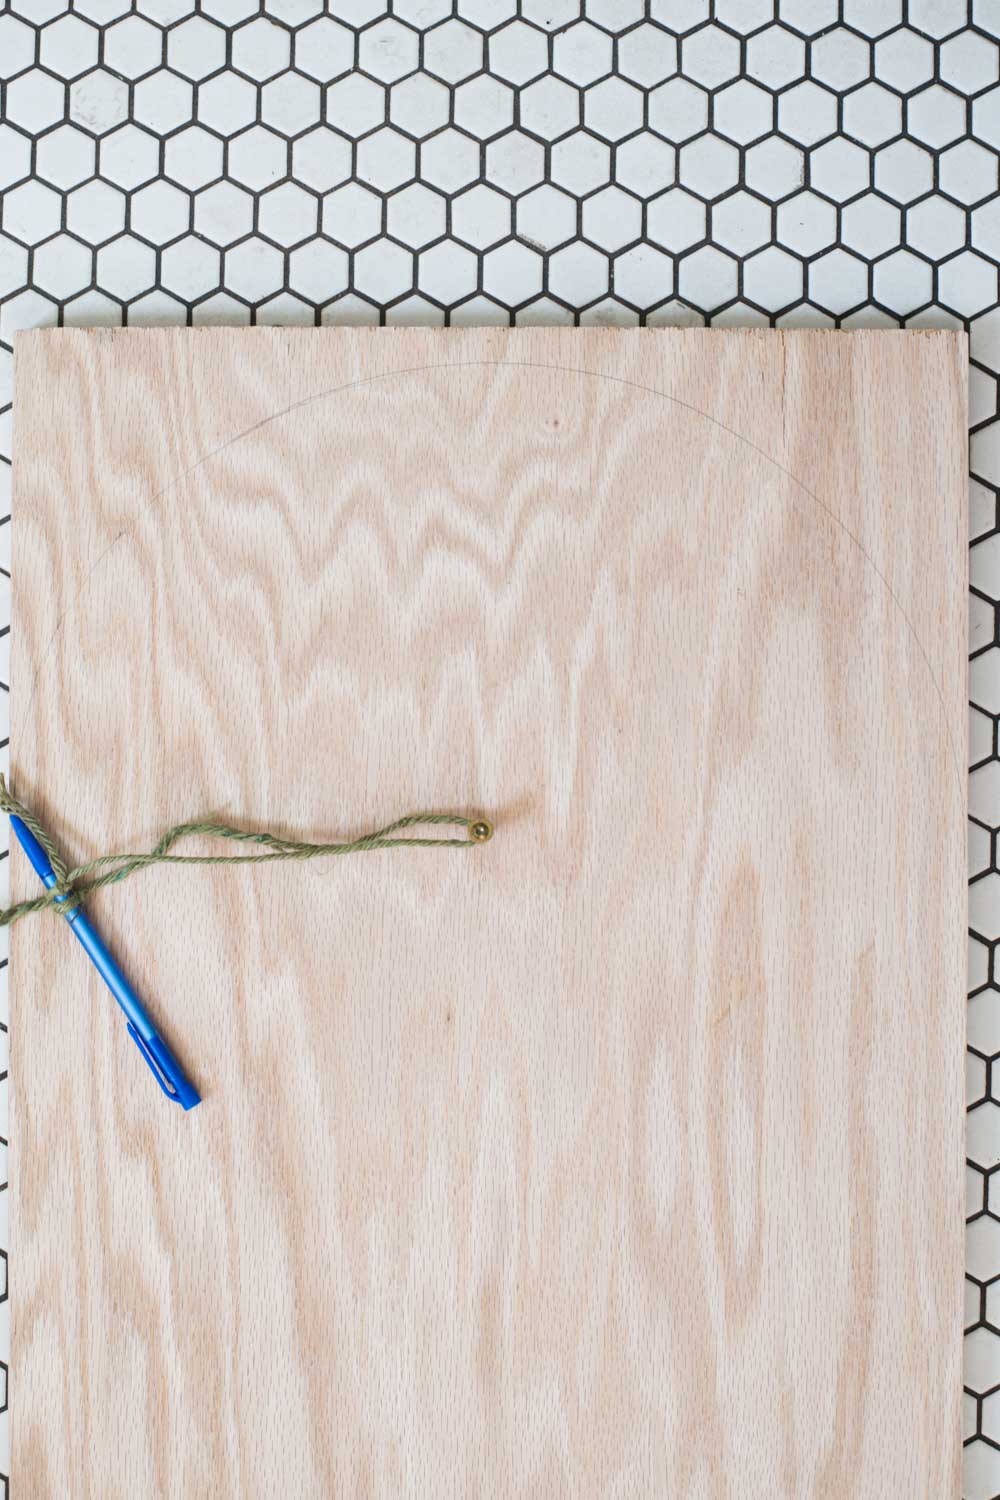
Cutting Out The Design
Using a jigsaw, cut along the mark.
A few tips for using a jigsaw:
- Pick a side! Plan to cut on either the inside, or outside of the line. I always try to cut along the outside, that way you can see where things need to be trimmed down or sanded to have your perfect shape!
- If you can, use an air compressor to blow the saw dust away as you are cutting. (This will require another human!) It makes it easier to see your pencil line!
- Go at a steady pace, not too fast (your design can get squirrely) or too slow (you’ll break chunks off of the veneer on the plywood)
- Use a sharp blade! If your jigsaw blade is too dull, you’ll rip right through the veneer and leave splinters and pieces missing!
- Clamp your wood to a sturdy surface! Nothing worse than trying to cut a traveling piece of wood!
Sand the edges of your plywood to smooth out the shape!
Adding the Magnets
Marking the Grid
We are going to start by marking a grid on the backside of the wood. You can add as many magnets as you’d like! Mine are laid out with 4 in each row, and each row is 6″ apart. It’s perfect for the way that I’m using it. If you want something with more magnets, do it girl!
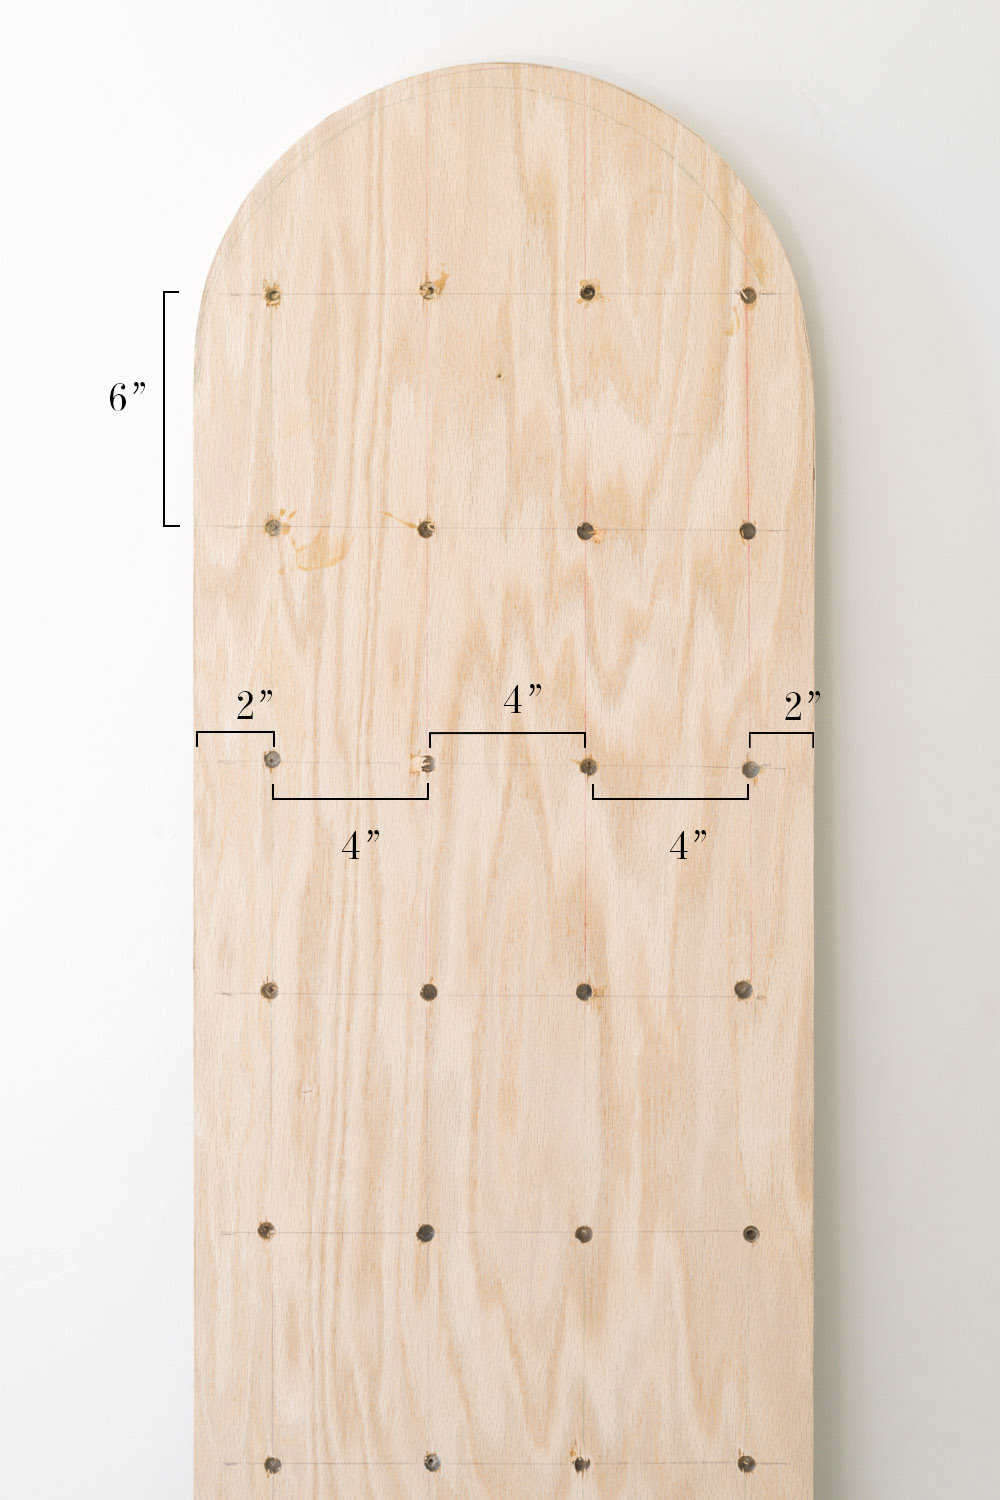
Starting at the top of your design, measure down and mark every 6″. Do this on both edges of your design. Then, using a straight edge, like a level or a scrap of wood, connect the rows.
Because our boards are 16″ wide, the math works out perfectly to have 4 magnets on each row spaced 4″ apart.
BUT!
We dont want them to be right on the edges right?!
So we’re going to split that 4″ measurement in half. Measure in 2″ and mark. Then measure 4″ for each mark after that. That will give you the correct spacing, and a 2″ buffer from the edge! Best of both worlds!!
Do this on every 3rd row, and then connect each column using the straight edge.
Where the lines intersect is where the magnets will go!
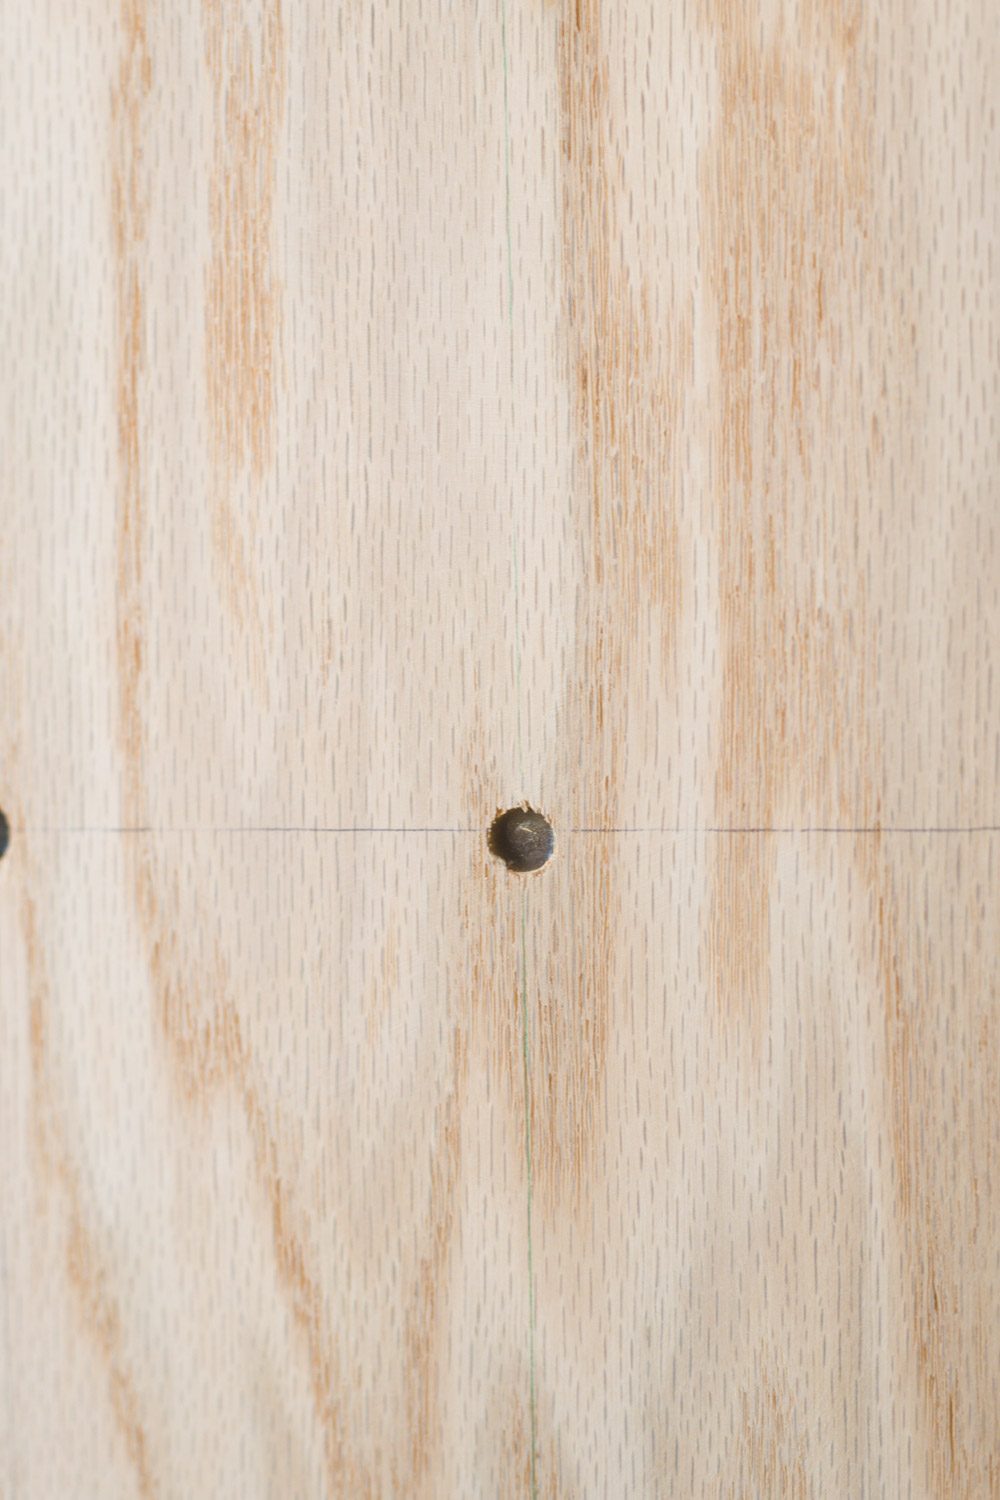
Drilling the Holes
This is the trickiest part of the whole project, drilling deep enough that the magnets will be powerful enough to hold stuff, without going too deep and accidentally drilling through your board.
If you are using the 10mm magnets linked in this post ,the drill bit size that you’ll want is 7/16. This is a super standard size and comes in every drill bit set. If you are using different size magnets, you’ll need a different size bit. Pick one that is just a tiny bit larger than the magnet size!
If you can, I HIGHLY recommend using a Drill Bit Stop Collar. It’s a ring that you put around and tighten to your drill bit. It makes it so that your bill bit can only go so far into the wood and gives you near perfect results every time.
I didnt have one on hand, so I used a piece of painters tape to mark the depth. Which worked well enough, but you have to be on high alert. There were a few holes that I drilled that were teetering on the brink of disaster. (If you use this method, I recommend putting your hand on the opposite side of the wood and drilling slowly, that way you’ll feel the bit before it breaks through to the other side.
Drill into your wood so that there is 1/8″ remaining.

Set the Magnets
This is the easy and incredibly satisfying part! Put a magnet into the hole, it should fit perfectly! Place another magnet on the opposite (face) side of your piece. This will hold the back magnet tightly against the wood.
Fill the holes with wood glue and let it dry at least overnight before removing the magnets on the face of the board. I left mine on for about 15 hours!
Add Edging (Optional!)
We added Edging to our piece to cover the exposed edge of plywood. I am normally ALL FOR the plywood layers, but for some reason I wasnt feeling it with this one. Edging is a veneer that matches the plywood. When you iron it on, it makes it look like your wood is a solid piece and a little more finished. Completely personal preference!
Hanging Your Board
You’ve got a few options when it comes to hanging your magnetic wood memo board. You can use a keyhole router bit to cut keyholes into the back. This is a great way to hang it if you are planning on moving it around, or like to change things up a lot.
If you have a spot that this is going to stay for the long and foreseeable future you can do what we did and use finish nails through the face of it.
First find your studs. This is super important, especially if you are using finish nails to hang it. (This is THE BEST stud finder I’ve ever used if you need one!) You’ll want to remember where these are. The easiest way that we do that is measuring from the corner and writing down the measurements.
Centering Your Board
Find and mark where the piece is going to hang. Ours was centered on the wall, so we found and marked the center of the board at the bottom. Then I measured and marked the center of the wall on the baseboard. When I lined the two marks up, voila! the board is centered.
Using a finish nail, nail into the stud (this is where your written down measurement comes in handy!) in the most inconspicuous place. We always do the very bottom, and the very top. Human nature wants to do it right in the middle, but you’ll see it, soooooo don’t do that. If you want, you can use wood filler to cover the nail holes.
That’s it!! You are all done friend, make sure if you complete this project that you tag #myvintagerevivals and tag me in your photo @vintagerevivals! I can’t wait to see them!!
Also, this goes without saying, but please keep the magnets out of reach of small children who might put them in their mouth. If you’ve got a little one, maybe hold off on this project until they are older. They can be harmful if swallowed!

Beautiful!! So can you put magnets holding art anywhere on the face, or just where there’s a corresponding magnet glued in?
Another vintage revivals project to love.
Love this tutorial! Stumbling upon it was a bright, happy part of my day. I’ll definitely be heading to Home Depot once the social distancing restrictions are a little less intense.
Speaking of the neodymium magnets, the link on the propagation tube magnets is not working. Do you still purchase those from Amazon?
Of course you did! I’ve been trying to figure out how to make a wooden magnetic board. I’m so glad I can always count on you for awesome DIY projects! Also those lights in your laundry are the best color. Would you please share where you found them… for all I know you just made them. Thank you for all your beautiful inspiration!
What a different, but great room enhancer. I want to change it for the seasons. I’m thinking of even putting small battery operated lights to jazz it up for Christmas. Since I get so many photo picture cards and letters; it could be a treasure trove of memories along with added greenery etc. Thank you for sharing.
What a different, but great room enhancer. I want to change it for the seasons. I’m thinking of even putting small battery operated lights to jazz it up for Christmas. Since I get so many photo picture cards and letters; it could be a treasure trove of memories along with added greenery etc. Thank you for sharing.
Such a great tutorial. I wish I would have read before I went ahead and cut my plywood and just did my best from your highlight 🤦🏼♀️. The arch was tough but I’m confident now after reading this I could totally do so much better so thank you. I’m doing the plant wall version but I did think this was very helpful.
Such a great tutorial. I wish I would have read before I went ahead and cut my plywood and just did my best from your highlight Helpful post.