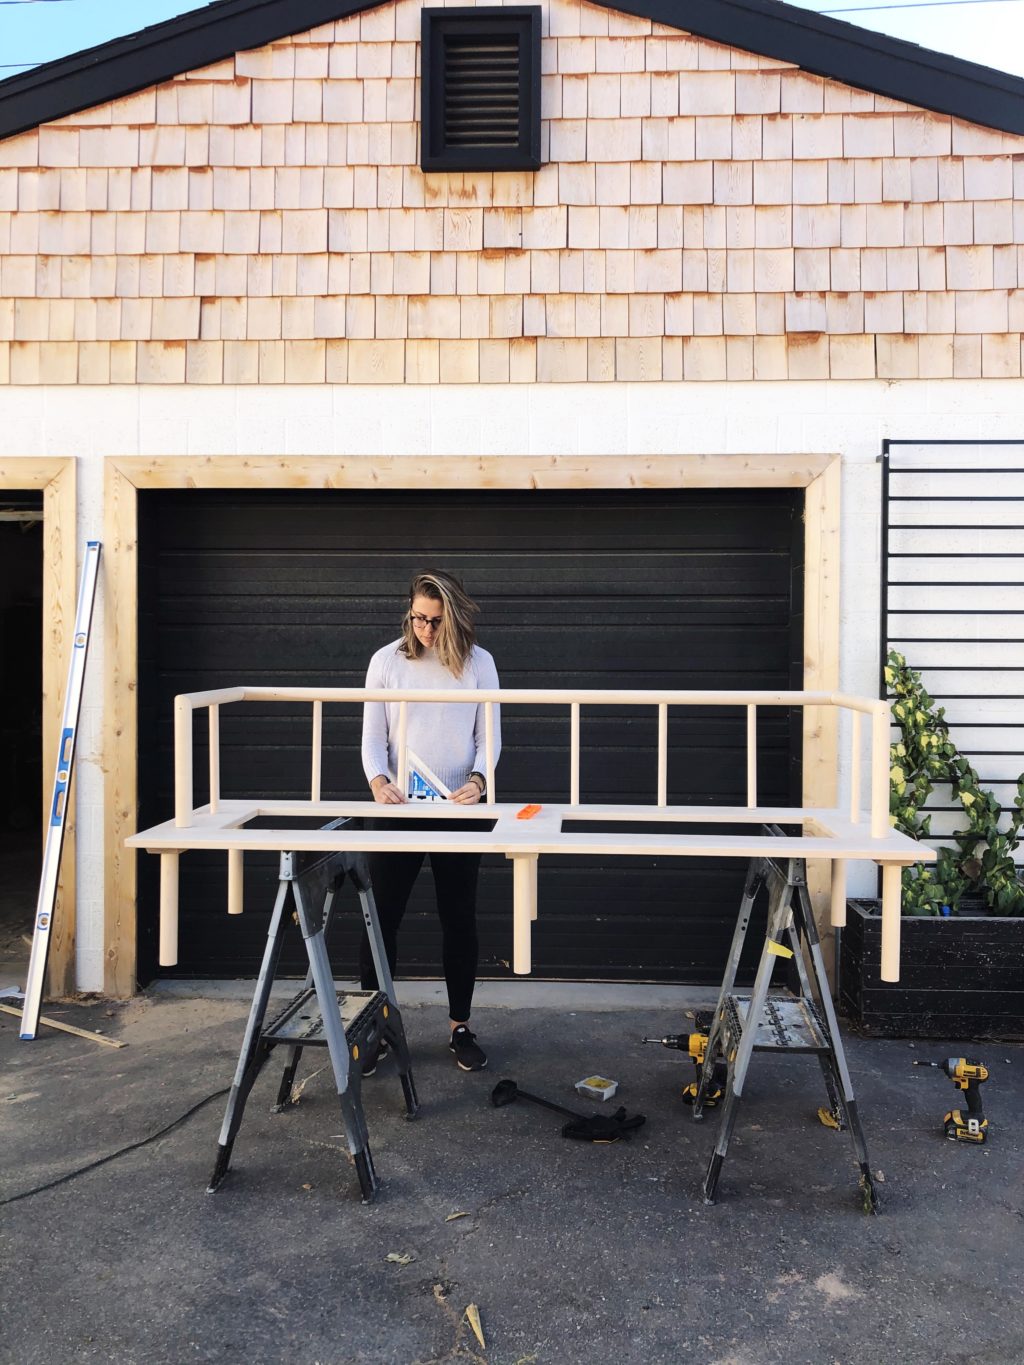
There are a lot of things that I’ve looked at and thought “Hm. I could make that.” right?! Bookshelves, Art, tables, even a rug (OMG remember that?!) But one project that I havent had the guts to tackle is a couch. Not a bench, like a full on couch. I was a weenie, but guess what!? WE BUILT A COUCH!! And it was so much less painful than I thought it would be! Do you want to build one too? Of course you do! Let’s get into it!
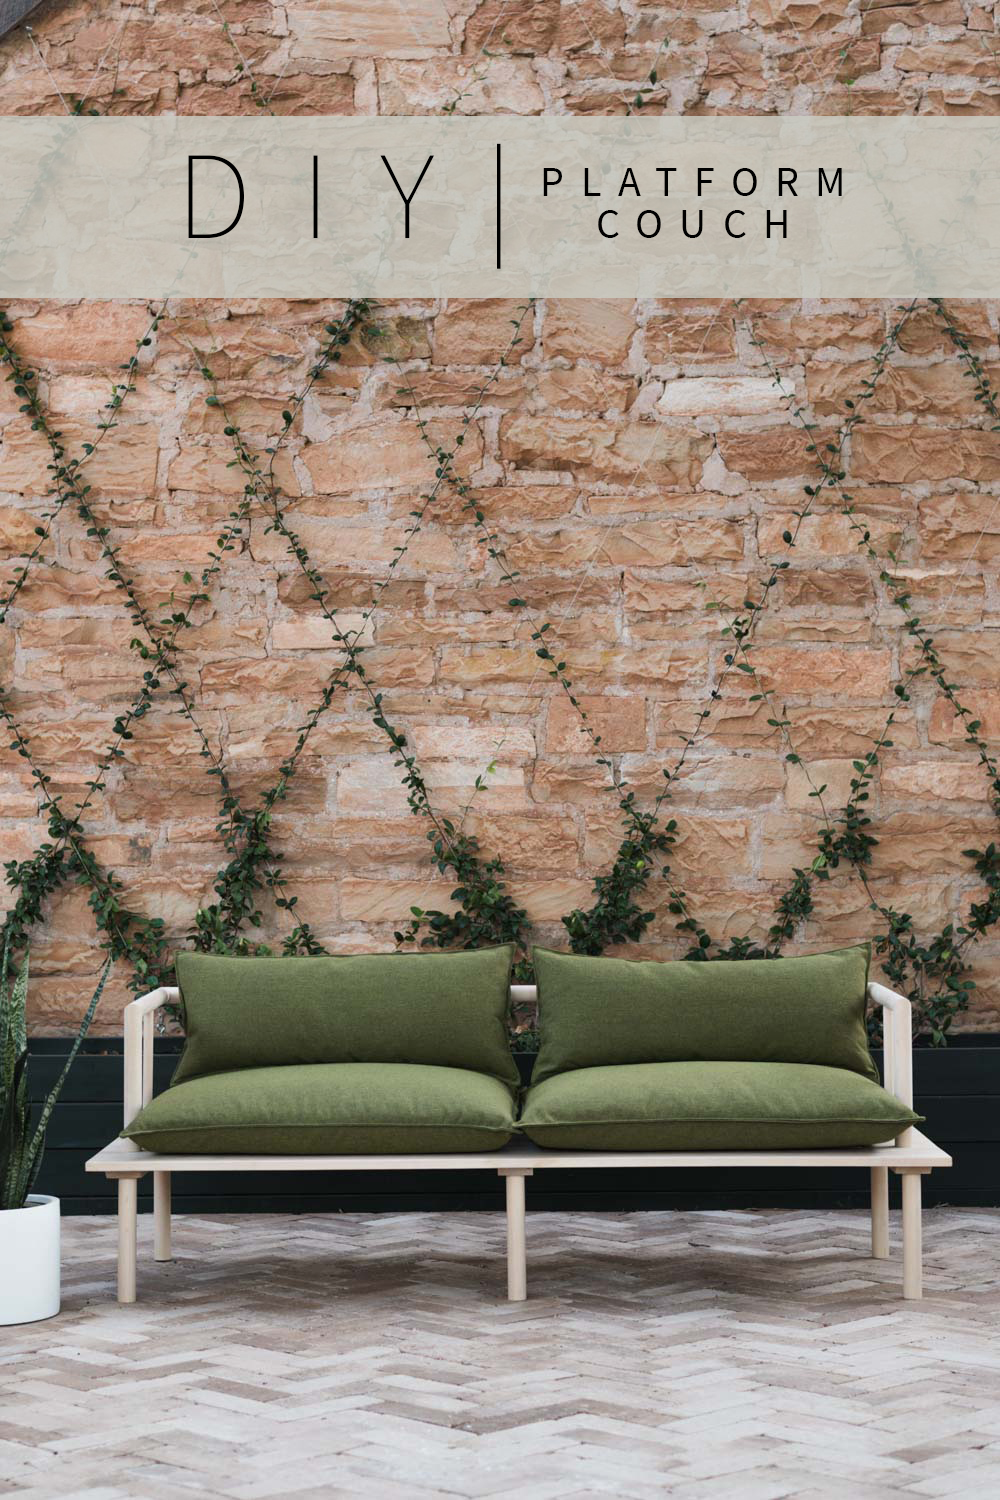
For years I’ve wanted to build a couch, I’ve saved tons of inspiration over the years and they always have the same thing in common, a platform base. When I was super into Mid Century design a few years ago I wanted to do one with little peg legs and even collected a few legs that are tucked away in a storage unit. But when the Merc came into my life my taste shifted into something more traditional+modern, and a little boho. So naturally my dream couch build also shifted. When Sunbrella reached out about partnering on an outdoor project I knew my time for an epic couch build had arrived!
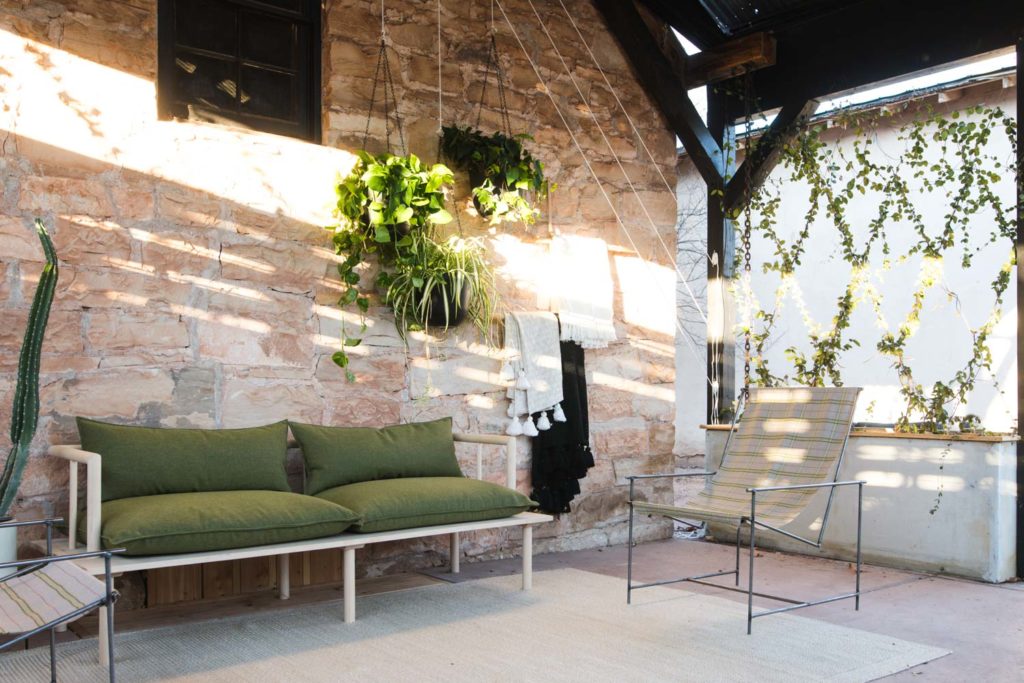
Here’s the thing about outdoor furniture, it has to be durable. And (of course) furniture should be beautiful no matter where it is. So I set myself on a mission to show just how far we can take it. Now that the build is over I’m stuck with a dilemma, I love the couch SO MUCH that I want it somewhere that I can use it day in and day out, like in my living room, or as my bed. I guess it’s a good thing that Sunbrella fabric is just as perfect indoors as it is out. What do you think?! Should we keep it outside or bring it in!?
First things first, you’ll need your materials. For this couch we used maple. Now, before the internet police get involved, let me be the first to acknowledge that I am fully aware that maple isnt the most idea wood for outdoor furniture. Our couch isnt going to be outside year round and it’s going to live under our covered patio. If you are planning on keeping yours outside year round, you’ll want to use a more weather resistant wood like Cedar, Redwood, or Teak. If you are building this for indoor use, a hardwood like oak or maple is what you’ll want to use!
SHOPPING LIST:
- 3 – 1x8x8 boards
- 3 – 1 ¾” diameter dowel x 8’
- 2 – 1” diameter dowel x 8’
- 1 – 1x4x8 board
- 1 – 1x2x8 board
CUT LIST:
- 2 – 1×8 @ 82” (frame front and back)
- 3 – 1×8 @ 12 ½” (frame cross supports)
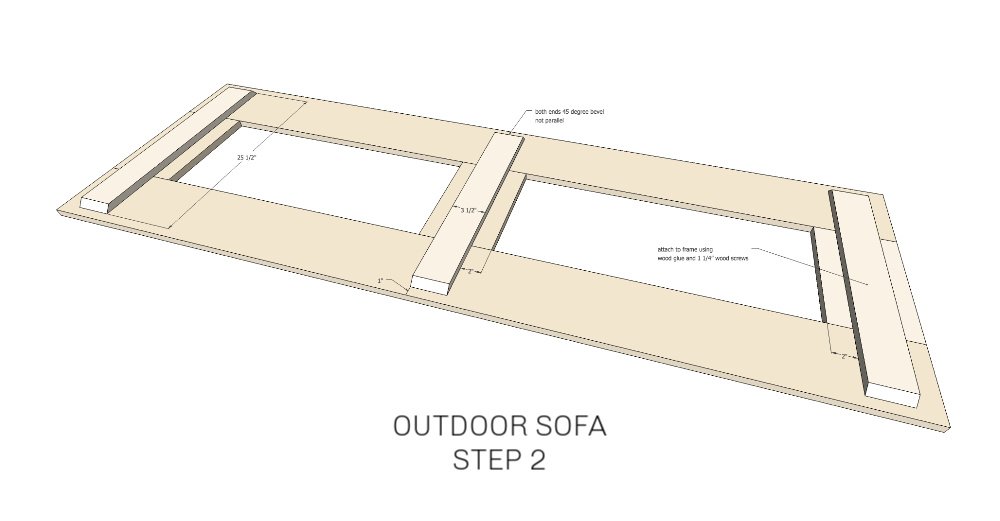
- 3 – 1×4 @ 25 ½” – both ends 45 degree bevel not parallel (frame / leg supports)
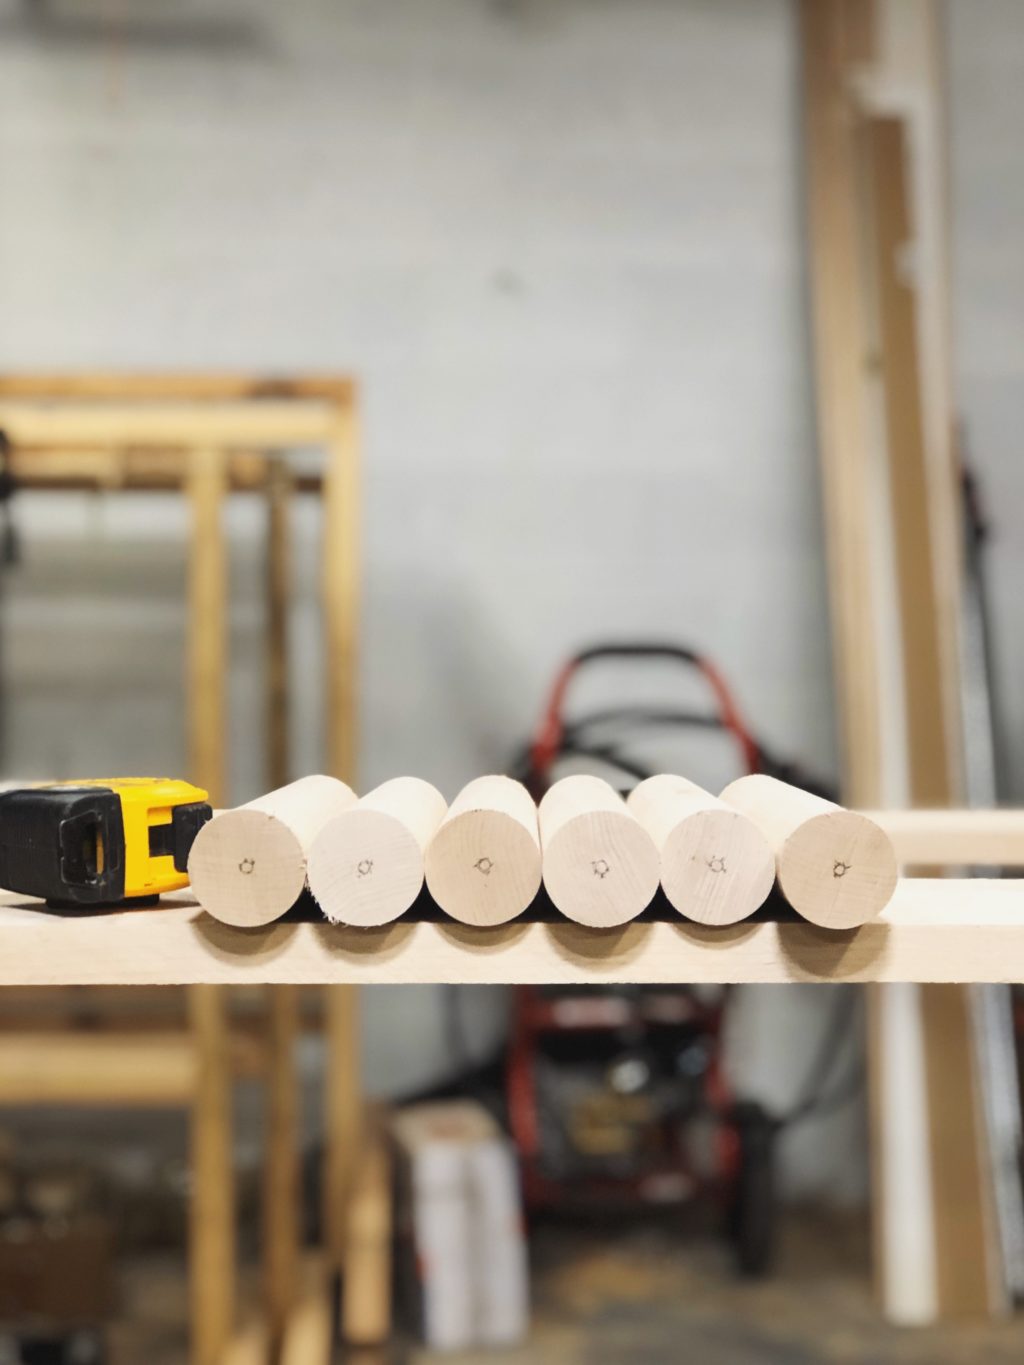
- 6 – 1 ¾” dowel @ 12 ¾” (legs)
- 2 – 1 ¾” dowel @ 15” – one end 45 degree miter (arm supports)
- 2 – 1 ¾” dowel @ 19 1/8” – one end 45 degree miter, one end 45 bevel (arms)
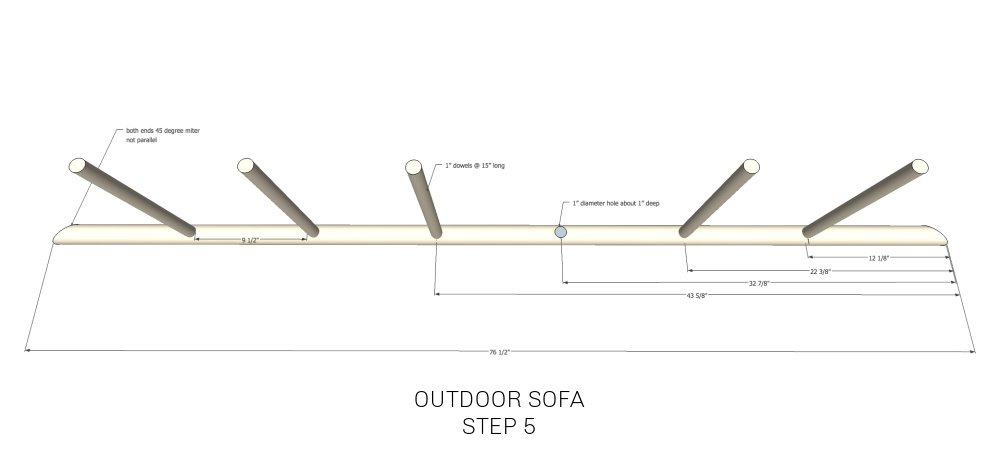
- 1 – 1 ¾” dowel @ 76 ½” – both ends 45 degree miter not parallel (back support)
- 8 – 1” dowel @ 15” (vertical dowels)
- 4 – 1×2 @ 29 ½” (webbing frame long sides)
- 4 – 1×2 @ 9 ¼” (wedding frame short sides)
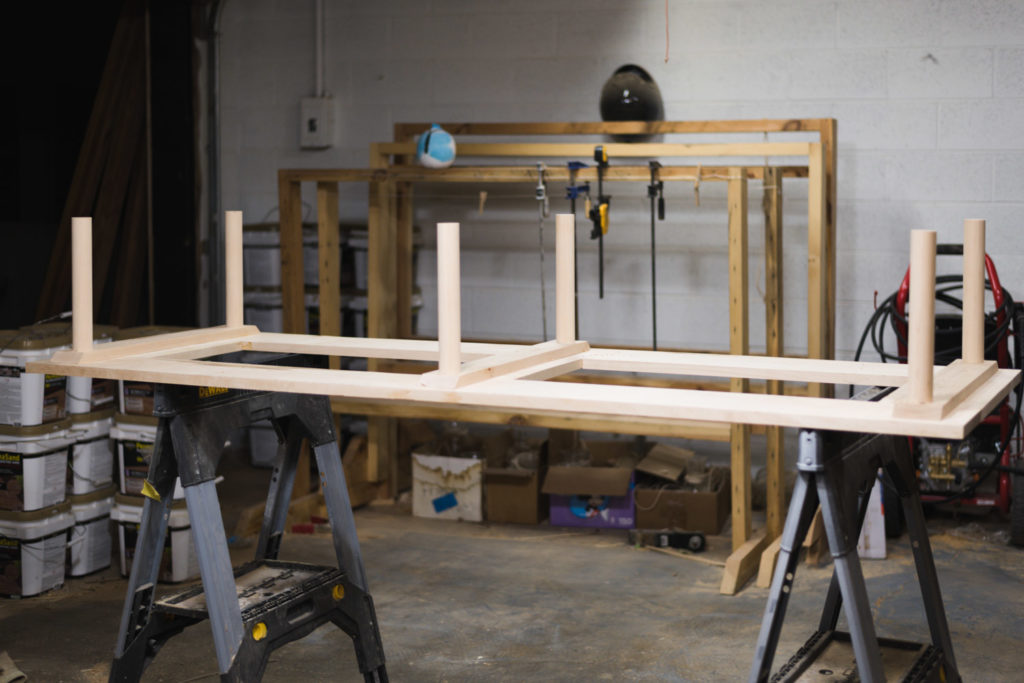
Step 1: Create the frame
Using wood glue and dowel joinery, build the frame of the couch.
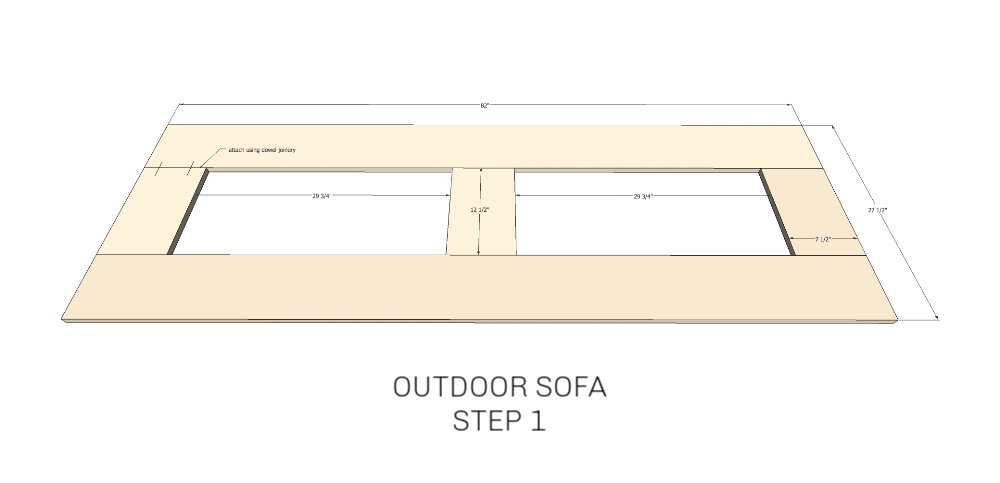
Using dowels to join the wood together makes it look beautiful and adds strength.
Start by making a template for your holes (you’ll want them spaced about 4 inches apart) Use this template to drill holes everywhere that the boards will be connecting.
Step 2: Attach Supports to the Frame
Using wood glue and 1 1/4″ screws, attach the support pieces to the underside of the frame. This not only adds support, but gives you the perfect spot to secure the legs!
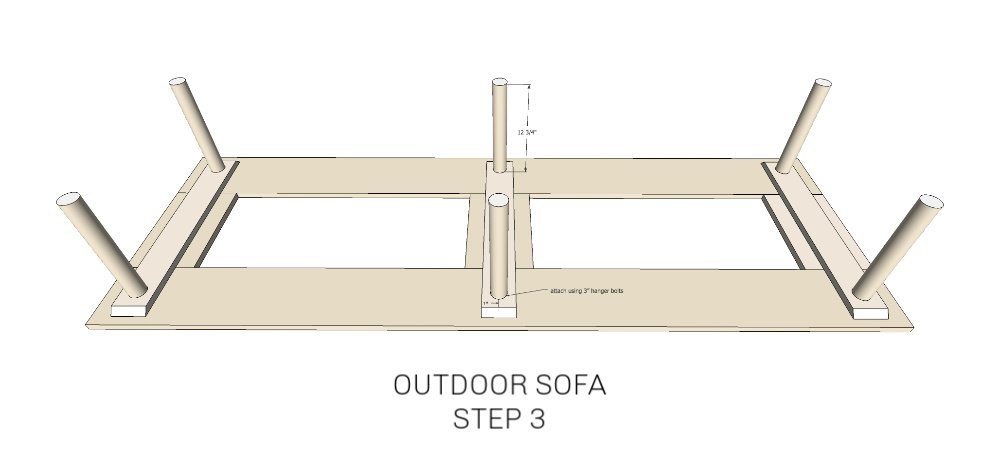
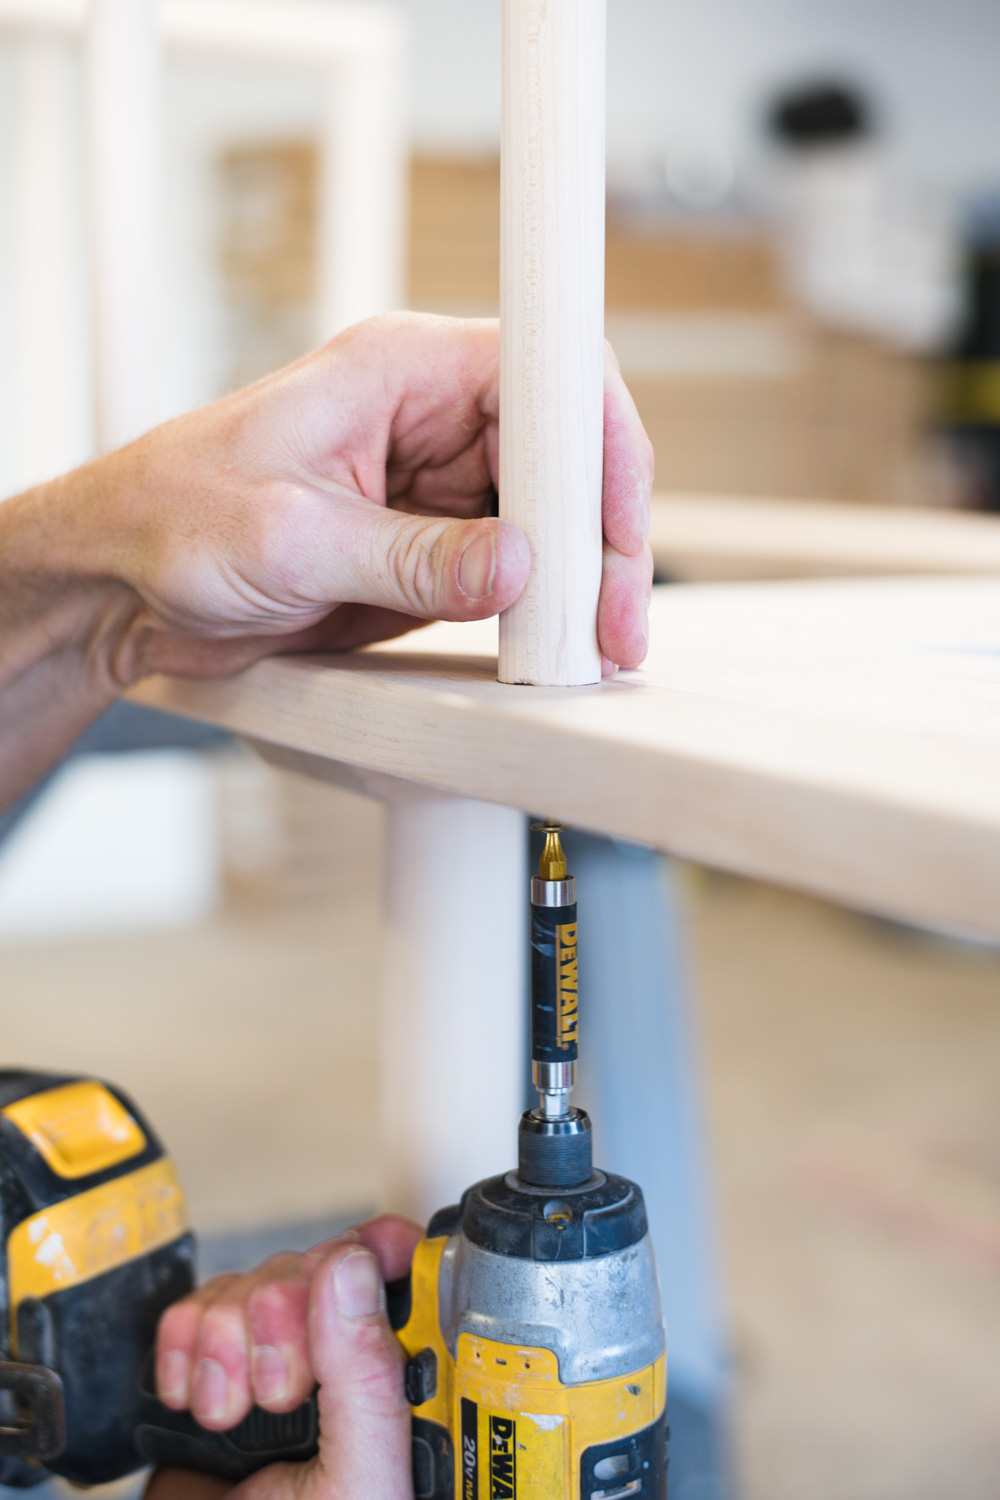
Step 3: Attach Legs
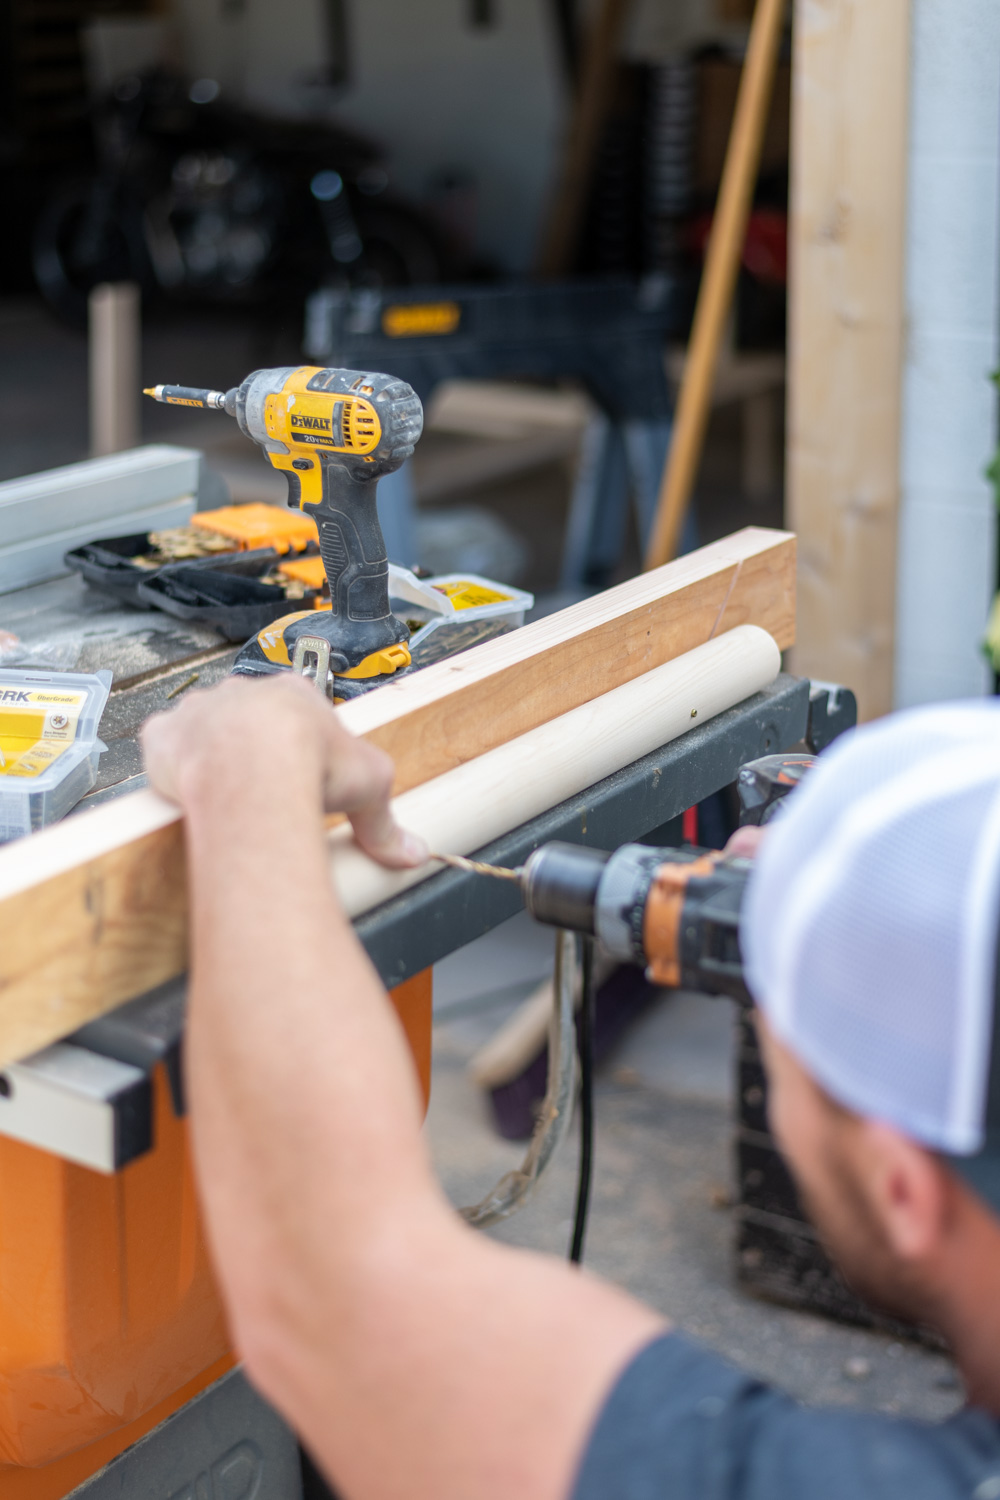
You are going to attach the legs using a 3″ hanger bolt. A hanger bolt is a double ended screw. You’ll pre-drill the hole into your frame supports, and into the dowel leg and then screw them together!
How to mark the center of a dowel HACK!
You are going to be predrilling a lot into your dowels and you’ll need to find the dead center to do it correctly. There is a super easy way to do it!
Grab your tape measure, put it over the top of the dowel and measure the diameter.
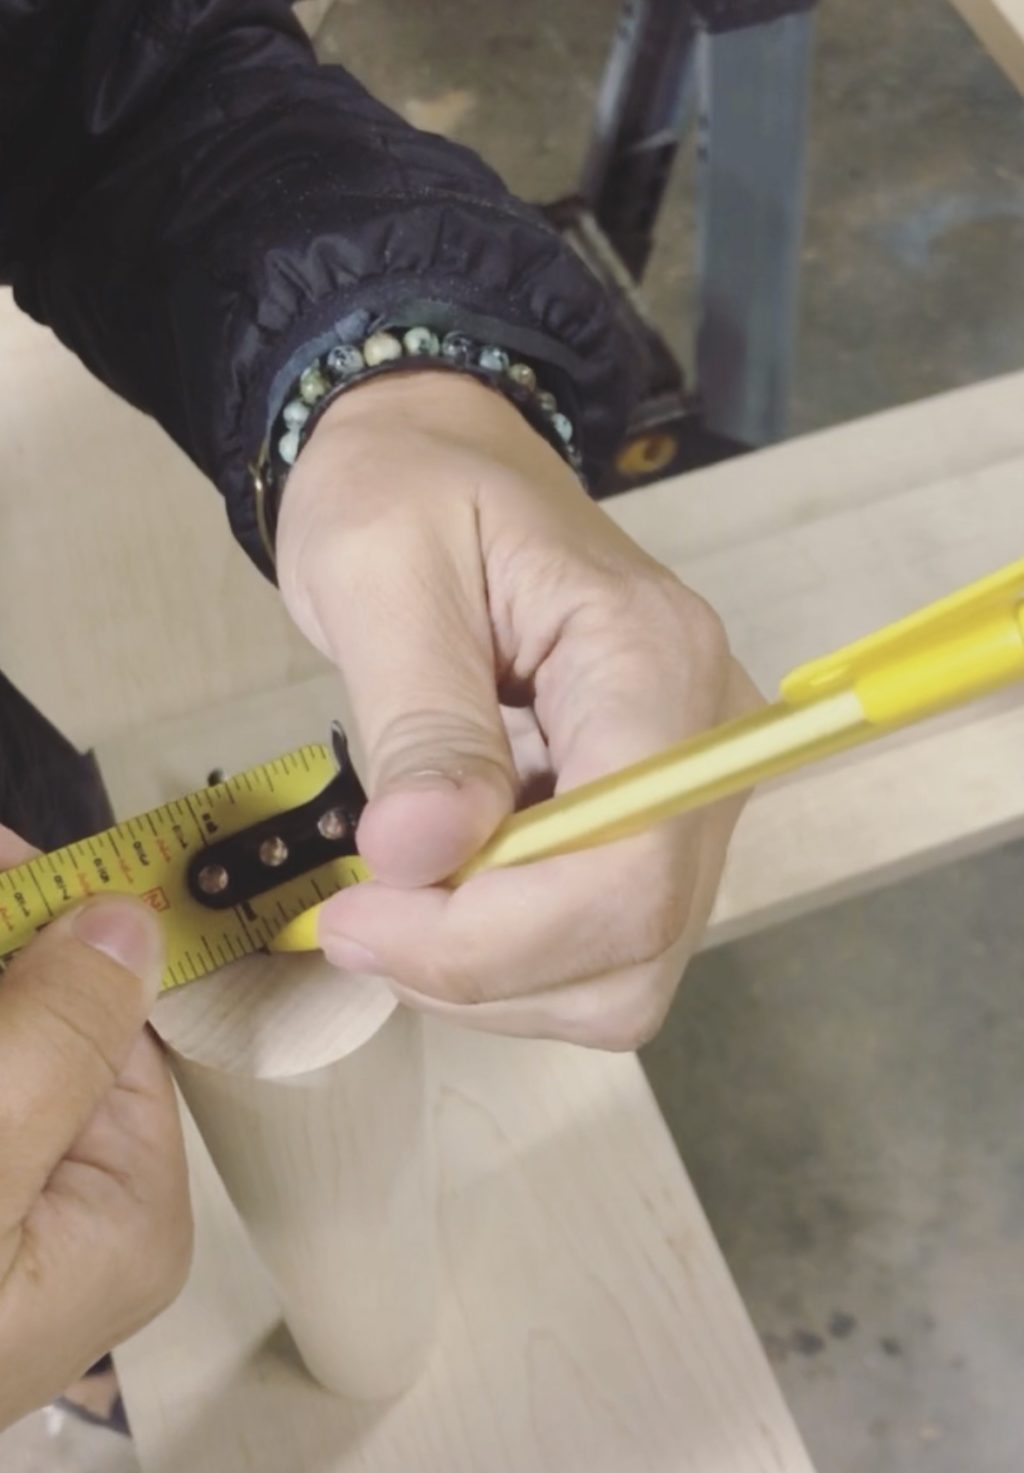
With your tape still in place, mark 1/16″ less than half on the dowel. Rotate the dowel slightly and mark again at 1/16″ less than half. Keep rotating and marking until you are back at the beginning. (I usually rotate it 5 times) Take the tape measure off, connect the dots, and VOILA! A perfect mark of exactly where you need to drill!
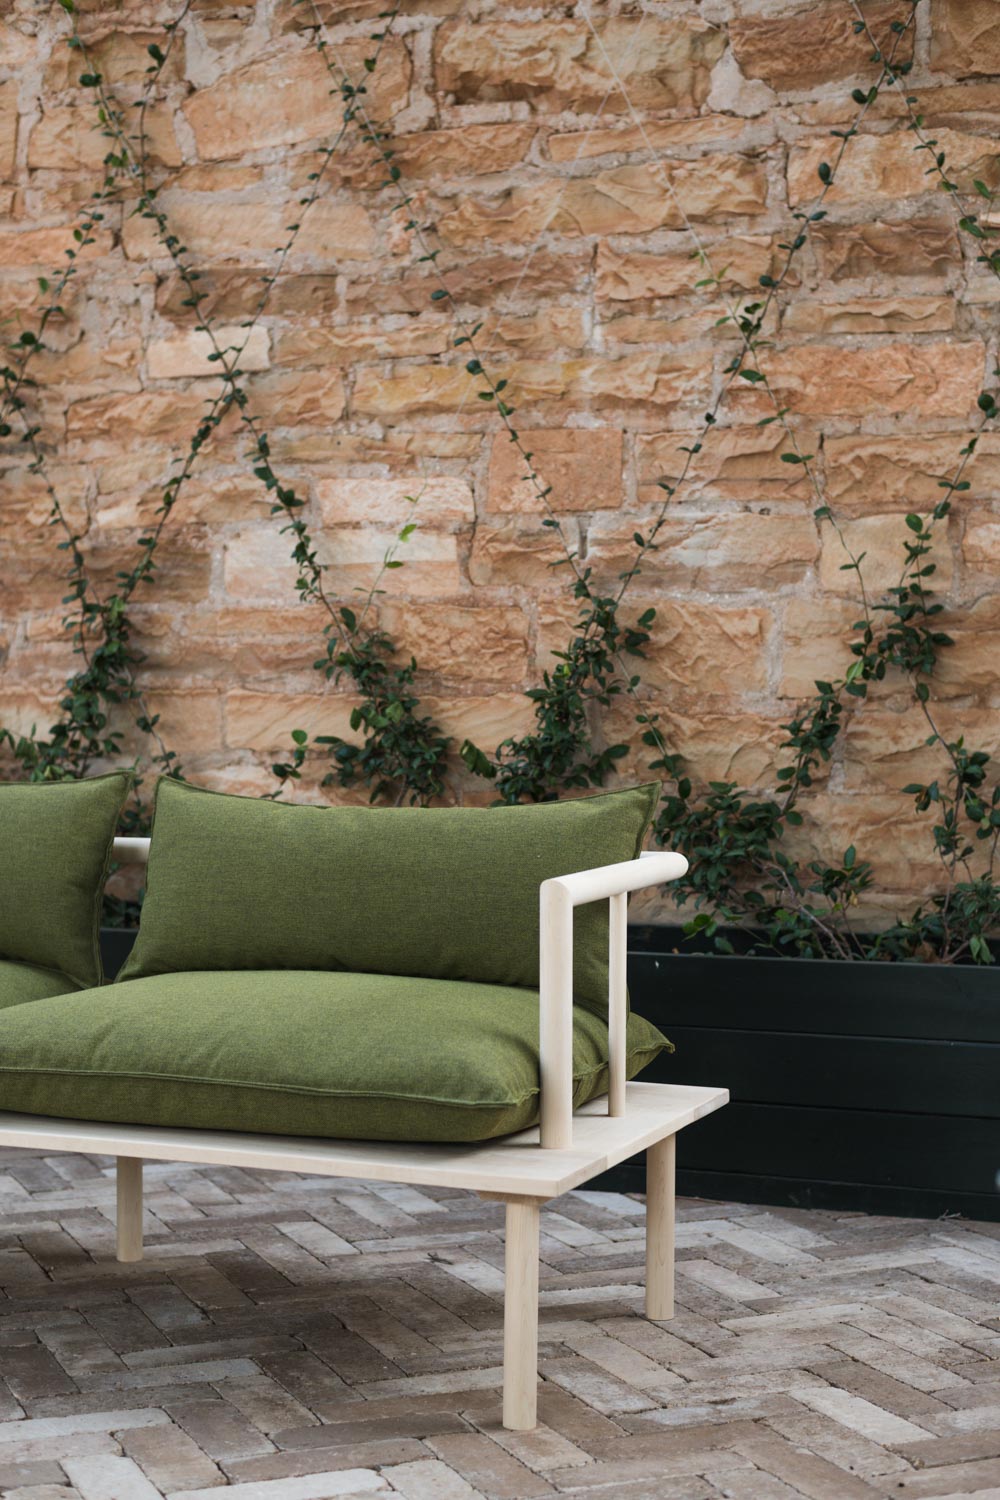
Step 4: Assemble the Arms
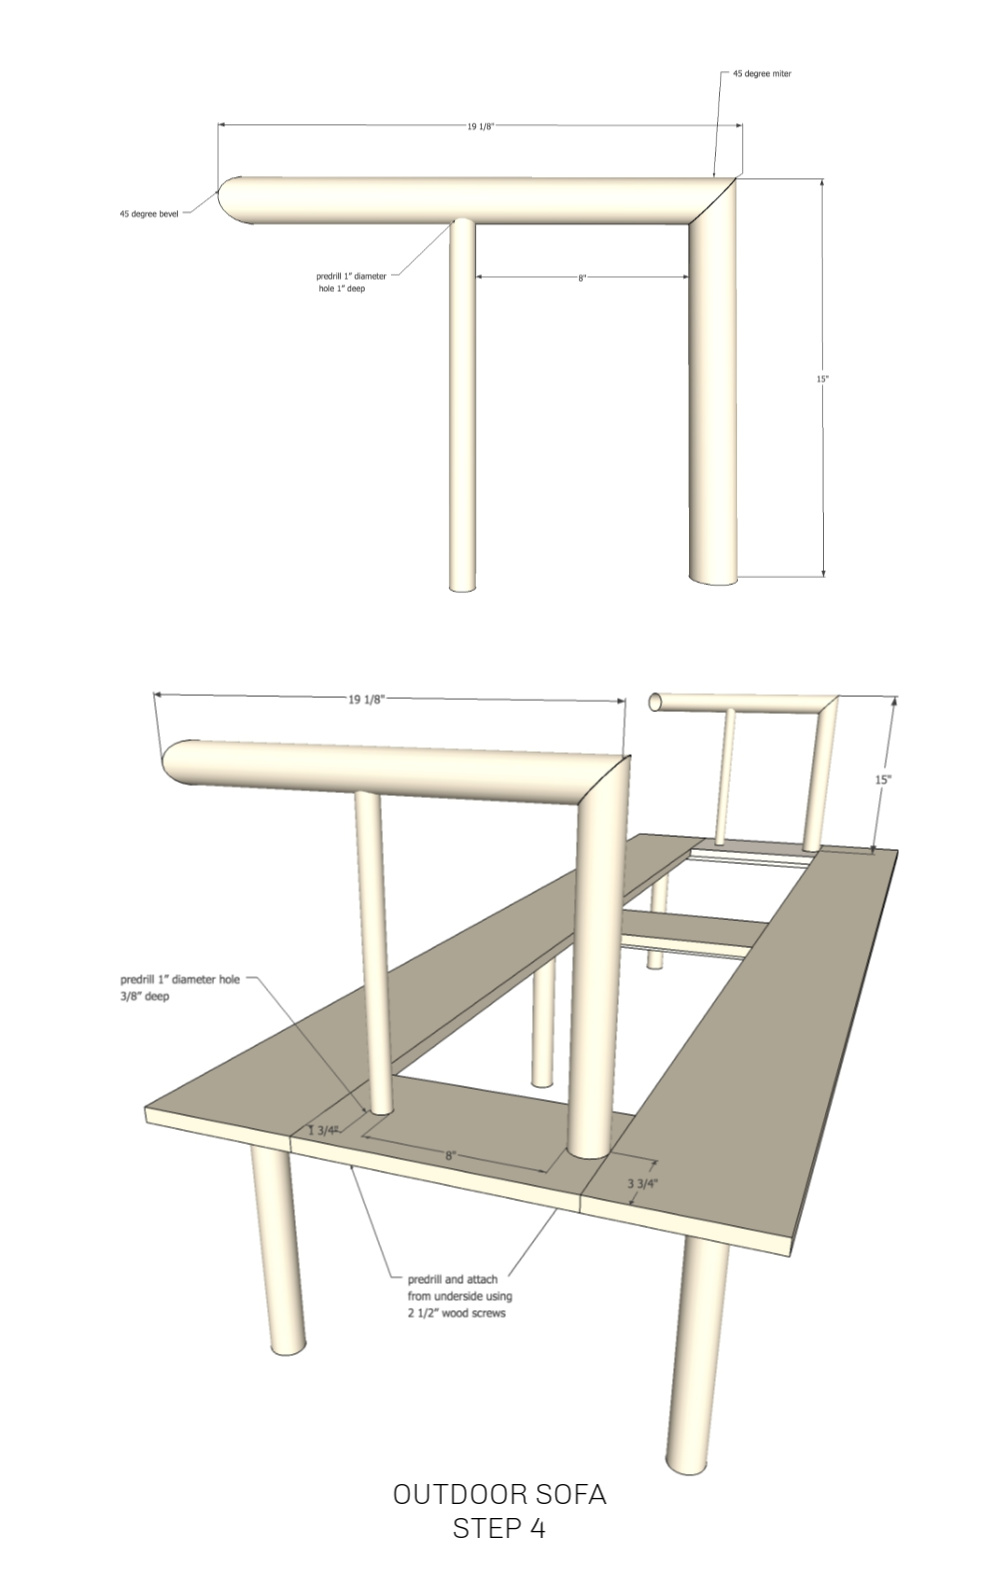
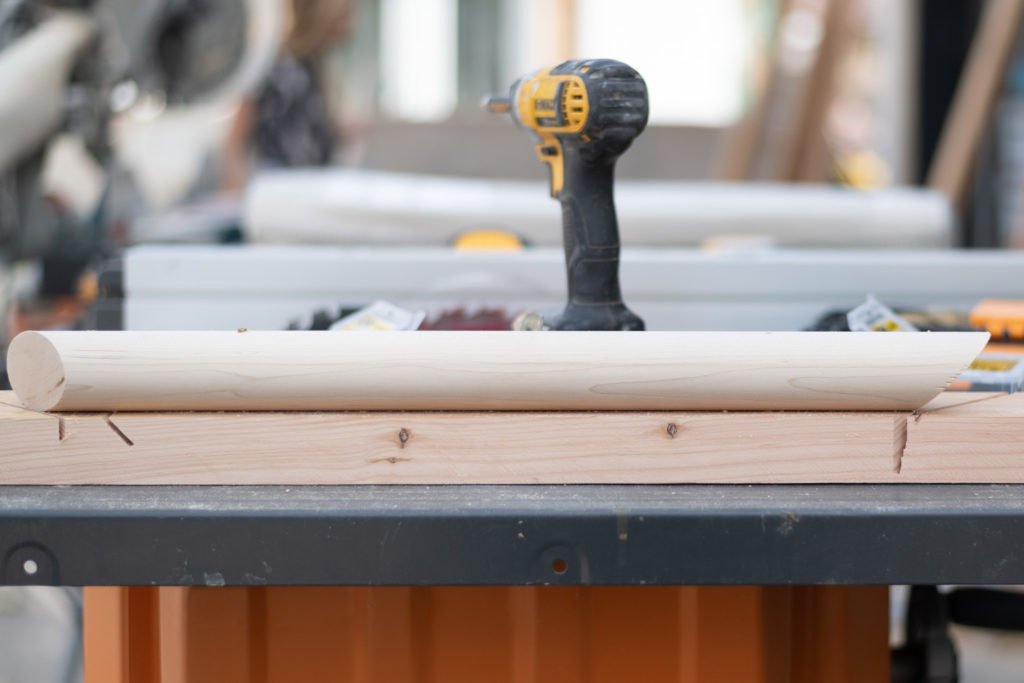
The trickiest part of this step is cutting the 2 different angles into either end of the large dowel. You don’t want the dowel to rotate AT ALL while you are cutting these angles. We attached the dowel to a support board while we made the cuts so that we knew it wouldn’t move. You’ll have to fill the holes, but it is SO WORTH IT.
Attach the arms to the frame from the underside using 2 1/2″ wood screws.
Step 5: Add the Vertical Dowels to the Back Support Dowel
I feel like I’m saying dowel a lot.
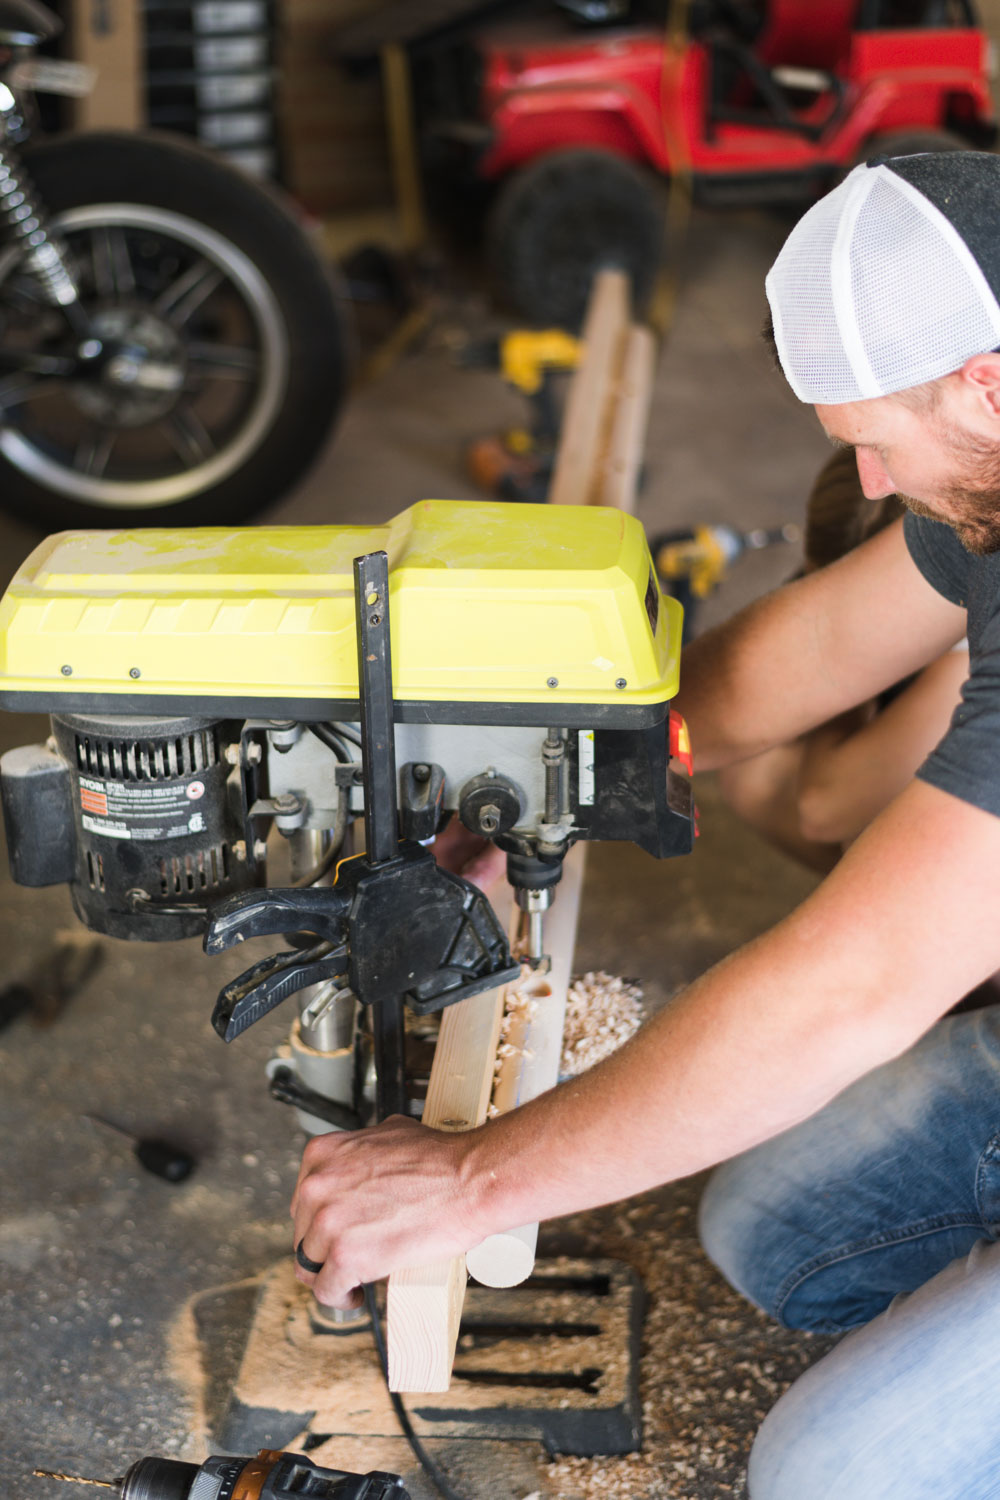
The easiest way to make sure your 1″ dowels are lined up perfectly is to use a chalk line. Snap your line (don’t worry! It will come off the wood!) and mark the spacing after. See the blue line in the picture below? We also temporarily attached this dowel to a 2×4 so that it didnt shift or rotate.
We used a drill press to create our 1″ holes. If you dont have access to one, you can absolutely use your drill + forstner drill bit but be EXTRA aware that your drill needs to be lined up and straight so that you arent drilling a wonky hole.
We didnt screw these dowels into place, we opted to just use wood glue because it gave us a little wiggle room to make sure that they were perfectly lined up when we were attaching them to the base. Wait until your base is prepped and ready to go before you add the glue, we dont want to add it too early and risk setting before we’re ready.
Step 6: Attach to the frame
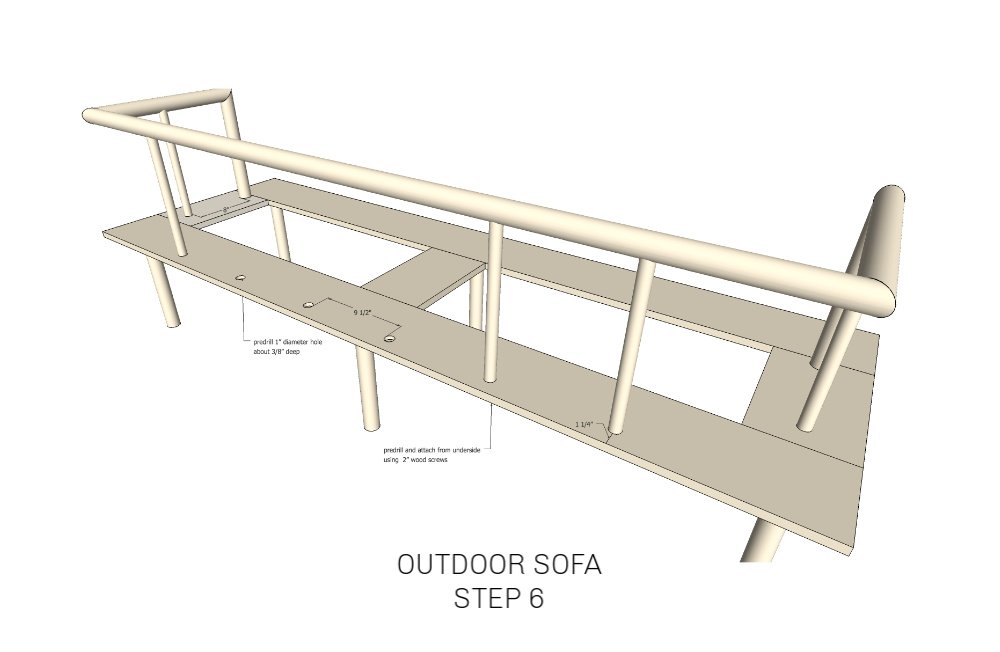
Predrill 1” diameter hole at 3/8” deep for each vertical dowel. This will give your dowel something to rest in.
Secure back top to arms using 1 ½” wood screws.
Then secure from underside using 2” wood screws.
Your couch frame is almost done!!
Step 7: Add Webbing
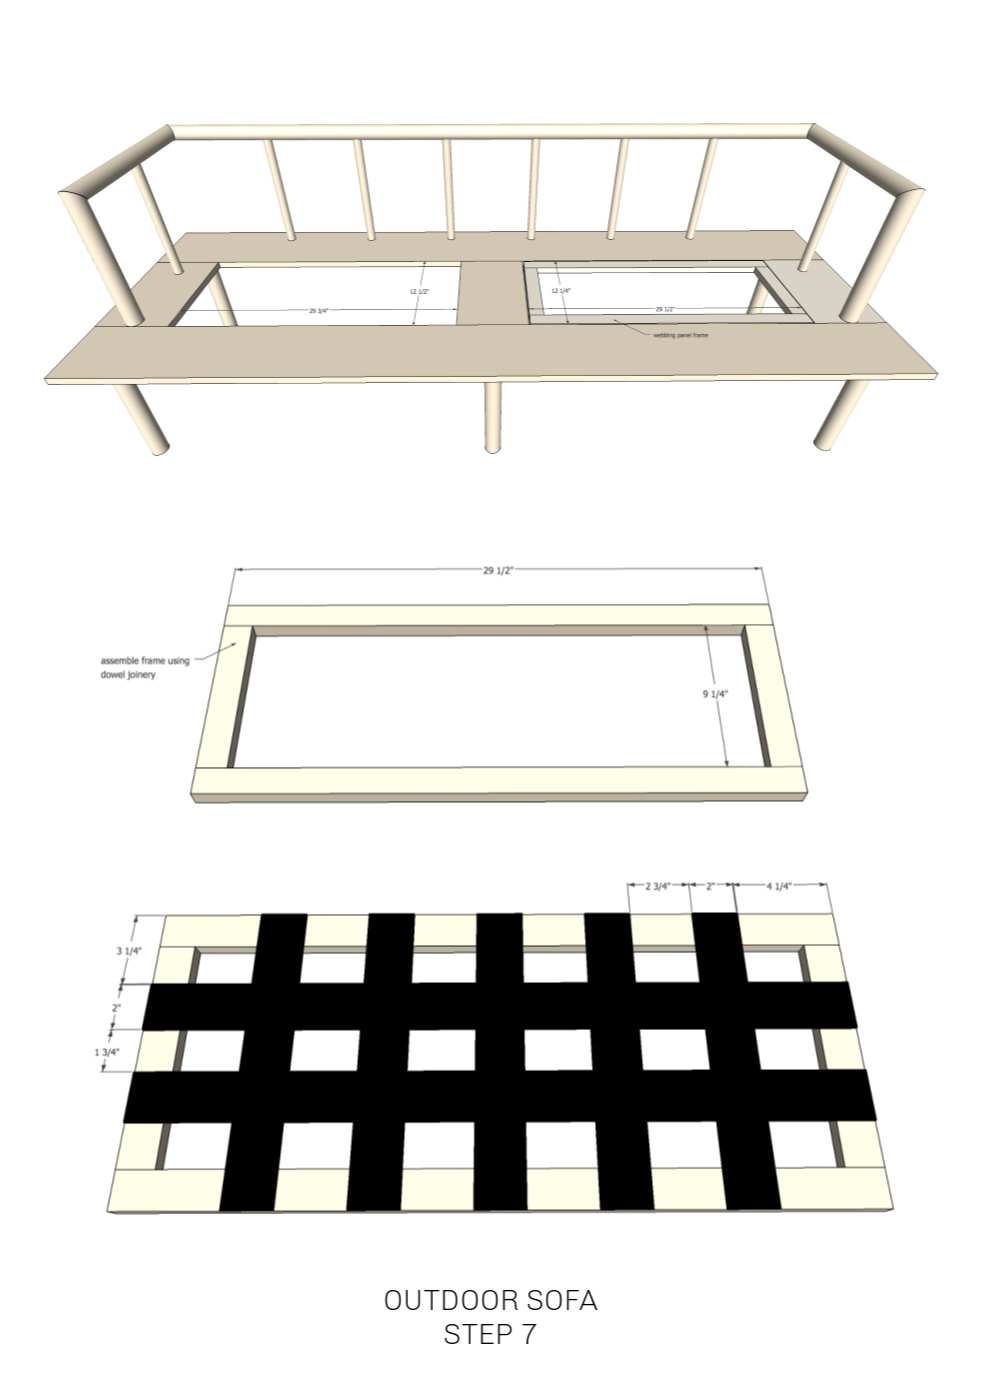
One of the most frequent questions that I got while building this couch was “why dont you just make the base solid?” Which is such a great question right?? Let me tell you! Because this couch will be used outside, the last thing that we want is to have standing water on it. If we build it out of a solid base, picture what would happen when it rains. The water will sit on top of the wood, stuck between the frame and the cushions. It will damage the wood, and also the cushions. We need ventilation to keep things damage/mold/pest free! But obviously we cant just have giant holes right where your bum goes. Which is where webbing steps in and becomes the hero of our story.
To build your webbing inserts, you want to build a frame that is the same size as your hole minus a thickness of webbing on each side.
You want the webbing to have a double thickness where you attach it.
We are wrapping the webbing around the outside of the frame, so start by lining the cut edge on your frame with the length of the webbing in the center. Staple it in place.
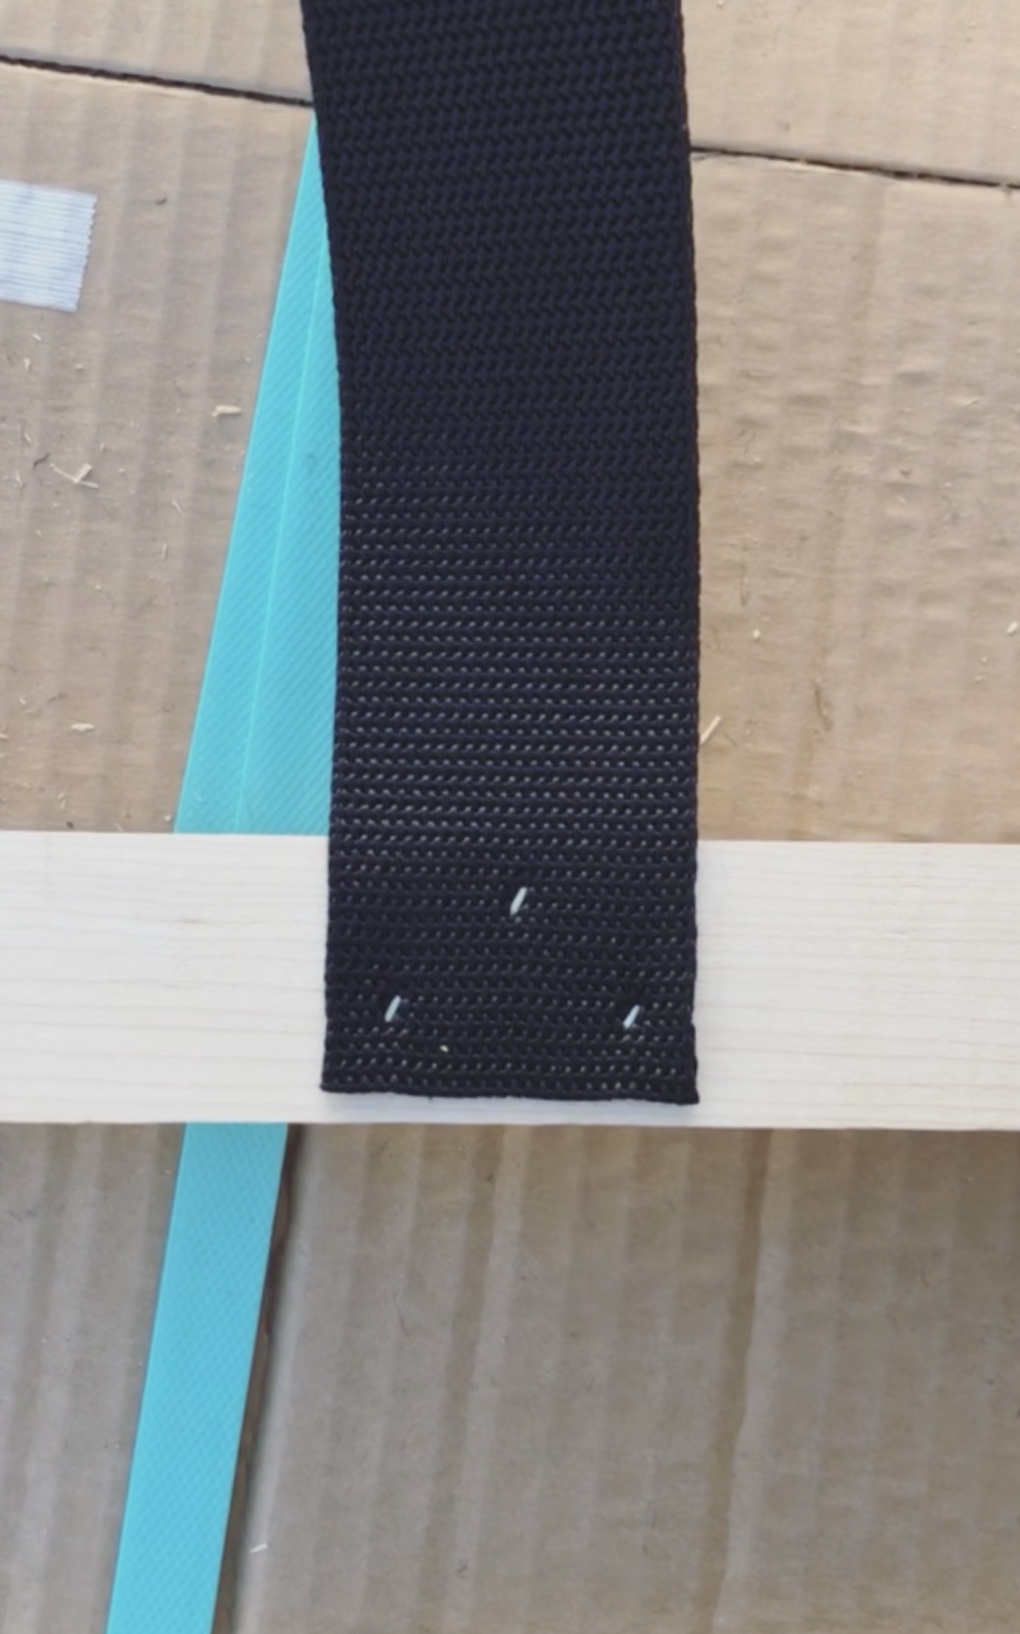
Fold the webbing over and staple it again.
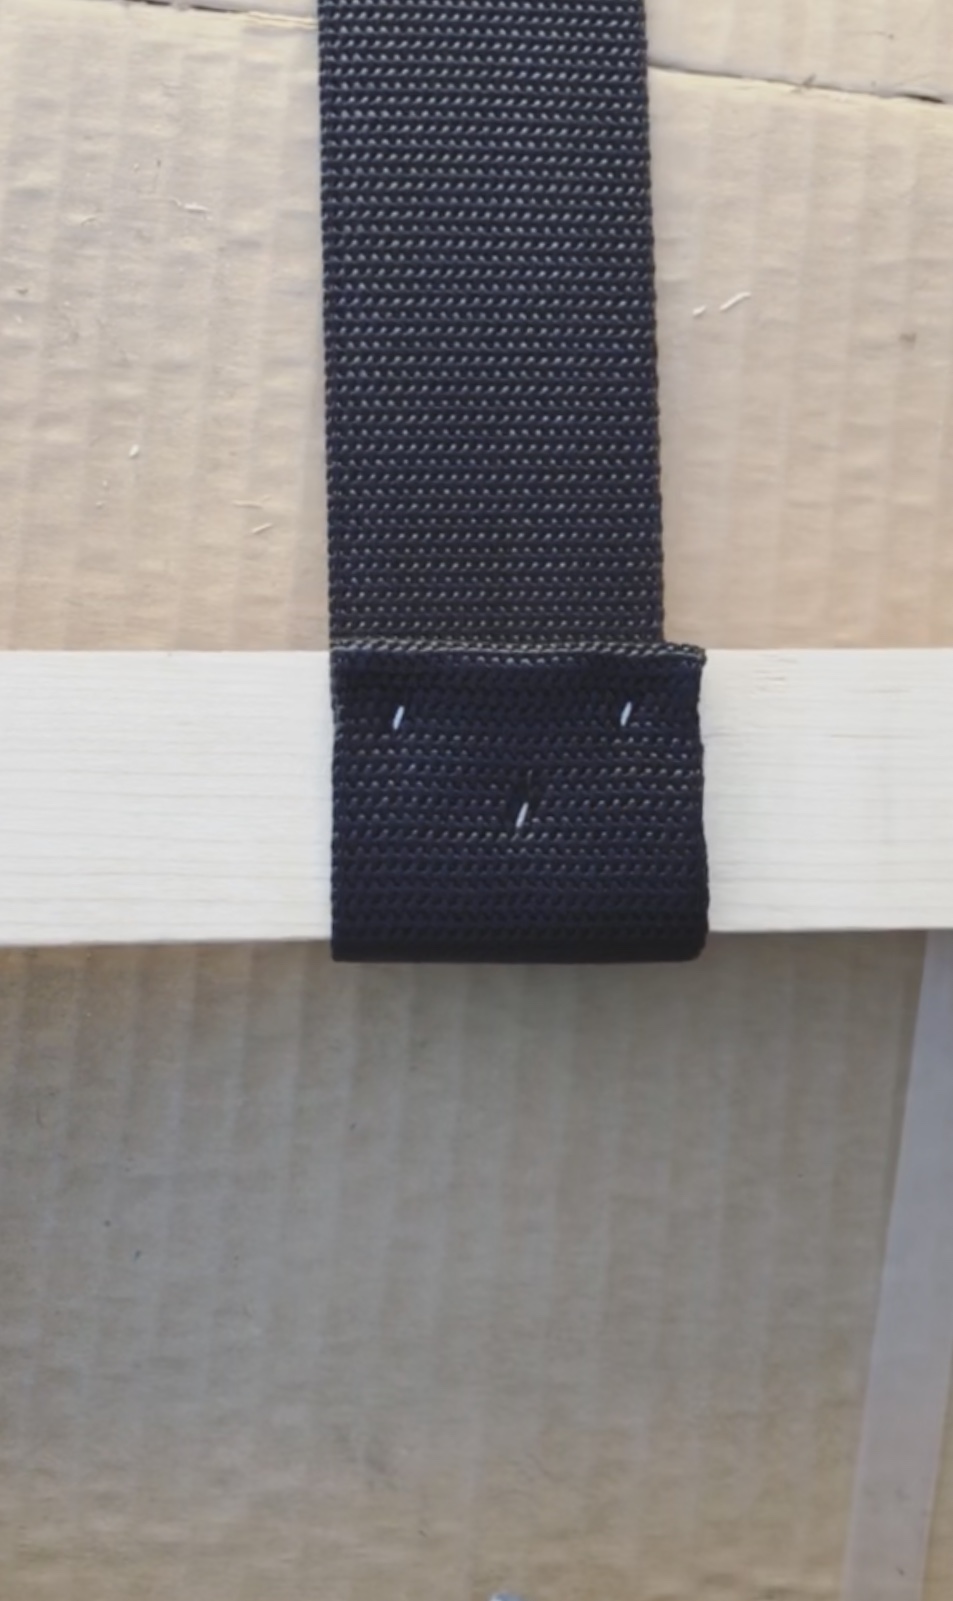
Wrap it around the frame and staple/fold/staple.
Step 8: Attach the webbing to the couch frame
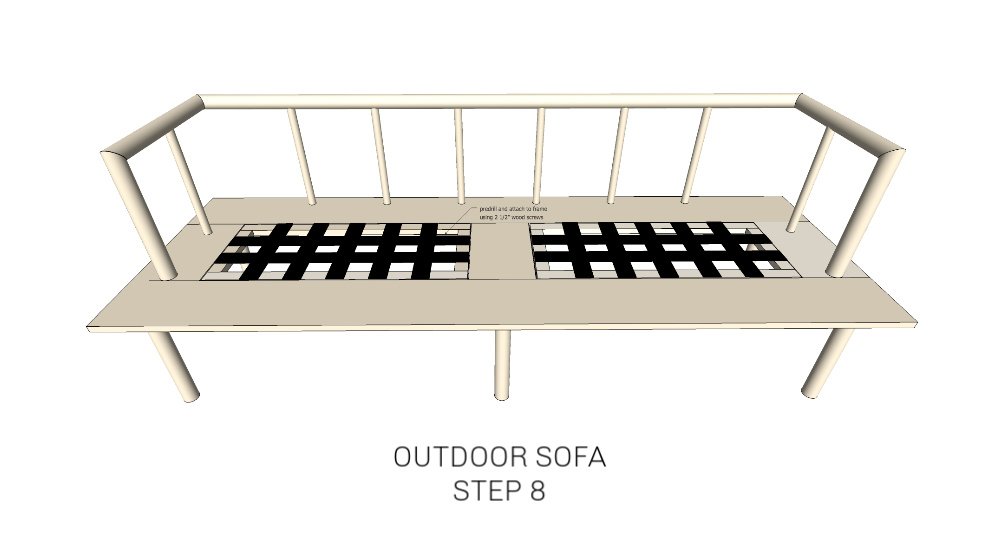
Attach the webbing frames by screwing through predrilled holes through panel frame with 2 ½” wood screws.
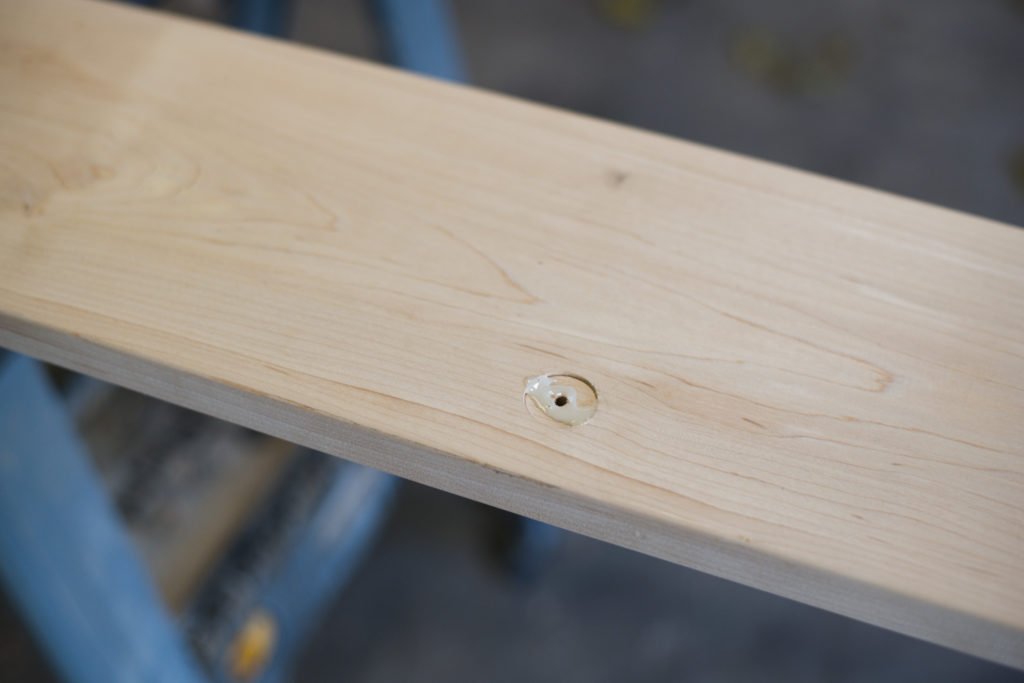
And that’s it for the frame build! Finish it off by using wood filler to fill the screw holes. I am still on the hunt for the perfect wood protector, but I will update this post as soon as I find it!
Next up, you’ll want to read Part 2: Upholstery!
[mv_create title=”Couch Build” key=”19″ thumbnail=”https://vintagerevivals.com/wp-content/uploads/2020/02/Sunbrella-Shoot-2-5.jpg” type=”list” layout=”hero”]