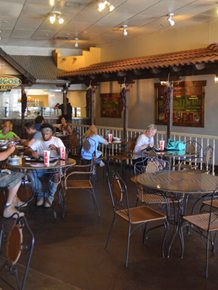
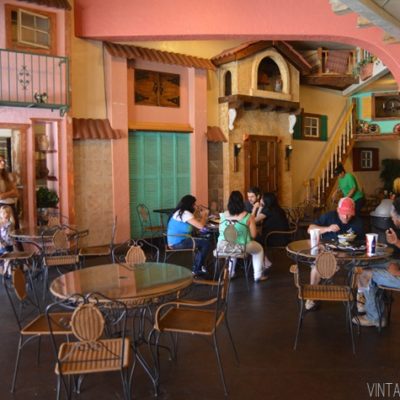
Happy Monday my loves!! Have I got a fun and suuuuper simple project for you today! As some of you know, we’re in the process of renovating and rebranding our family restaurant Durango’s Mexican Grill. Its been quite the adventure to say the least.

One of the biggest perspective adjustments that I’ve had to make is making sure that things are restaurant worthy. Its one thing to build a table for your house that you know 5 people are going to use and its going to be wiped off once or twice a day. Its another thing entirely to build something that literally hundreds of people are going to use, that’ll be wiped off every 20 minutes. And to do it on a budget no less.
When it came to tables, I wanted something super simple and modern. Not a lot of detail, but still cool. Oh and did I mention that we needed 28? Yeahhhhh. I’d seen some really cool raw edge plywood table tops at a few restaurants in Salt Lake but I kind of felt like they were a little thin. So we took the basic idea of plywood and beefed it up (on a budget!)

This is TOTALLY a project that you could do for your kitchen table, coffee table, desk, shelving, basically anywhere.
We were really driven by the budget that we had to work with so in order to keep costs as low as possible, we used 2 different types of plywood. The really nice pretty kind with a birch veneer (that runs about $50 for a 4×8 sheet) and the not so pretty kind that is rough pine (that runs about $25 for a 4×8 sheet).

Because we were making so many, we set up a work station in our garage so that we could easily mass produce and precisely duplicate the table tops. (Hi Court!)

We made 3 different sizes of table tops, but regardless of the size of your table the process is the same.
Start by cutting the desired size of your table out of both types of plywood. If its an option, you’ll want a table saw for this. You can possibly have it cut at your local hardware store, but chances are that they might not be exactly the same (just a heads up).
Once we had our table tops cut we used the remainder of the wood to cut 3” strips for the lip on the very bottom of the table (that way it looks like its 3 layers thick, but its really only 2).
Our GRR-RIPPER pushblocks were the perfect tools for this when the wood got small.

Lots and lots of strips.

To join the corners of these bottom pieces, we cut them at a 45 degree angle and fit the mitered edges together. (We also made sure to use the nice wood for these because I didn’t want someone to cross their legs and catch their clothing on the rough wood.)
The next step is to sandwich wood glue between the 2 large boards and set it with screws (make sure that they are long enough to catch the second piece of wood, but not too long that they go through the front of it!)
After you’ve done this step, you’ll add the lip piece on with glue and finishing nails (again so that the screws dont snag clothing).

Once everything was dry and we made sure that it was completely secure and then used a belt sander on the edges to make sure that everything was smooth without rounding out the corners too much (Court did that part). Meanwhile, I used a palm sander and 400 grit sandpaper to smooth the top.
Because the durability of the finish is so critical in a restaurant scenario we had a cabinet maker spray an automotive clear coat on them for maximum durability (added bonus is that that they won’t yellow). Have you ever been in a restaurant that has sticky tables, even after they’ve been wiped off? Blech. An automotive clear coat makes that a non issue.
If you’re doing this project at home, you probably don’t need something that intense. My FAVORITE clear coat is Varathane Triple Thick. It is almost magical.

When you’re applying it, pour a fair amount onto your piece and use a Purdy brush to spread it. You want it to be nice and thick. The color will look milky until it dries. Just like with any other product that you brush on you dont want to manhandle it or you’ll possibly ruin your finish. Just brush it on and walk away until its dry.

We installed our tops onto really basic matte black cafe table bases, but if you are looking for something a little bit more amazing, a conduit pipe base (like this one) would be out of this world!


We built and installed these in the restaurant in May and they are doing so well, still looking brand new!

Cant wait for you to see what else we’ve been working on!


okay, this is incredible!! love it.
Very awesome. I’ve been thinking about a new table – something like this could be just the ticket.
I love this! We’ve been searching for a new dining room table, but hadn’t seen anything that interested me until now. Question on the sides– You mentioned that you sanded them. Did you also put clear coat on them, or just on top? If you did put it on the sides, how haha? I’m sure it’s simple, but I wouldn’t put it past myself to end up with a really dripping looking table. 🙂 Thank you!
Great question! One I wouldn’t have thought of until I was pouring on the clear coat!
A narrower version would be cute with hairpin legs… Like as a sofa table, in an entryway or hallway, etc. Another genius DIY, Mandi!
Totally!!!
Nice table! Do you have any tips on preventing brush marks when applying the clear coat? I’m so bummed I recently ruined a piece because all the visible brush strokes.
Ash what kind of clear coat did you use?
The tables are amazing! Saving this for a future DIY for my new home. Thank you 🙂
X Min, honeyandgazelle.wordpress.com
I am so excited about this post!! I recently bought a home, and there were two of these (or very similar) table bases left in the garage, as well as some plywood. I’m thinking I already have most of what I would need to make an awesome craft table, or two smaller tables that could be used together, or apart. Thanks for the inspiration!
A great DIY idea I’m so going to try this, thank you!
You guys own Durangos!? My grandpa lives in Hurricane and we ALWAYS ALWAYS eat there when we visit. This is awesome.
Love the table! Great way to create a simple table!
Just came back from So. Utah. I always thought Durango ‘s was in St. George, we passed it in Hurricane and I was so excited LOL.
Great idea! It does not look homemade at all. Very professional and trendy looking.
For those people who have a very small kitchen and still want a table in it, they can make it to the dimensions they want and need. Where did you get the table base from? I never thought about looking for something like that before.
Thanks for sharing.
I never would have thought plywood could be made into something that looks so nice. Great work!
Amazing! You guys are so amazing in so many ways! Thanks for sharing with us!
The tables look great and are really complimented by the chairs. Where did the chairs come from?