This peg board wall treatment is perfect for any house! Because the wooden pegs are interchangeable you can mix, match, and customize to your hearts content, its the decor equivalent of the 80’s staple Units! This oversized pegboard can be used as shelves, to hang art, and as a place to store you backpack and purses. This pegboard is one of the projects I created in Aspyn Ovard’s house, you can see the entire makeover here!

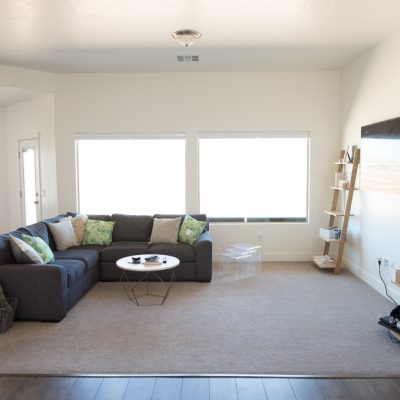
The entryway wall in Apsyn’s was HUGE. Its tall and wide and dwarfed anything she tried to put there. Do you ever feel like that in your house? Nothing like a 4×4 piece of art looking like a postage stamp to deflate your decor dreams. If you’ve got a huge space to fill but are wondering exactly how to pull it off, this pegboard project is for you!

How To Build A Wooden Peg Board Wall
To build this project you’ll need:
(1) 4’x8’x1/2″ sheet of plywood per panel
(1) 4’x8′ sheet of normal peg board (total)
(4) 1″x2″x3.5′ per panel
1″ wooden dowels
Tools You’ll Need:
1″ Forstner Drill Bit
Drill
Nail Gun
Level
Philips Head Screwdriver
You can see all of my tool recommendations here!
Step 1: Deciding On Spacing
Start by figuring out the spacing of your holes, you can do them as close together, or as far apart as you want! I figured that my holes needed to be 6″ apart to get the look I wanted.
Step 2: Centering Your Holes
To center them on the plywood I divided my 6″ length by 2 and started there. This meant that my first and last row of holes are 3″ from the edge.
One thing to be aware of is that the template peg board might measure weird. Notice in the picture below that the hole is marked on the 3rd hole but my tape measure is over hanging 1/2″. That is because for some reason the pegboard isn’t exactly 4′, its closer to 3′ 11″ so I had a 1/2″ allowance that I needed to accommodate. You’ll take this into account when you’re marking your sheets of plywood.

I went through and circle-marked every 6th hole horizontally and vertically with a marker. This gave my my 6″ spacing that I wanted.
Step 3: Stack All Of Your Plywood
There are a few important things to know.
- Stack your wood so that it is all face up. When the drill bit punches through the back it can damage the veneer and its not so cute.
- Put some wood or an extra piece of plywood underneath to raise up your wood so that you don’t have to worry about accidentally drilling into the ground and ruining your bit.
*If you’re making something that needs both sides visible, use a sheet of plywood. It will reduce the punch out significantly.
Step 4: Mark Where You’re Going to Drill
Once our wood was stacked and the hole guide was placed (remember your 1/2″ allowance that we talked about earlier!) Court and I each took a Philips head screwdriver and marked each spot by tapping on the end of the screwdriver with a hammer. Don’t be afraid to give it a good whack! The whole point of this is to mark the plywood so that it’s unmistakeable where your hole needs to be!

When you take it off it will look like this:

See all the little puncture marks?
Step 5: Make A Jig
The hardest part of this project is making sure that your drill stays at a 90 degree angle while you are drilling your holes. This tool from Rockler looks FREAKING BRILLIANT. Unfortunately we didn’t have one and had to make a guide ourselves. We used a few different sizes of scrap wood and created a corner pocket that guided the drill straight down.

The longer pieces stabilized it so that it couldn’t wiggle side to side, and the vertical pieces were the actual guide. This is an easy jig to make!
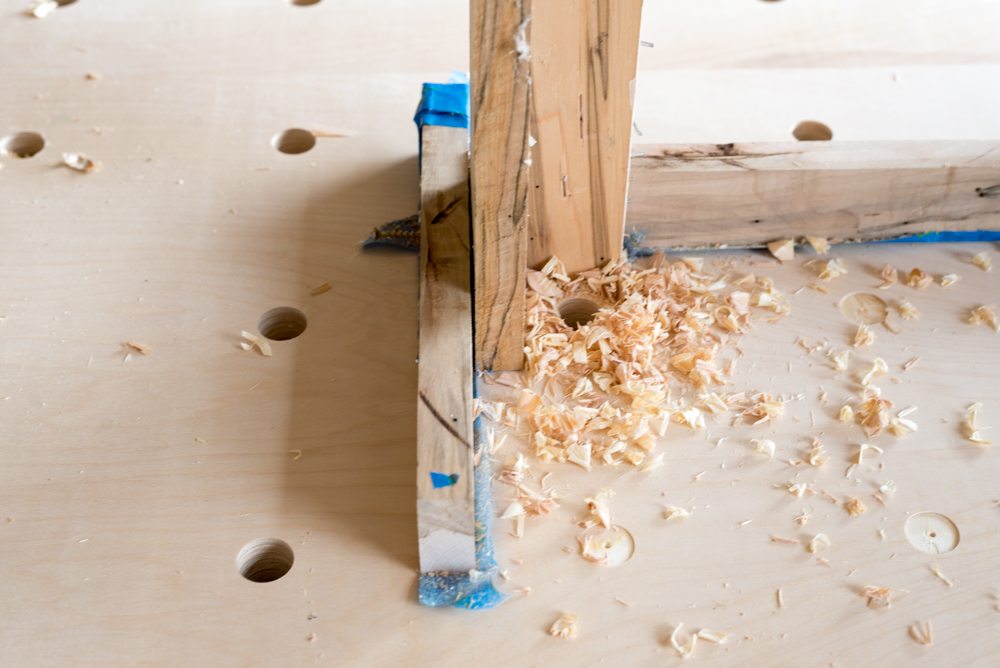

Step 6: Drilling The Holes For Your Peg Board
One thing that we learned after damaging the wood a little was that we needed to carefully “peel off” the first layer of veneer before you go full throttle with the drill. The Forstner Drill Bit will do this for you, you just have to very slowly turn it to lift up the top layer. You can see in the pictures below what that looks like. Once we did that we didn’t have any problems with the wood splitting on the front.


Installing Your Wooden Peg Board
Installing your boards onto the wall is really simple but you will need at least 2 people.
You’ll need (4) 1″x2″ pieces of wood cut down to 3.5 feet per panel.
Step 1: Install The Support Boards
Determine the height of your installed peg board. If possible, have one person hold the board in that spot while the other one marks on the wall, where support boards can go without being seen through the holes.
Find where your studs are on the wall and mount the 1×2’s into as many as you can (most of the ones we installed had 3 studs behind them) make sure you’re using a level!

Step 2: Attach the Pegboard
Attach the pegboard using small head cabinet screws or high quality finishing nails. We used 4 nails per 1×2 and they are great because they almost disappear. I used little bit of wood putty to hide them completely. The nails will be strong enough to hold the peg board.

You can frame out the sides of the plywood, or leave them open like I did, whatever suits your style!
Making Pegs for Pegboard
The length of your 1″ dowels depends on the width of your shelves. The shelves we used were 8″ deep so the pegs we made were 11″ long that way they could fit into the hole, against the wall, and be a little longer than the depth of the shelves.
Peg Board Shelves
If you want to use your peg board shelves for home decor, I wouldn’t recommend going shorter than 8″. That makes it a little hard to use standard size decor on them!
I LOVE how these shelves turned out. They are massive and such a statement! Perfect if you’ve got some big walls to fill!
Aspyn’s entryway is so massive its kind of hard to tell how high everything is. For reference, the round mirror on the middle section is eye level for someone that is approx 5’5″.


If you make this pegboard project I want to see it!
You can check out the rest of Aspyn’s room house overhaul here!
Ok, this tutorial hit my email @ exactly the right time. I was just asking my hubby to make something similar for our dining room. Quick question, when you say “carefully peel” are you using the drill to start the area and than your hands to peel the top layer away. I need to flesh this step out a little. THANKS!!! Love love love your blog.
Hey Christy!
Such a great question! I mean to use the drill at a slow speed instead of at full speed, I’ll update the post so it makes more sense!
Thanks!!
xo
m
You guys are so talented!
It’s crazy that just a hole without any support from the back can hold things so straight, you didn’t have any sagging issues at all?
I LOVE, LOVE, LOVE this project. I made a small pegboard out of plywood for my sewing studio, but I found it really hard to drill the holes. I needed to put a TON of force. I was using a Ryobi 18V drill with a 3/4″ Bosch spade bit. The plywood was 3/4″ thick. Did you find ot hard to make the holes at all? I can’t imagine doing so many in 3 different panels!!!
Hey Julia!
I think your problem might’ve been that you were using a spade bit instead of a forester bit. Forstner bits are a million times easier to use and get better results!
xo
m
I love how you broke down your construction process! Hi, my name is Madalen and I am currently started my own Blog with DIY projects, home designing and landscaping named Up North Projects. The URL is upnorthprojects.blogspot.com. I was wondering on suggested links on my page if I could put your blog link there. I feel like you have great ideas! Especially this one!
Love love love this. I’ve been meaning to do a full length one in my son’s room. Have you considered a French cleat mountings instead so you don’t have to hide the nails? And would copper piping instead of dowels still be strong enough to hold shelves with books and other heavy things? Just wondering your opinion. Thanks!
Exactly what I was thinking; French cleats might allow you to hang the panel by your self, too.
Throughout the years, you have done some pretty awesome DIY, but this might be my favorite to date! This is awesome!
Love this! One question though, the shelf just sits on top of the dowels, not attached?
On the boy biting….. while he is nursing or biting other people? When mine were nursing and tried biting, removing the “source” and a light tap on their mouth got the idea across pretty quick. Biting other people wasn’t stopped until his grandpa bit him back after he went after a cousin. 🙂 That was long time ago though!
Yes the shelf just sits on top of the dowels! He mostly bites me and its not usually when he’s nursing, he’ll just walk up and bite me on the leg.
HaHa, he’s checking out how tender you are! 😀 My biter went for his brother or cousins, always another child. I think it shocked him when Grandpa bit back, but he never did it again.
Hi Mandi!
Love the way this turned out…really awesome job! If I’m ever patient enough (and have a workspace to accommodate this), I will do it!
I was wondering about what you used to hang stuff like the mirror? Is that just another peg that is shorter? Did you put a notch in it so it would hold things better? Sorry for all the questions…just curious as to how this works.
Thanks!
I was wondering the very same thing about the mirror! I have been stumped by that ever since I first saw it!
Wow you did wonderful work! I love pegboard, also have a good idea. Happy to hear your amazing works…
I have seen this before but never so detailed and such a wonderful display! Congrats and thanks for sharing. I would love to do this but for books, wondering if they will hold up…also wanted to ask you what did you use for the shelves?
Love this!!! Now I need to figure out a good place in my house to put this. I don’t think my foyer is big enough.
Oh I love it!!! Oversize it’s beautiful.
Here is mine, I built it directly on my wall 😉
https://www.lanvertdudecor.com/2014/04/diy-design-mur-pegboard-revisite/
Beautiful DIY job!
Thanks for figuring everything out and sharing it. I’ve seen these on Australian sites and you can buy them in stores over there. Being from Canada that isn’t an option. I’ve wanted one but was too lazy to find out how to make it. I’ve loved your stuff since I saw you on Nate Berkus. Oh I also make your Swig cookie recipe all the time. Delish!!
Hi Mandi! Loved your tutorial – the pegboard turned out so beautifully and I love that it can be changed and customized whenever! Now to convince my hubby to make one with me…
Another thing that caught my eye is your beautiful ‘Pin-it’ button…I’ve never seen one like that before – do you mind sharing the source/plugin that you’re using?
Thanks!
Kelsey
Why use a Forstner bit? You might not have had the “peeling” with a spade bit and since you are drilling all the way through, no need for the flat bottom to the hole that the Forstner supplies. Spade bit would be cheaper, too.
Fantastic idea just what I need for in my studio. I have Got leftover plywood from doing our flooring. It looks so nice and I gather you can change the configuration as you please. Will let you know how it went.
cheers from down under
Nina
I love this. Although, I don’t want to DIY. I wish we could just purchase a panel.
Hi! Wonderful tutorial! I was just wondering if you could explain how you hung the vertical rug to the right of the peg boards? I’m wanting to do something similar with my Moroccan wedding blanket and I’m not sure what the best way is to go about it.
Thanks!
Hi, I love it, Could you tell mel about diameter of the pegs ? thanks
They should be 1″. She notes this on the top, where it says wooden dowel…that becomes your pegs after you cut it down to size.
I am not handy but am trying to figure out a way to create these giant pegboards portable to create a display for pop up shops. Would you suggest hinging them together at sides or on top or somehow mounting them on casters or easy moving? I would love any tips or ideas.
I would build a small 2×4 frame, cover it in a very thin plywood (to keep it as light as possible), paint all of that white, then follow the design above and mount on that sucker. add some industrial-style casters and away you go.
you guys are awesome
I’m late to the game here, just came across this. if you have access to a cnc machine, it will create those holes in no time, and do a very clean job of it.
Most towns and cities have some sort of shared workspace or makerspace that provides access to a cnc and will provide assistance with it.
Also a french cleat is a great idea to keep the visible side looking clean but it can also be made in a way that will retain the raised gap between the board and the wall, giving it some great visual depth.
i’m planning on trying this with a walnut veneer for my mid-century house
Are the shelves secured in some way? I’m trying to figure out how we could do that. I just know if I don’t my kid (or let’s be honest me or my husband) will somehow make them come crashing down on her head.
Love these, they look amazing. Hoping to do something like this in our bathroom.
Hi Teresa,
You could try and make the shelf a bit longer than shown above, and then secure them with tube straps. Home Depot sells them as a 4 pack for $1.46. I tried to include the link here, but it doesn’t seem to be allowing me to do that.
Hi. Any way you can make this into a pdf, for downloads without the ads?
How do the pegs not fall out? Are they held in place by friction? Does the distance they protrude behind the board matter to allow front to cantilever?
Another brilliant project. Now I’m tore between the peg board and your display ladder. Decisions decisions
The jig is SUCH a good idea! It’s just what I needed for another project 🙂 Thank you!!
This may just be the perfect project for my large kitchen wall! Are the boards used for shelves just laying without anything to hold them? Do you have issues with these rolling/sliding off?
I’m going to use this in my sewing room. Great project. Thanks!
Can you imagine doing this project, but leaning them on the floor instead of installing them? I have a big wall in my living room, but I live in an apartment and don’t want to put big holes in the wall. I was thinking I could get these peg boards started, lean them and still use the shelves, hang art, etc. and then they can travel to a new home when I buy and perhaps get mounted there! What do you think?
SO CUTE!!! Do it and send me a picture!!
Hi Mandi, great work! Thank you for sharing.
Hi, I wanted to ask what kind of wood did you choose? Is it Maple? Birch?
I just love it! How long did it take to make such thing?
Hi! I’m looking to do this at my work. However we have metal framing in our walls. Do you think it would still work/support the boards enough?
Thanks!