Painting furniture is one of the simplest DIY projects on the planet. However, it is also one of the easiest things to mess up. Trust me, I’ve painted more furniture than I care to remember and have learned so much it will make your head spin. Today I’m passing all of my wood painting info along to you! I’ve teamed up with my longtime partner Sherwin-Williams®, who sponsored this post to give you THE BEST furniture painting information available!

There are a million different sites telling you different (and conflicting!!) info. No one wants to learn to paint furniture the wrong way, or the hard way. So today I am sharing with you my absolute foolproof way to paint furniture. I have hundreds of reader questions at the ready and I’m going to answer all of them! (It’s a good thing that most of them are the same, see the most common at the bottom of this post!)
Furniture Paint vs. Wall Paint (NOT THE SAME!!)
Paint for some reason has this catch all mentality. How is it that we as humans have 15 different types of moisturizers, but paint is only allowed to have one formula? NO!! Regular latex paint is not designed for hard surfaces that get a lot of usage like a kitchen table.
If you’ve ever painted something and had the finish turn out tacky like it’s never cured, or had it peel off in sheets (so satisfying but not when it’s on your kitchen table) chances are GREAT that you went to the paint counter and told them the sheen and color but nothing was mentioned about the product type or project right?! Do you know how I know this?! Because I’ve done it…a few times! DANG IT!!!
You know you’re using the wrong kind of paint or the wrong technique if:
- Your furniture feels tacky or sticky like it’s never cured
- The paint dents
- The paint chips or scratches it peels off
- It’s extremely hard to clean and easily stains
- It fades
- It doesn’t have a smooth finish
- You want to kick it every time walk past because of all the horrible feelings that come up at the sight of it.
Best Paint for Furniture
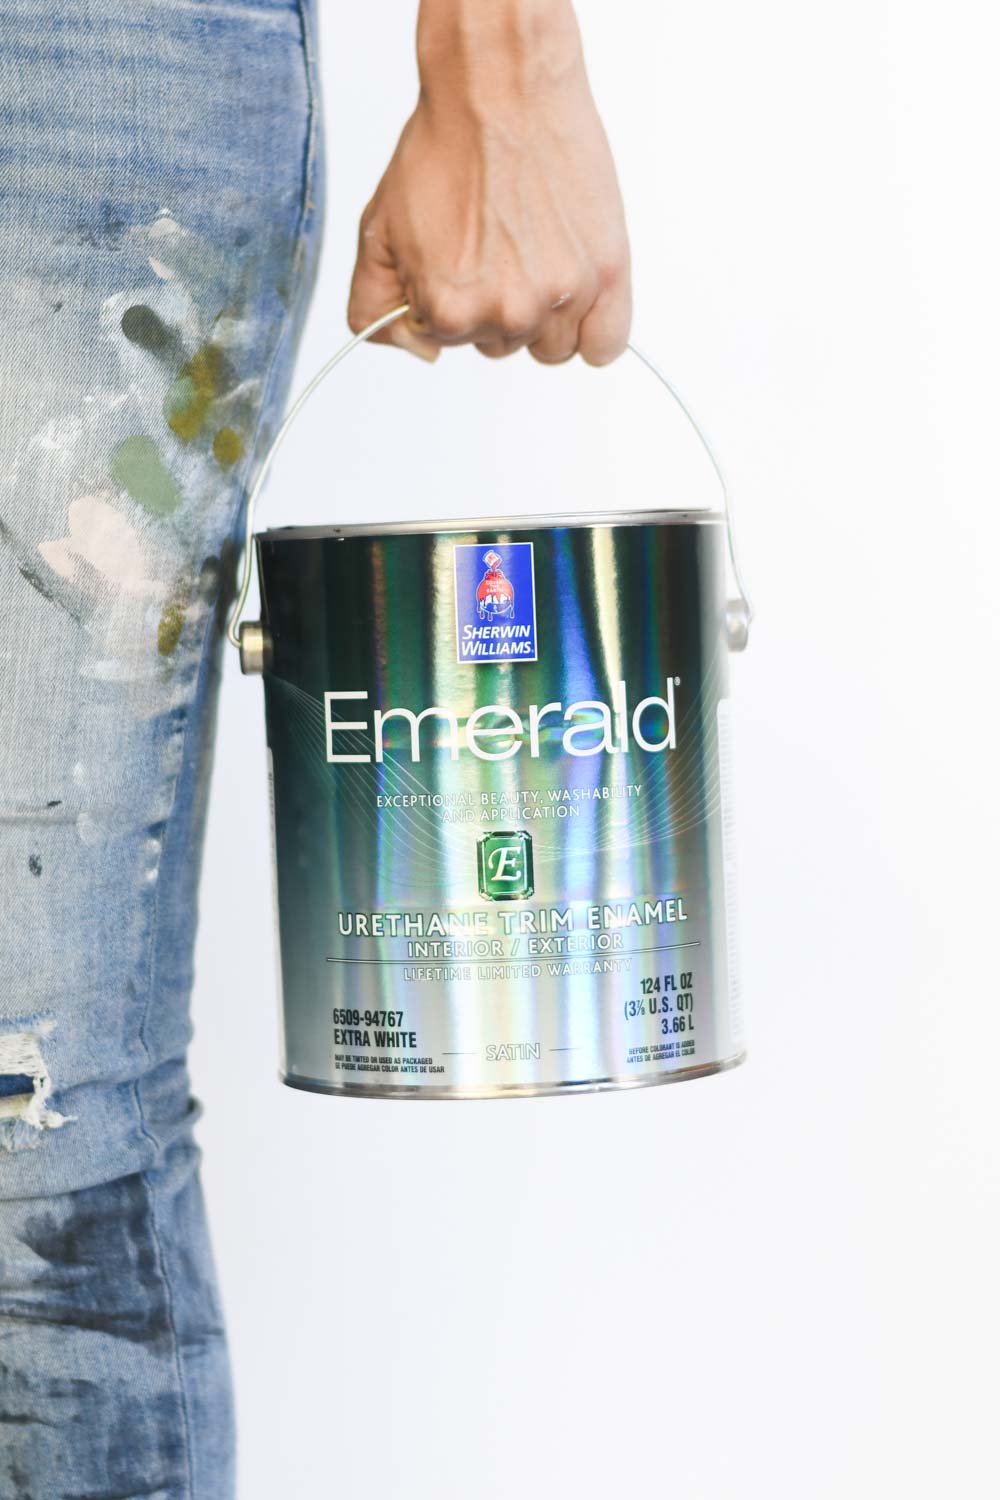
Ok so now that I’ve established that you need the right kind of paint (we’re all on the same page here yes?!) let me tell you what the best paint for furniture is. Sherwin-Williams Emerald Urethane Trim Enamel (its a long title. We’ll call it Emerald Trim Enamel for short ok?) When you are painting hard surfaces, you need to use a product that is created for hard surfaces. If you’ve followed Vintage Revivals for a while you might remember the many proclamations of utter devotion for Sherwin-Williams Pro Classic. Pro Classic is awesome, but Emerald Trim Enamel is a newer product and my new favorite.
It is formulated for hard surfaces and it is MAGIC!! You don’t need to put a finish top coat on it, and if you are painting over a freshly sanded surface you can can choose not to prime but we always recommend priming your raw wood surfaces for an amazing end result! Oh and have I mentioned that when you’re using it you get a completely smooth finish with a roller? Mic drop.
Once you use the right kind of paint for your projects, you will NEVER go back to using regular latex wall paint.
You know you’re using the best kind of paint if:
- Finish is hard and unaffected by things on it
- Finish doesn’t dent
- Surface can easily be wiped off (for instance on a table)
- Finish chips rather than scratches.
- Finish is smooth
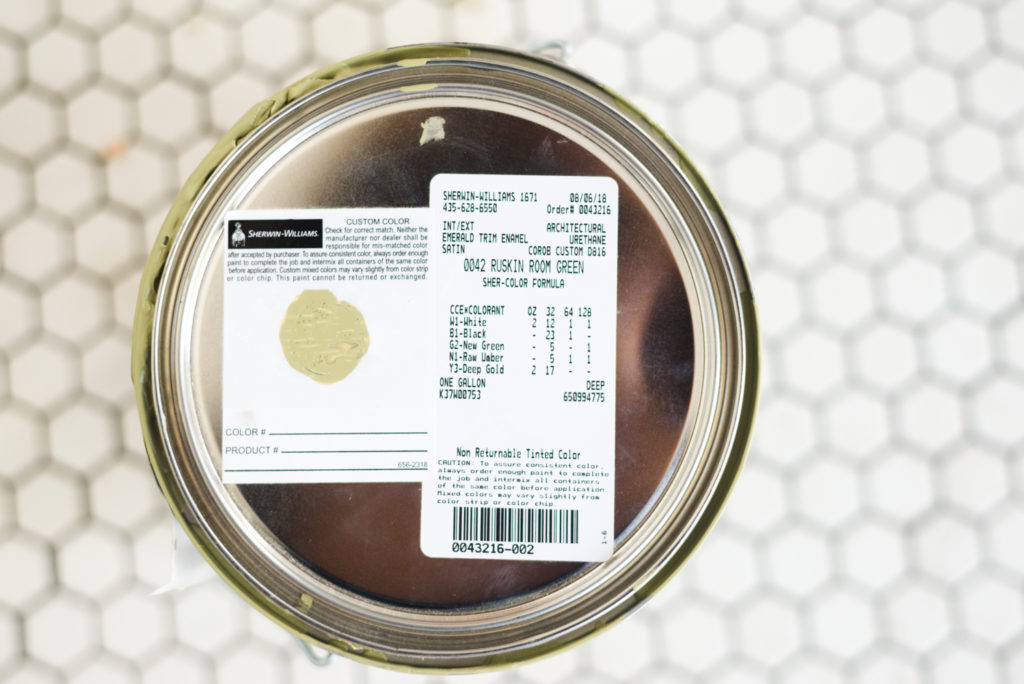
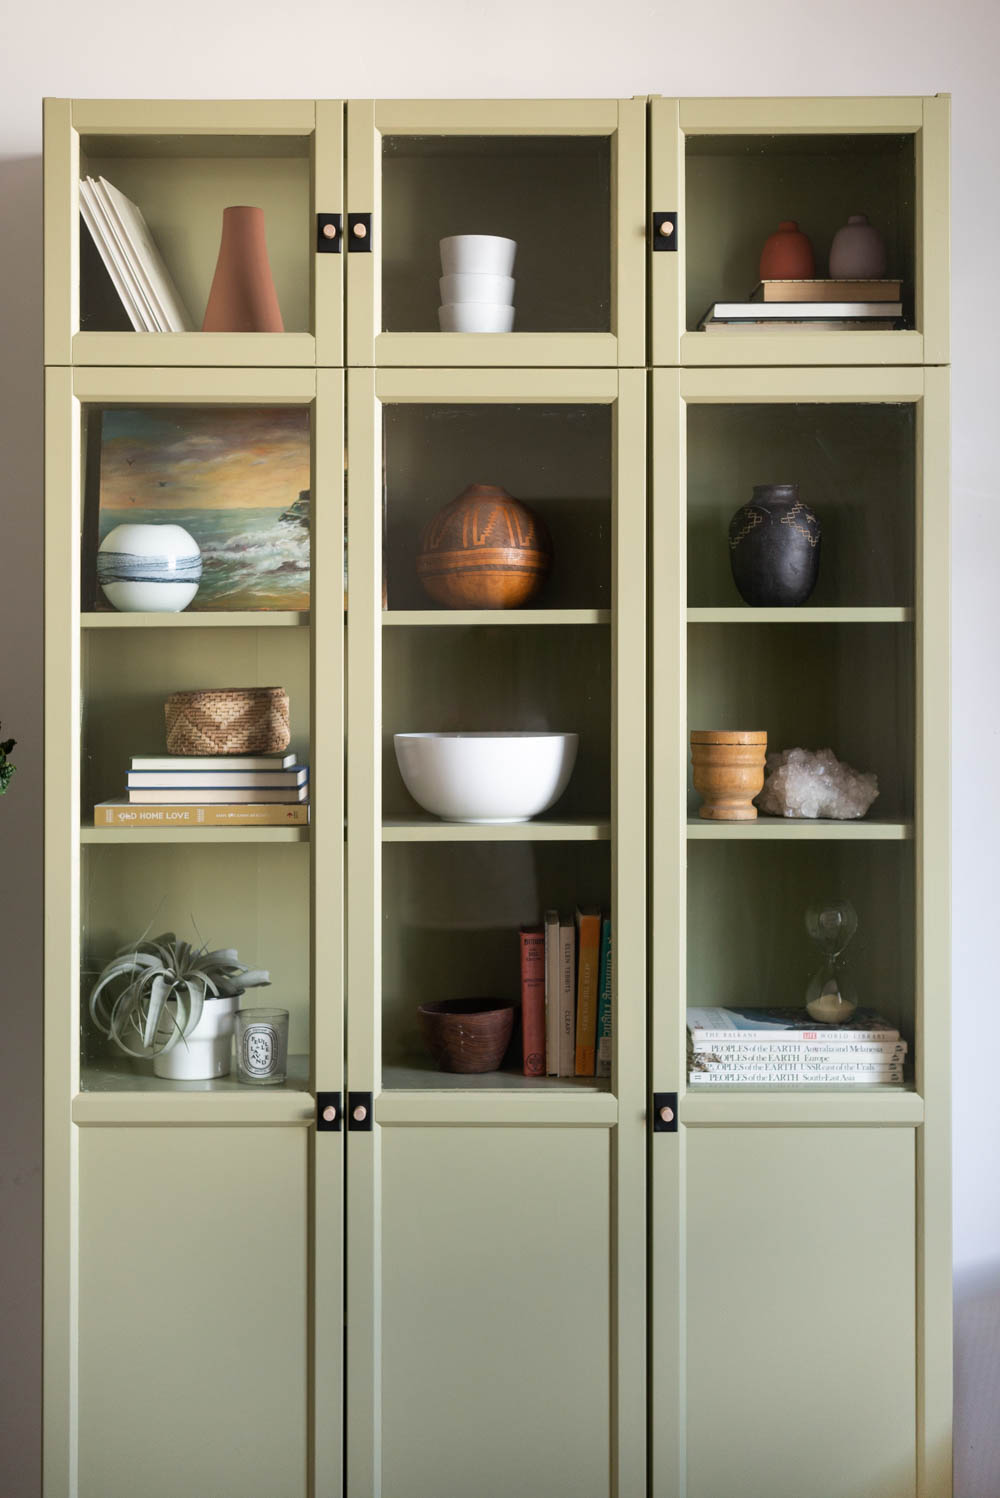
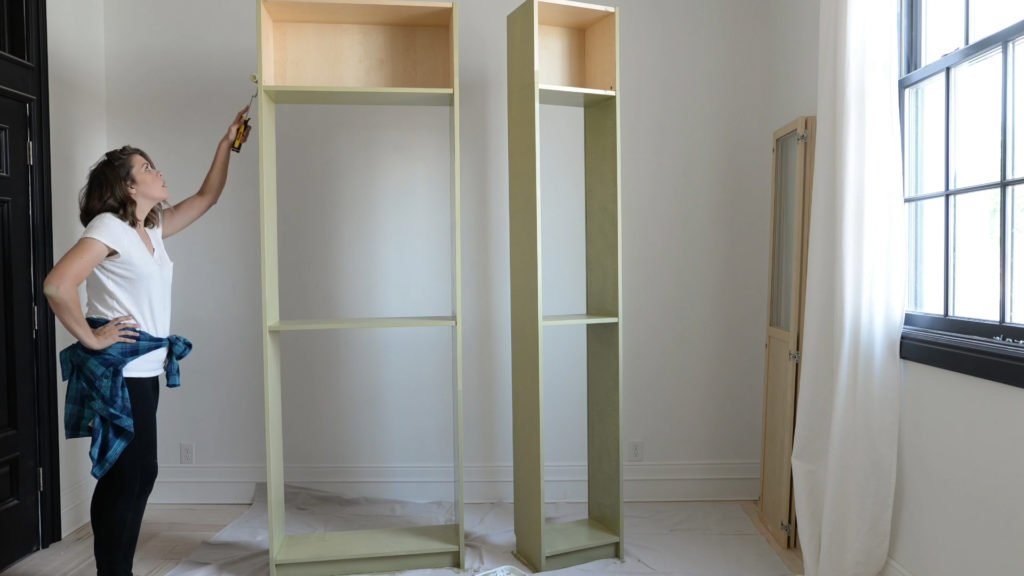
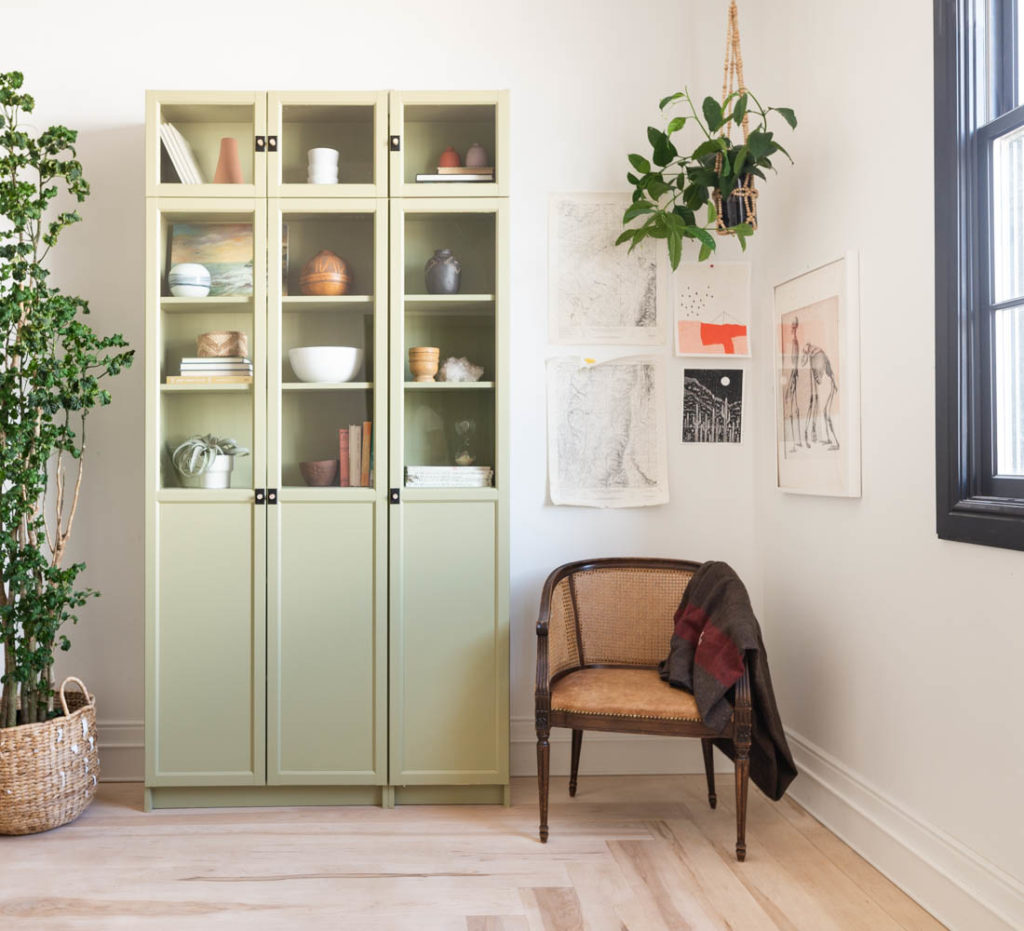
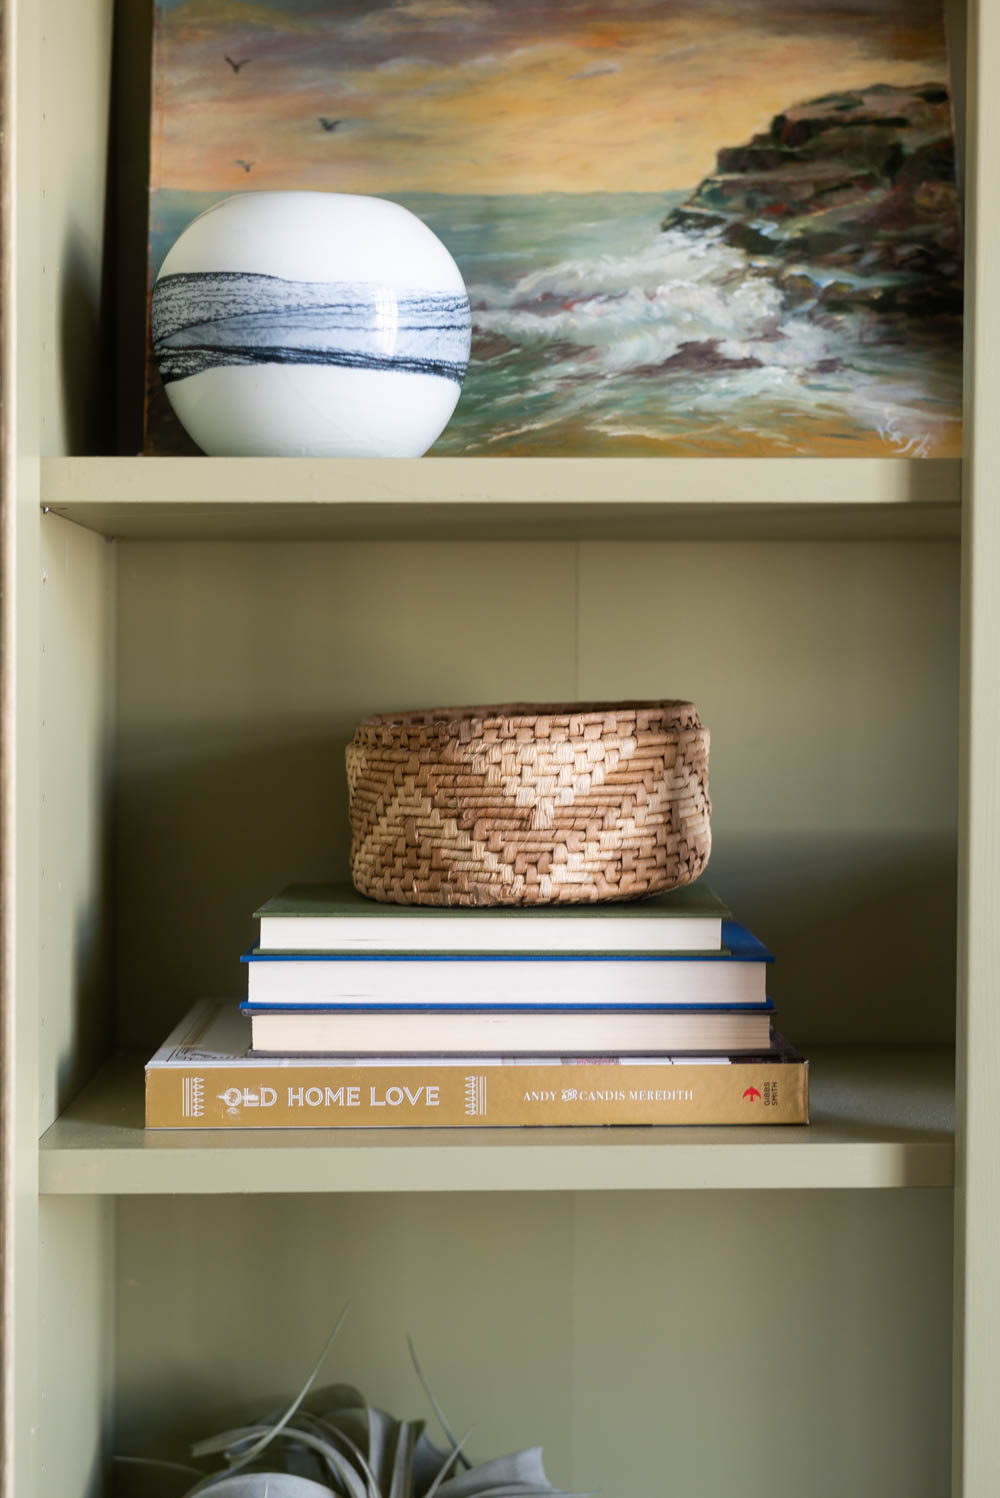
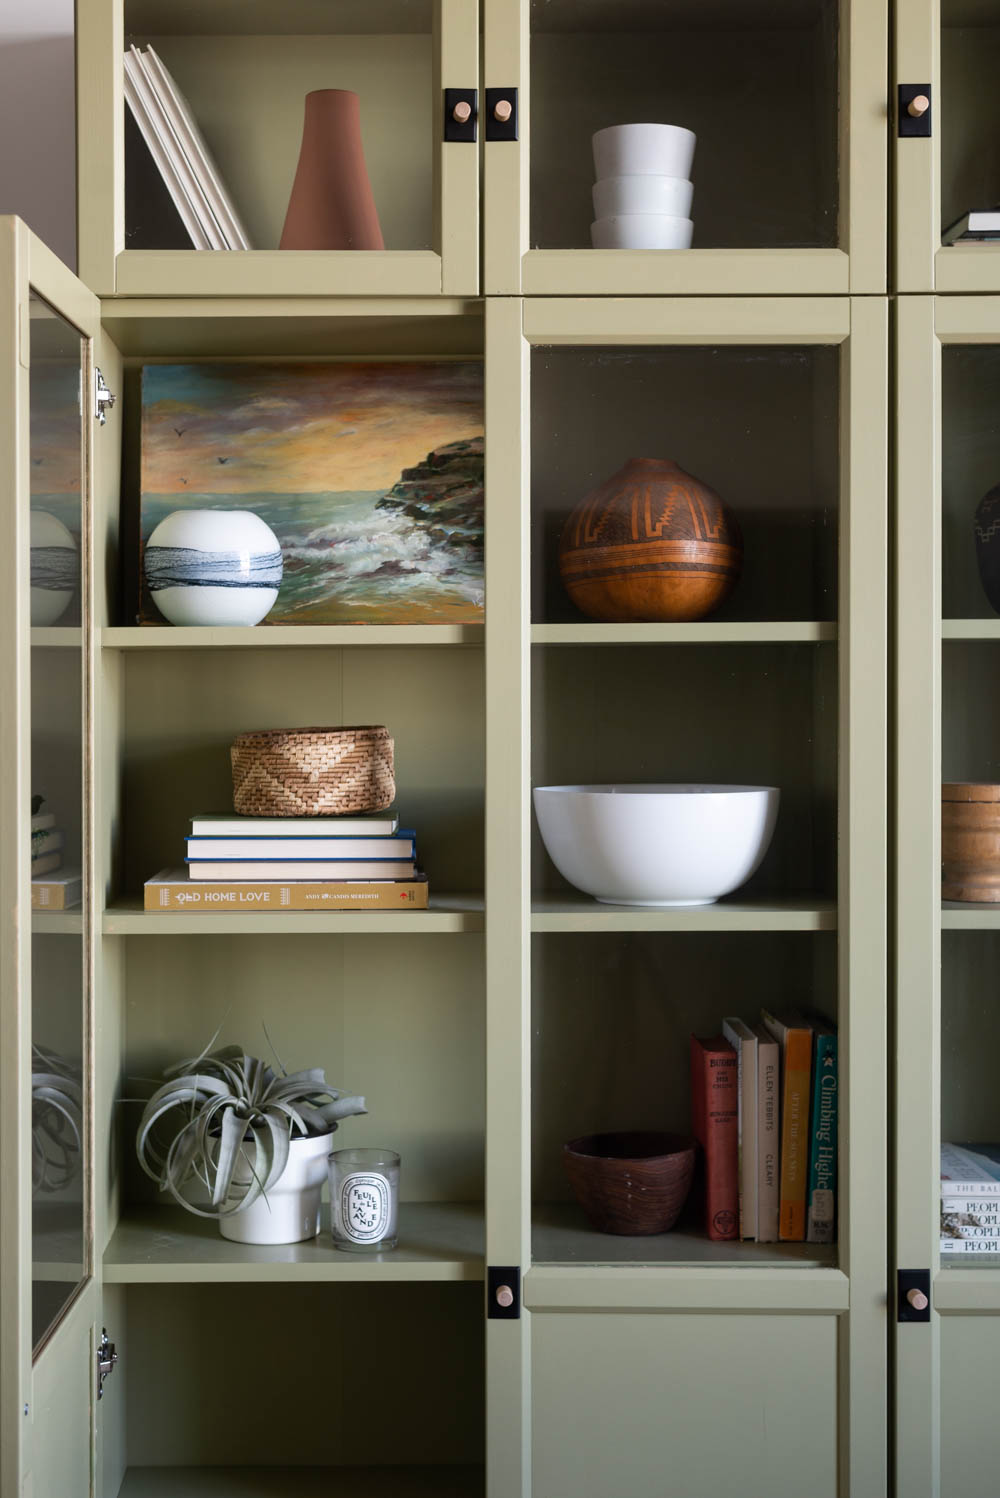
The color that I used on these IKEA Billy bookcase is Sherwin-Williams Ruskin Room Green SW-0042. Its the perfect muted dusty green and I am obsessed with it!
Painting Techniques
There are 3 acceptable ways of painting furniture; 4 if you live in 1992 and consider sponge painting a stylish way to bring character into your house. Painting with a sprayer, painting with a roller, and painting with a brush.
We used a paint sprayer when we painted the doors at the Merc and got a perfect mirror finish. But for the sake of relatablity and ease, today we’re talking about the other 2 techniques, rolling and brushing.
Brushing paint exclusively is a technique that I havent mastered yet (it’s on my bucketlist!) but using a good quality brush is CRITICAL. If you show up and are planning on painting a piece of furniture with one of those $2 chip brushes you might as well douse it in gas, light it on fire and save yourself the time. A good brush will cost around $15 and pay off in dividends.
Rolling a piece of furniture is my favorite technique. You have to make sure that you get the right kind of roller though, because if you don’t you will end up with a ton of anger inducing texture. Find a lint free roller that has a nap of 1/4″ or lower. Think about what happens when you’re actually rolling, the longer the nap the more surface is sticking in the paint right? The shorter the nap, the smoother the finish. HOWEVER. One of the most frustrating furniture painting pitfalls I’ve experienced is using a foam roller. The logic behind it is sound. The lower the nap the smoother the finish, so no nap means THE SMOOTHEST FINISH EVARRRRR! The problem with using a foam roller is flashing. Flashing is when the sheen is different (you can see a great example of it in this post!) My favorite roller for painting is a Purdy White Dove 3/8″ or a Sherwin-Williams Mohair. They are both awesome and will give you a great result!

Painting Supplies
Once you know what kind of paint to use, and how you’re going to paint your piece, it’s time to round up the rest of your gear! (FYI all of these supplies are available at your neighborhood Sherwin-Williams store.
You’ll need:
- Paint Brush
- Paint Roller
- Roller tray
- Roller tray inserts (I promise they make your life so much better!!)
- Drop Cloth
- Paint stirrers
- Paint can opener
- Painters tape
- 220 Grit Sanding Sponge
- Paint Triangles

How To Paint Wood Furniture in 5 Steps
Ok are you ready to get started!? Let’s dive right into painting wood furniture!
Step #1 PREP: Sanding, Stripping, and Cleaning and Disassembly
The first step to furniture painting success is your prep. There are a million tutorials online that give you hacks for skipping prep, but guess what? If you skip it, chances dramatically increase that you’re not going to get the result that you want.
-
Cleaning always comes first!
Sometimes all your piece needs is a good wipe down. If you don’t need to sand or strip, using a strong cleaning agent like TSP or a good cleaner degreaser will get rid of a lot of grime. TSP is a powder cleaner that you can get pretty much anywhere paint is sold. It’s really aggressive, so if you use it you’re going to want to wear gloves. If you’ve sanded or stripped, use a damp microfiber cloth or tack cloth to gather any dust.
-
Sanding:
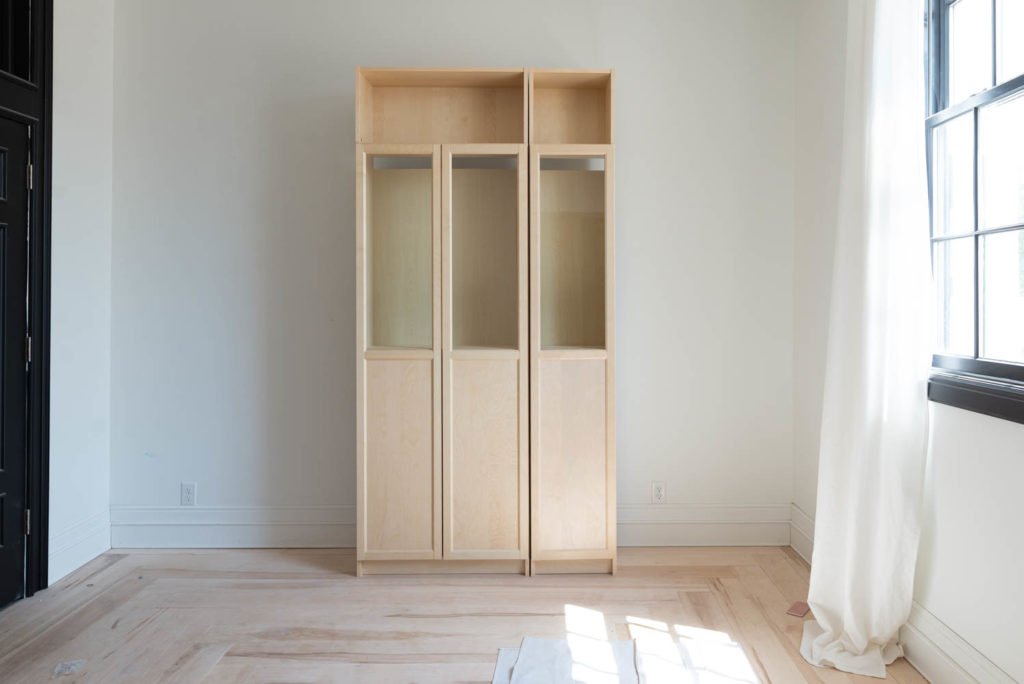
The thing to remember is that you don’t have to take the piece down to the raw wood, when you’re sanding you are taking out imperfections (like scratches etc.) and roughening up the surface so that your paint has something to grab onto. The more aggressively horrific the surface of your piece is, the more you and your sander are going to become acquainted. For newer pieces, like the IKEA furniture we’re painting in this post, a light sanding with a sanding sponge is plenty of prep. If you actually need to take stuff off of the surface you’ll want to use a sander and disk. I LOVE the reuseable Diabo SandNet disks. We’ve been using the same one for 5 months!!
WARNING! Removal of old paint by sanding, scraping or other means may generate dust or fumes that contain lead. Exposure to lead dust or fumes may cause brain damage or other adverse health effects, especially in children or pregnant women. Controlling exposure to lead or other hazardous substances requires the use of proper protective equipment, such as a properly fitted respirator (NIOSH approved) and proper containment and cleanup. For more information, call the National Lead Information Center at 1-800-424-LEAD (in US) or contact your local health authority.
-
Stripping:
Sometimes sanding isnt an option, like if your piece has a lot of detail that the sander can’t get into. This is where you tell your husband that you’re going to get a stripper and just see the reaction. #stripperjokes All joking aside, stripping paint is one of the gratifying DIY ever. There is just something about spreading the product on and watching the paint bubble and wipe off. The downside with stripper is that it can be really hard to get it out of the corners and grooves of a piece. I only use a stripper when absolutely necessary. That’s what she said.
-
Disassembly:
I always take furniture apart as much as I can before I start painting. Removing doors, hardware, and backs (if you can) makes it SO MUCH EASIER to get a professional finish (no one likes to open a drawer and see that they forgot to paint the edges!) If you’re painting a new piece like we are with our IKEA bookcases, we didnt even assemble them all the way before painting. Just make sure you put all of the hardware in a safe spot.
-
Taping
Once everything is cleaned and ready to go, now is the time for painters tape. Place it along the edge of your piece and use a credit card to burnish it into place. This will prevent any seepage and leaks.
-
Testing
To ensure success, you can do an adhesion test before priming. This will help you determine if your prep work was successful. In general, you want the surface to be clean, dry and dull before you start painting. To test for adhesion, apply a small amount of primer like Sherwin-Williams Extreme Bond to an inconspicuous area. Allow it dry properly and test to make sure it adhered to the surface well. Once you have determined good adhesion, you’re ready to prime and paint the piece.
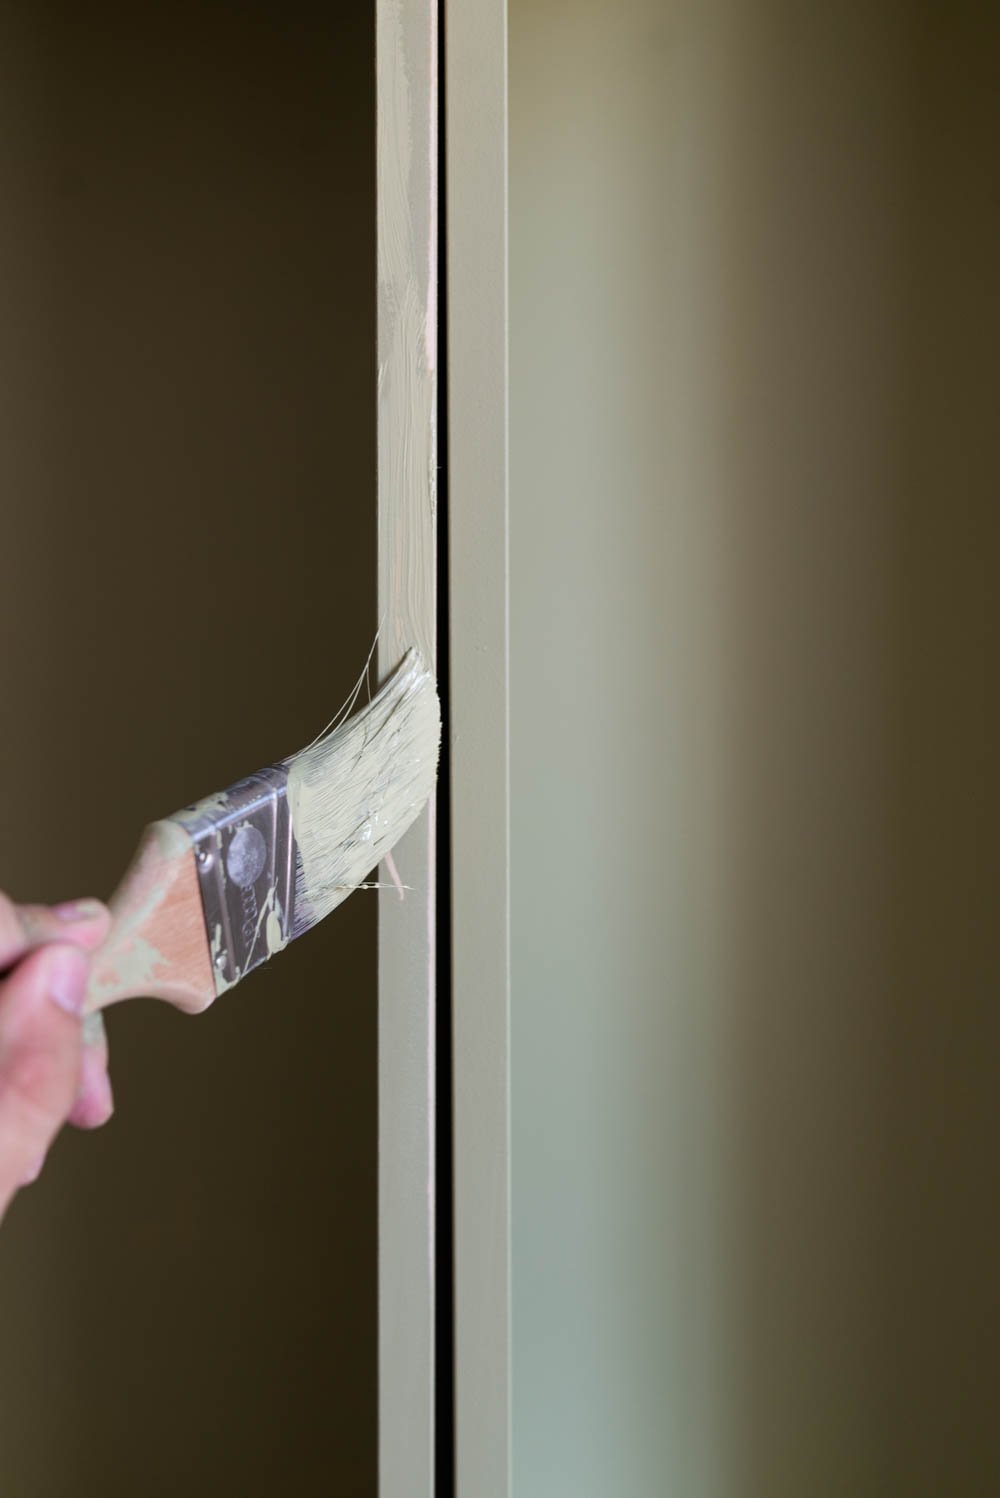
Step #2: Cutting In
If your piece has trim or moulding on it, you’re probably going to want to cut in first. Cutting in is when you use a brush to paint just the corners of things before you paint the whole piece. Sometimes (depending on the piece) you don’t have to cut in, but if you do make sure that you feather the edge of the paint onto the rest of the piece. If you don’t you’ll end up with a hard paint line and some serious texture.

Step # 3 Rolling The First Coat of Paint
OH MY GOSH ARE YOU READY!? Here it is, the big moment. Start by loading your paint roller with a medium amount of paint. You’ll know it’s too much if you can’t see a lot of the texture, and too little if you see all of the spaces between fibers. The right amount looks full but not saturated.

Move your roller on the piece with even pressure, moving in the same direction the whole time. Be cautious to no over do it.Make sure that you are watching the edges and don’t leave big mounds of paint on them. Once the coat is on, put your roller down and STEP AWAY FROM THE FURNITURE.
The biggest mistake that people make when they are painting a smooth surface is that they fiddle and touch and try to fix every imperfection.
Once your paint is on the piece it’s begun the drying process. Friends, if you are messing with it keep in mind that it’s still drying, it’s just not drying flat. If you over brush or roll it, you’re just adding texture, which we don’t want. As it’s drying, if you notice a spot you missed, leave it for the second coat. If there is a drip, wipe it immediately. If you notice it as the paint has already started to dry just leave it alone, you will make it worse!
So much can be fixed between the first and second coats, don’t make your job harder by fiddling with it.
There is going to be a little bit of texture until the paint dries. Just let it settle. I PROMISE it is going to be fine!
For reals though, have you stepped away? Cause you need to do that. The paint will darken as it dries. After it is dry (usually about 15-20 minutes) you can gently touch up the mistakes that you exercised great restraint to not fix before. Go you!!
Step #3 TOUCH UP: Sanding Drips or Texture
Oh now it’s time to fix those mistakes. using a 220 grit sanding sponge, gently sand away the issues, whether it’s a drip, or a hair, or a texture issue. Wipe that spot down with a damp microfiber rag to get the dust!
Step #4 PAINTING: Roll The Second Coat and Let It Dry
Step #4 is just like step #2, you are going to roll the paint and let it dry. Make sure to leave it alone! (Are you sick of hearing that yet? Cause it’s REALLY important to leave it alone.)
Leave it alone. (That’s the last time I promise)
Step #5 Final Touch Ups and Reassembly
Once coat #2 is dry, you are free to touch up the piece as necessary. Sometimes you need to sand it, and sometimes you dont! Please keep in mind that even though your paint has dried, it hasn’t cured. Meaning, its dry and you can touch it, but until it’s cured you can still scratch it or chip it easily. When I was putting my piece back together I got a pretty gnarly scratch on it that needed to be touched up so I sanded it and fixed it. I always try to wait at least a few hours before I put it back together to give the paint a chance to start to cure.
Painting Tips
Painting around glass
I’ve been known to start a project without adequate supplies on hand. Sometimes the mood just strikes you right?!! One day I was painting a piece with mirrored doors and I didn’t have any painters tape, so I just brushed over the glass and was happily on my way. When it came time to get the paint off of the mirror I was kicking myself for not having tape, but figured out a pretty cool hack that I wanted to pass along. If you get paint on your glass, swipe over it a few times with a damp paper towel and give it a minute to sit. Then go back over it with a razor blade and it will literally fall off the glass!

Storing Your Paint Mid Project
Look, I get it. We’d all love to be productive enough to get a project done in one sitting, but reality, and 2 year olds and school pick up happen and then its 3 days later and I’ve ruined my brand new paint brush because I got distracted and forgot to put it away. Just me? One of my favorite tips to keep paint fresh for days on end is to put the whole tray, brushes and all, into a garbage bag to seal the air from getting to it.
Paint Pyramids
These handy little buggers are worth their weight in gold. Use them when you’re painting things like cabinet doors, or smaller pieces to lift them off of the ground.
And when it’s all said and done, you’re left with a piece of gorgeous furniture and a perfect paint job THAT YOU DID YOURSELF!! High fives all around!!
Real Life Questions
I asked what your most frustrating furniture painting problems were, and man did you guys deliver with the questions! Let’s answer some of the most common ones, shall we?
“After days of drying, things would stick to the top. To this day I’ll have things stick to the top of the table 4 years later! Why?”
This is one of the most common questions I get, the reason things are sticking is because it’s not a paint created to dry hard. Touch your walls (it’s ok, no one is looking!) does the paint feel hard? Nope! Using the right kind of paint, like Sherwin-Williams Emerald Trim Enamel is the best way to avoid eternal stickiness!
“The spray paint I used left a matte line, even though the paint was high gloss”
This is called flashing and it happens when the paint color is uniform, but the sheen is not. It can happen for a few reasons but most commonly happens when the product is applied inconsistently, either too much or too little.
“I painted a pine dresser white last year and it’s starting to yellow where the knots are! Why and what can I do?”
Ugh this is so frustrating. It seems to happen most with pine. The resins from the wood are concentrated in the knots and has started seeping through the paint. The best way to prevent this is to use a stain blocking primer or a shellac primer. Make sure that you get a nice good coat on and then scuff sand it without taking it all off.
“I hate when I can see brush strokes or foam roller strokes from whatever I use.”
Man I hate that too!! Using a sprayer is definitely a way to prevent that in it’s entirety, but using the right kind of brush and roller will help a ton!
Now for the best part! I’ve got a whole video tutorial on How To Paint Furniture! Check it out below!!
If you’re ever planning on painting furniture, make sure you save this post to your Pinterest board so that you can come back as often as you need to!

Have any questions? Leave them below and I’ll answer!!
You might also want to check out:
How to Paint A Crib (and is it safe to paint baby furniture!?)
What pieces did u get to create that with the billy bookcase. I need something exactly like this!
Hey Amanda! We used the regular Billy with the height extender unit and the Oxberg doors!
Wow, what a transformation! Great guide, thank you Mandi.
Are the handles a DIY? Ttey are very nice.
They’re the handles included with the doors (unpainted) and these backplates from CB2:https://rstyle.me/n/c8z9p5vqaw
Hi there! Great tips! I’m about to paint cabinets made of mdf-can I use this paint? Any special tips for painting mdf?? Thanks!!!
Make sure they are well cleaned and dried. Take off all knobs and handles
I want to paint patterns on a wooden piece of furniture. Should the same Sherwin Williams paint be used for my project?
Yes for sure!!
I didn’t see anything about priming or sealant. Do you not need them with this paint or did I miss something?
This is timely! poised to paint my wood kitchen cabinets (currently just a standard ugly wood finish – no paint) and want to know two things!!! 1) Can I assume this would be the SAME paint I would use for kitchen or bathroom cabinets that get constant use? 2) Would you/or have you ever used a liquid sand paper product rather than sanding or would you stick to actual sandpaper?
Thank you!
Hey Mary!
Great questions!!
Yes, this paint is PERFECT for kitchen and bathroom cabinetry!
Liquid Sandpaper (from what I’ve experienced) is used mainly on pieces that already have a painted finish, it creates a chemical reaction that makes it so that the new paint can bond easily with the old paint. It doesnt actually remove anything, just softens the old finish. If you are painting your kitchen cabinets, they need a hefty amount of prep to clean off all of the grease. I dont think I would use liquid sandpaper on them, I would probably take the time to really prep them the right way.
xo
mandi
Thank you! That’s great advice!
Thanks for an amazing post! I have a couple of questions which always stump me when I’m painting, compared to projects descriptions online.
1. Painters tape. I’ve always heard about removing the painters tape when the paint is still wet, but does that mean you re-tape between coats?
2. Speaking about coats, how the heck do people get “2 coats done in an afternoon” when the minimum time to repaint is usually several hours? Just repaint as soon as it’s touch dry, or actually follow the instructions on the can ??
Thanks for being awesome, and so incredibly relatable ?
Great questions!!
Painters tape needs to be removed when the final coat is still wet. If you’re using waterbased paint (and 98% of the time you are) the lower layers will soften when a new wet layer is added on top. So as long as you remove the painters tape when the top layer is wet, the other layers are good to go! Definitely dont change the tape in the middle of the project.
Best practices are what the manufacturer suggest, that being said, I usually recoat after about 2 hours, when the surface is dry but not fully cured. (Paint can take up to 30 days to fully cure and NO ONE is waiting that long between coats!)
I think I understand why I’ve had so much trouble with painter’s tape before!! I had no idea you needed to remove it while the paint was still wet!!
Thanks for the helpful tips! Definitely will be helpful for some of the projects I’ve got in the works!
Ali Enza
https://happilyeveradventurous.blogspot.com/
Any need to seal it?
Nope!
Thanks, Mandi! I am about to embark on a few new projects and I’ll give this paint a try. Is it water-based or oil-based?
It’s water-based so easy to clean up!
What are your thoughts on painting an old (my neighbor’s discarded) wood dining table? A Home Depot paint associate recommended I go for solid color deck paint. It’s the most durable of the deck paint choices. I thought, perfect! Exposed to the sun and the elements? Hose it off when it gets dirty! I’m using the thinnest nap roller/ good brush on the rounded base method. I’ve already bought the paint. I guess we’ll see if this works.
I have zero experience with deck paint, is the table going to live outside? Keep us updated!
My experience with deck paint (SW Armorseal Tread-Plex) is that it is VERY hard and durable especially in Florida sun. I roll it on concrete with 3/8″ nap and it dries quickly. You can drag metal deck furniture across it without a scuff or scratch!
Thank you for the post. Do you know how long it takes for the paint to cure? I wish I found this post before I painted my first dining table because I did not realize there are two types of paint. I do have an issue and hope you can help. When I went to Home Depot and asked for help on my table, they suggested using a semigloss paint with no sealant/protectant which we listened. We purchased a sample size since that is all we needed and good for 2 coats. We have a total of 3 coats since I used a coat from a previous sample paint jar. We have no idea if it’s water or oil based paint on both samples. We waited for 7 days to dry and cure after the final coat with 24 hours of dry time in between each coat. We thought it was good to go when we placed things on it, and it didn’t leave any dents are mark. Happy for us until we tried to wipe the table down after dinner. The paint speared and was transferred to the wipes/towel. We started with the Lysol wipes but noticed the paint speared. Then we wiped the other half of the table with a regular wet towel and same thing happened. Do you know why that happened or what would cause it? Is it because the paint hasn’t cured? Your help is much appreciated. Thanks in advance.
Mandi, I followed your advice from a previous, similar, post to paint a bookcase and a bathroom vanity, and got amazing results! Smooth finish, no stickiness, great coverage. Even got some compliments and requests for my tips (told them about you!) Thanks so much. It’s so gratifying to succeed with a project on the first try.
Thank you for this tutorial! I’ve been too intimidated to even begin a project but now I can do it! Looking forward to painting nightstands that have needed painting for years!
I’m wondering about water or oil based as well. Soon I’m embarking on a wainscoating project in a dining room and I was wondering if this paint would be a good choice. I have always used BM’s Advance brand but might be up for trying something new. What do you think, would Emerald be good for that?
I would use regular Emerald on this, walls dont get the same kind of heavy duty use that furniture does! Hope this helps!!
xo
m
I’d love to hear your general preferences for sheens – I love an eggshell look, but the wipeability of a semi gloss and am always struggling to decide! What did you use for these bookshelves?
This is wonderful, thanks so much! I have been using wall paint to paint other things and now I know better! Question…what is your pick for a good exterior door paint?
I’ve got a whole post about exterior door paint here:https://vintagerevivals.com/how-to-paint-a-front-door-the-best-front-door-paint/
What are paint triangles???
Hi Mandi, This post is giving me courage! We plan to paint a lot of furniture as well as all of our stained 16 doors. This vast undertaking has me rationalizing the purchase of a sprayer. Preliminary research is leading me to feel I need a $1000 sprayer. Any thoughts on quality spraying equipment? Thank you.
This is exactly the post I needed! Thank you!
Have you ever painted a piano? I just got a used piano off Craigslist practically for free. I really want to paint it but I am not sure if paint will stick to it even after sanding. It is worn but most of it still has a shiny finish to it. You know how some pianos have a very shiny smooth coating? Even after scuffing it up it is still smooth feeling. Do you have any experience in this area? I would love your advice.
This isn’t Mandi habit I painted my piano and LOVE IT. Lightly sanded and used BM paint. So easy and looks amazing!! I’m sure Mandi’s recommended paint would be perfexct!
This is such a great post!! Thank you so much for all of the time and work you put into your blog. People like me really appreciate it!
Hi Mandi! How do you paint the edges of the piece without getting that buildup along the faces? Do you use a roller or brush? Paint them first or after the faces?
Thanks for all you do!
I initially started on your post about painting cribs. Is the VOC level on this new paint the same or comparable to the ProClassic you initially recommended?
I am not 100% sure, but I believe it is actually lower
I believe that all Sherwin-Williams paints now come in a zero-VOC option.
Thanks Mandi for all the tips, especially the walking away part – I tend to try and perfect things and then end up with imperfections because if it!
I’m painting a vintage faux bamboo dresser with a happy shade of hot pink today and thanks to your article I’m excited to get started… off to buy the paint!
I want to paint an old hutch that I originally stripped, stained, and varnished. Can I paint over it with just some sanding or do I need to strip it again. And what kind of primer should I use before painting?
You should be able to just sand it! Make sure that you are using a bonding primer (Sherwin has a great one) and you’ll be good to go!
xo
m
Thanks for this post. I have been trying to get up the courage to paint kitchen cabinets. I’m going to do it now.
Im painting my oak kitchen cabinets. Should i use Sherwin Williams premium wood & wall primer or is the one you mentioned in this article the better one to use?
Great tutorial!
Is emerald paint the best to use when painting over an oak bathroom vanity? There will be a lot of moisture so not sure if it would need a top clear coat?
Thanks for the helpful article! I have one question. You say: “Find a lint free roller that has a nap of 1/4″ or lower.” But then you say: “My favorite roller for painting is a Purdy White Dove 3/8.″ That nap size is bigger than 1/4 inch. Was that a typo?
Hi Mandy here is the question for you. About a year ago I painted an old sideboard, a dining room table, and six chairs with chalk paint. The reason was that I was told you could just paint right over it if you decided to change colors. Well guess what? I’ve decided to change colors. Having said that I did notice that overtime I have gotten a few nicks that lifted the paint on the table surface. What I do not like about the chalk paint is that I could never achieve any kind of gloss on the table top and the sideboard top even if I used the recommended sealer everything that my husband. Can I repaint these items without a primer and using the Sherwin-Williams emeralds that you are so high on?
How about painting dining room chairs. I have some that I need to repaint. Should I used the spray or regular with a brush
I painted our dining room chairs about a year ago (with diluted chalk paint). I used a sprayer and the turned out great!
What colour is the paint that you used for the Billy bookcases. I love it!!
Thanks. Arlene
The color mentioned earlier in the article is Sherwin-Williams Ruskin Room Green SW-0042. Have fun with your project.
Any special hints on a bathroom cabinet? One end is synthetic, the rest is wood. Will just roughing up the finish on the end be enough to hold the paint ?
Hi Mandy. really liked your painting ideas and knowledge. Recently I used Sherwin Williams Pro Classic for an 50 year old bathroom vanity. It went on very smooth. Color was Svele Sage. It was recommended over the Emerald. I also spray several coats of Deft lacquer over the entire project for added protection against moisture. Now I am planning on painting the entire kitchen. Don’t want to have to use the lacquer finish, so would like to try the Emerald. My biggest problem is that the doors are slab. The builder put in a router or groove all the way around each door, 2″ from the edges as decoration. Don’t want to cover it with moulding. Want to fill it in and sand and paint. Do you have any suggestions? These are veneered and in some cases the veneer is in very bad condition. So I am going to peel it off on some but not all the doors.
I’d love to hear your general preferences for sheens – I love an eggshell look, but the wipeability of a semi gloss and am always struggling to decide! What did you use for these bookshelves?
Great information. I need to paint my pantry shelves, they currently have “builders paint” ugh! Should I prime before painting and is this the best paint for the job? Also, how long should I wait before I restock the shelves?
I have a dresser that was painted white already, but I would like to repaint since its gotten very dirty. What do you recommend doing since it is already painted, sand it all the way to the wood base?
I combed the web and found your instructions for painting furniture, more thorough than anything else I found online. So I am currently following your instructions to paint an old desk. And I’m painting it SW Ruskin Room Green! Thank you!
There must be a mistake bc the Purdy white dove 3/8 nap made my project very textured. Now I have to start over and sand again.