I am still alive! (well barely. What day of the week is it?) The Hoard Sale was a MASSIVE success. Stay tuned for a post all about it,
Last week I shared my tip for getting a perfect paint job, so today I thought it would be fun to show you a project that got just that.
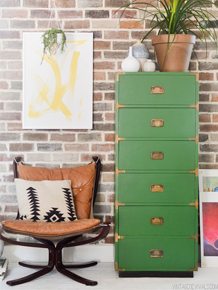
IKEA Rast dressers are utterly fantastic for a nightstand replacement. They are inexpensive ($34.99), small, and made out of solid wood. They were just what I needed for Macie’s Bedroom. But here is the thing. Sometimes you don’t want it to look like a Rast. Sometimes you want it to look a little nicer. Ya feel me?

After putting the dressers together the first thing that I did was putty all of the pre drilled holes and the screws. I like using the pink putty that dries white.

Pile it on nice and tall. Sort of like a wad of bubble gum. Don’t try and make it perfect at this point.

Make sure the your putty is completely dry before you start sanding.
To sand I used a 220 grit sanding sponge and a small circular motion.


Once everything is nice and smooth, give you dresser a quick wipe down with a slightly damp cloth to get the dust off. (You can also use tack cloth, but lets be honest, who has that on hand at all times?)

Once it is time to paint, you will want to follow this tutorial to a T. It will give you a perfect finish.

For those interested, here is the paint formula for the custom pink color:

Now for the REALLY fun part. Bring on the leather and brass!!
I stated by cutting a campaign shaped pull out of leather (you can upload this image into Design Space if you have a Cricut Explore and cut it with that, or you can print it off and trace it!)


The corner pieces and brass pulls are from Home Depot. To find them you will want to go down the aisle that has the pulls and knobs.
The brass corner brackets come in packs of 4, you will need 3 packages per dresser.
The pulls can be found right by the hinges and brackets. They are called Brass Utility Pulls. You will need 3 of these puppies too.

Start by gluing your leather piece onto the drawer. I decided to move mine to the top of the drawer instead of putting it in the center. Make sure that it is centered and level.
Then hold your brass handle onto the leather and mark where the screws will go.
Using a small drill bit, drill pilot holes through the leather and into the wood. Then attach the pull.
You will want to drill pilot holes for the corner brackets as well, so that you don’t split the wood.


Check out the other tutorials from this room makeover here!


This turned out so awesome! We are getting and IKEA here in Kansas City in just a few months and I can’t wait to start working on projects like this 🙂
Thanks for sharing Mandi! Excited about that custom pink color! What a great idea to use leather details.
Not a huge craft/DIY talent, but I’m definitely going to give it a try this summer. My room really needs something like this in it.
Thanks for inspiration xx
I am SOO sad I couldn’t go to the hoard sale this year! I went last year for a little bit with a friend, and I wish I could have stayed longer! Next year, next year!!
As for this dresser, this is why I love ikea and I love you! I just love anything inexpensive that you can put your own touches on! Cute Mandi!
What an amazing transformation. I seriously love the color with the brass and leather. ANOTHER Home run! Really really enjoy your blog. 🙂 Have a great day, catch up on your rest!
I just bought an ikea dresser just like this! Can’t wait to let the creativity flow! You are so inspiring. Love your projects.
https://www.thelittleliongirl.com
I am completely obsessed with this room makeover! Like, I visit it every day. EVERY day. I am in the process of collecting beautious things to recreate for my youngest daughter…. cannot wait!!
DYING, waiting on the macrame headboard… the suspense…. Hurry girl, hurry! (<— I enjoy my exclaimation marks far too much, I know.) Love. This. Blog.
Hi there!
First thing’s first, I absolutely adore your website!
That being said, I was wondering if you would be doing a tutorial on the Macrame wall hanging that you did on Macie’s bedroom reveal? I would love to create one!!
Thank you 🙂
-Tayler
Love it! Where did you get the leather trim?
This is so lovely! I’m going to try it, but I don’t think my husband will go for pink so I’ll try a blue one too 🙂
I stumbled onto this nightstand hack after drooling over your laundry room revamp (gorgeous)–but I’m really interested in these bedside scones/wall lamps! Where did you get them, pretty please? Thanks so much!
I am redoing my room right now and have my eyes on a campaign desk for a long time, but I didn’t want to ship one since I don’t live on the continental U.S. I would love to try doing this to a regular desk. Thanks so much for the tutorial! Also, I too was wondering where those cute wall lamps are from. They are too cute!
where are those wall lamps from? – love them!