What is it about spring time that makes me want to change everything in my life?! PLEASE tell me that I am not the only one that experiences this.
I am ready for new projects, and new design, and new well, everything.
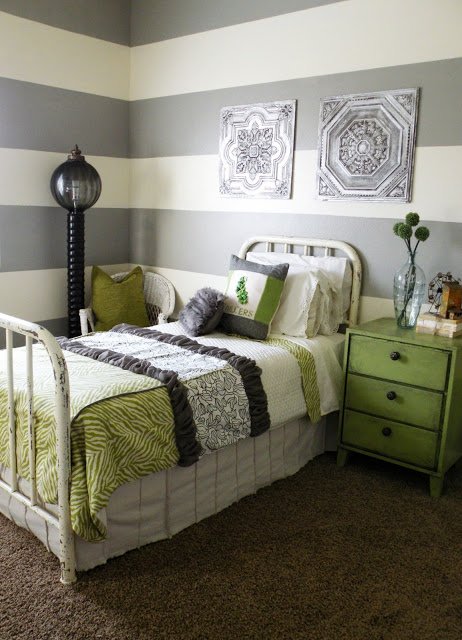
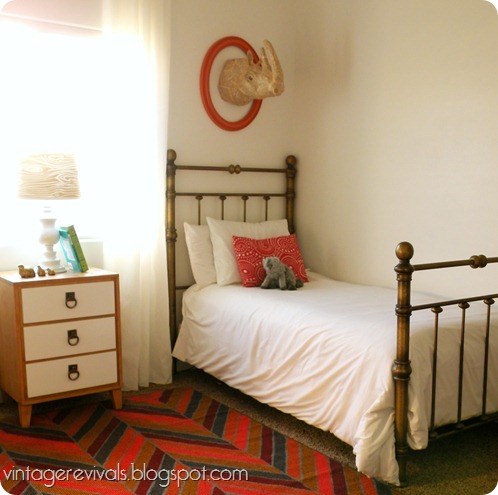
The room on the scratching post first is Dylan’s. I took it from this:
To this:
And that is basically where it has stayed for a FREAKING year.
It was great to take it back to a white space but it had like zero personality (besides that awesome rug). It is 1000% not Dylan and I am itching to change it.
First thing to go?
The carpet. The painted concrete floor in Ivie’s room has held up amazingly well and carpet is the Bain of my existence. So that is the project we are starting with.
Hopefully I can cure this itch before I start changing something else…you never know.
Do you have a spring itch that isn’t allergy related? Tell me all about it!
Another fun announcement that I have today is that I have started writing for a new AMAZING blog called The Interior Collective. You MUST hop over and check it out, it is full of killer information and designers. It is a weekly column so I will be sure to give you a heads up when a new post is live!
Dun dun dun DUUUUUUN! (Very exciting announcement to follow.)
The Hoard Sale is upon us folks. For those who are scratching your head wondering what in the world a Hoard Sale is let me tell you.
One of the ramifications of having a DIY blog where the focus is thrifting related is that you accumulate a lot of stuff. And by a lot I mean, well a lot. At my house the accumulation of such items is called The Hoard. It is a living, breathing, organism that lives in the garage but often times can be found dividing and multiplying in the trunk of my car, the corner of the bedroom, and in every closet that can be closed off to visitors. The Hoard has a tendency to grow exponentially when the weather warms up and yard sales abound.
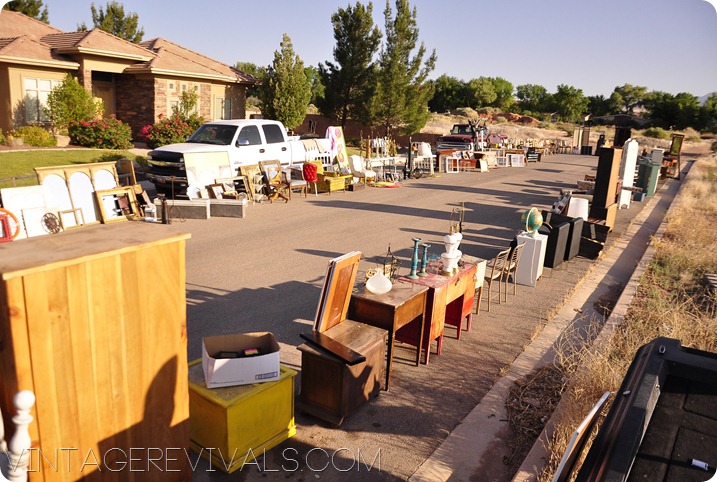
And once a year I team up with my BFF Brooke to sell off anything that doesnt have a home INSIDE the house. It is very fun and traumatic at the same time (because some of the stuff is just SO good!)
Last year we threw it together at the last minute and this is what it looked like:
I.know. Wehaveissues.
But it is a fantastic way for us to sell our crap, connect with our readers, and be able to park in our garages again…for at least a week.
This year we wanted to give you plenty of time to get your ducks in order so that you can join us! The sale is on the calendar for May 18, 2013 and begins at 8 AM SHARP. It is located in St. George UT (we are about an hour and 1/2 north of Vegas) and it is THE sale of the year.
It is stuff we have found on Craigslist and at the thrift store that is handpicked and we have a) used in our house already b) bought for our houses with the best of intentions.
There will be some pre-finished pieces for those that are not DIYers, but the majority is project central.
I had to clean out my garage just to make room for the literal 2 truckfulls of treasures I found this weekend. Want a sneak peek of some of the goodies?
We would so love to have you there!! I will be posting teasers for the next month and 1/2 so you can see a bit of what you are in store for.
Dudes! My FREAKING computer has a virus. (I know, I know, I should’ve bought a Mac.) So it is in the shop, which means the fun post I had written for today is also in the shop (that is what I get for being on top of stuff. NEVER again.)
I have a few tidbits that I wanted to share, and since not everyone is on FB I am over here.
1. The winner of the Home Depot/P&G giveaway is Kiara who said:
My #1 painting tip: use quality products, from tape and tarps to brushes and paint. When I was 15, I repainted my entire bedroom, including the vaulted ceiling that went up to 8′ high. Mom made me buy all the cheap supplies, and I had SUCH problems with them! The paintbrushes kept leaving bristles behind; the thin tarps kept ripping, and didn’t keep paint from seeping through; the tape wouldn’t lay flat against the surface, which meant paint was getting in underneath it.
You HAVE to have good supplies. If you don’t, more then likely you’ll not only regret it, but end up spending your savings from the cheap products to buy MORE supplies!
Thanks for the great post, Mandy, and the opportunity to win these items! <3
– Kiara from Land & Luxury
Miss Kiara you have 48 hours to claim your prize
2. Yesterday I Instagrammed a picture of the most terrifying cat ever
When I went back for round 2 that evening it was gone. Which tells me 2 things. Someone loves vampire kittens, or someone has learned that even horrific things can be made whole with spray paint.
So do you want a clue about Monday’s exciting announcement? It has a little to do with Miss All Things Thrifty and a lot to do with the crap in our garages….
Sometimes you find an amazing kitchen table that makes all of your hopes and dreams come true.
And sometimes you have to build one yourself.
We have been through our fair share of kitchen tables in our family. The cheap black distressed counter height table with stools that chipped when you gave it a dirty look. A gorgeous reclaimed wood table that was too long for our little space. And last but not least, a painted teal table that I was over after a few months. Its part of my DADD condition ( Decorating ADD if you are unfamiliar with the term. We jokingly refer to it at our house as Dad issues.)
Painted tables are just a little too much maintenance, and Court did not love the reclaimed wood (he felt like it was never clean) so that left me with 2 options. Metal or Glass. And since I have not yet learned the art of welding (don’t worry one day I will) glass it was.
I am super digging a warm modern industrial vibe right now and thought it would be fun to try my hand at building a pipe table. I wanted something unique but it needed to be easy for me to wrap my head around too.
First things first. Lets chat pipe. The pipe that I used is Rigid Steel Electrical Conduit. You 100% want to buy this from Lowes because they can cut it to your exact dimensions and thread it there. The rigid is important because they also sell electrical conduit that is very thin and cannot be threaded, therefore totally worthless for building anything, especially a kitchen table. FYI you can also find Rigid Steel Plumbing Conduit at Lowes, the only difference is that it is a bit more expensive because it is treated so that it is safe to use for drinking water. Save the $ for something important.
This is the awesome machine that cuts and treads the pipe. It uses lots of oil to help with lubrication while threading so be aware of that if you are transporting them in your car. Just ask for extra plastic bags to put on the ends to protect your carpeting.
As part of my DADD I have a mind that looks at a million components of the project all at the same time (it makes Court CRAZY.) But before I could get all pipe happy, I needed to find a piece of glass so I knew what my measurements for the table base needed to be. Glass table tops are FREAKING expensive FYI. I kept an eye out on Craigslist for one to pop up and at $100 it LITERALLY saved me $1,000. I know. $1,100 was the quote I received on glass. Such a better choice to go used. My glass measures 3’x5’
Now for some important bullet points:
You guys know that I am all about girl power. In fact, most of the building projects at my house are done by me while Court is at work. But. Unless you are like a legit female bodybuilder, you will need someone strong to tighten all of the joints in this table. I tried to put this together while Court was out of town one week and it didn’t work so great.
In my mind I thought I would have to have almost all of the pieces custom cut for my table. In reality, I only had to have the long pieces cut. All of the short pieces are precut (which is FANTASTIC for everyone involved.)
While this may seem obvious to everyone else I just need to share. Measurements for the pipe goes from end to end including the threading. So if you are going to come up with your own measurements be aware of that fun fact. And you will also need to factor in the space for the fittings (for example a T fitting adds about 1” to your total measurement because it has to have room to accommodate the pipe that comes out of the bottom.
Now for the fun part.
To build this table you will need:
(1) Pipe Joint Compound (this lubricates the treads and makes it easier to tighten, it is a must have.)
(4) Floor Flanges (roughly $6.00 each)
(8) 90 degree Elbows
(12) T Joints (they look like a T!)
(4) Bushings (roughly $9.00 each)
(8) 10” Pipe
(12) 3.5” Pipe
(8) 8” Pipe
(4) 50” Pipe (these are the ones you will have to have custom cut and threaded at Lowes.)
Pipe Wrench (or 2)
Start by building your table top (aka the part that is going to hold your glass)
We found it worked really well to use a smaller piece of pipe temporarily to tighten all of the elbows and Ts, because you can get more leverage than you can just holding onto the fitting.
This is SUPER important to note. Every time you are completing a closed shape (like a square or rectangle) you need to have 1 of 2 things happen. To screw both ends tightly into your fittings you need to have one side reverse threaded (which I believe only exists in a real life metal working shop, they did not do it anywhere that I could find here) OR you need to screw one end of the pipe very deeply into the joint so that it will have room to unscrew a little while screwing it into the other end, (deep enough that it wont come all the way off of the first end.) This is the technique that we used and it worked great (because of my husbands massive muscles and my cheering.)
The only place that you will encounter this backward twisting situation is the table top support. It will be the center bar and one of the small pieces (because technically there are 2 rectangles being created.) . When you are doing this (especially with the middle crossbar, it helps to have your pipe screwed into one end and angle the T so that you can rotate it to be on the end of the pipe.)
The Pipe Unions on the legs have a giant nut that connects them together so you wont have this problem there.
This is a Pipe Union. They are a little bit expensive (about $9.00 each) but they add character and simplify the building process.
Here is a detailed diagram of all of the components so that you know exactly how to assemble your table.
It is very important for the stability of your table to have a cross piece at the bottom. That way if your fat cousin Kenny comes over and happens to sit on your new table it wont flatten.
To prevent the glass from sliding I used clear rubber disks on each corner elbow, and they have worked PERFECTLY.
I absolutely LOVE this table. Total cost including the glass was around $350. No too shabby if I do say so myself.
It adds just the right amount of industrial to the space.
Check out these posts for more info on the other elements in the space:
In my almost 3 years of blogging I have never posted a recipe (mostly because I don’t cook and use spatulas for stirring paint.) But I just have to share this recipe with you. I want you to know that now that I am sharing this recipe it was after months of research and about 10 extra lbs. and 15 different recipes. And literally this is the only one that I deem important enough to share. So please relish this moment because its never going to happen again.
There is a little shed in St. George called Swig. If you are ever in town it is a MUST stop. It is located on 1000 East just off of St. George blvd. (Order a cookie and a Dirty Dr. Pepper.) They sell drinks and baked deliciousness. There is always at least an 8 car wait, and everyone gets a sugar cookie. Everyone.
Update: There are now 2 locations! Who knew heaven could be in 2 places at once!!?? The second location just opened up at 287 West St George Blvd.
Swig cookies are my daughters favorite treats/rewards/bribes (and mine). Anyone who tastes a Swig Sugar Cookie will never be the same. They are literally life changing.
Now I am no Gail Simmons, but I am going to try my best to describe these bits of heaven to you. The cookie itself is crunchy and crumbly and buttery (sort of like shortbread) on the rough edges, while the center is soft and chewy. The frosting isn’t too sweet and the combo is well, the best cookie ever. The cookies need to be served cold with the frosting at room temperature to get the full Swig experience.
After a super long time of searching and trying out recipe after recipe that was supposed to be THE BEST SUGAR COOKIE EVER I was coming up empty handed. Until this weekend. I found the recipe. You MUST try these cookies, there is no if ands or buts (or butts) about it.
And I have never written a recipe tutorial…so sorry if this is awkward for everyone involved.
You would be crazy to not pin this for later (or for right now if you are uber motivated.)
[mv_create title=”Swig Sugar Cookie Recipe (LITERALLY The Best Cookie Known To Man!!)” key=”13″ type=”recipe”]Happy baking! (And in the spirit of full disclosure, I dont know if this is the actual Swig recipe, it was adapted from a combination of recipes including this one. )
Oh, and that hot pink straw in my pictures is actually a color pencil.
Friday is HERE!! I am heading out of town today to speak at the Kanab Women’s Forum and I am SUPER excited about it! If you are in So. UT and have a free day tomorrow I would love to meet you! Ticket info is here.
Remember a few weeks ago when I announced that Creating With The Stars was back? I was super excited to get going, my partner was Jessica from Mad In Crafts. Round one theme was upcycling and Jess came up with an awesome project. She used vertical blinds (you know, those HORRIBLE things!) and turned them into a headboard. I thought it was such a great project and was literally SHOCKED when I saw that she had been eliminated. Am I crazy? Anyways. Jess has some amazing projects over on her blog so pop over and cheer her up a little. Did I mention that I was shocked?
I got an email from my BFF Jilly that said “You will LOVE this blog.” with a link to Brooklyn To West. UM HELLO TALENT. Arielle Alasko is the talented designer behind the blog and I sent her an email just to tell her how fantastic I thought she was. The subject line was something along the lines of “I feel like I want to propose to you.” Too soon? Meh. She is amazing and I literally want to drive across the country just to hang out with her. Is it weird that seeing someone’s designs will make you want to do that?
Do you guys read The Hunted Interior? If not then consider yourself behind. Kristin Jackson is the DIY mind behind this blog, she has got a killer style and I love reading her posts. She is going to be HUGE one day. Mark my words. This girl is the real deal.
I have had to channel my inner foodie the last few days in anticipation of the ONLY recipe that you will ever see here on Vintage Revivals. Cookie photography is something that my friend Bridget has down pat. She is like a frosting ninja and one of my absolute favorite reads, even though I never cook, and only make frosting so I can keep it in my fridge to eat by the spoonful. Check out Bake at 350 and make sure there are no children around, because they will be SO excited by her cute cookies that they will beg you incessantly to make some for them. Thanks Bridg.
So what are some of your favorite blogs? I am always looking for new reads, leave a link in the comments (even if its your own!)
We have all seen on HGTV those amazing kitchen renovations where it literally doesnt look like the same house. Then we sigh that it will probably never be a part of our reality. Well, luckily for me, I was able to see/help design a transformation of this magnitude over at my in-laws. Yesterday I showed off the living room before and after, and as astounding as that is, the kitchen is literally to die for.
This is what it looked like before. My MIL pretty much despised it from the day they moved in. It was plagued with the worst that the early 90’s had to offer. Oak Cabinetry, drop down ceiling, florescent lights, off white Formica countertops. It felt teeny and crowded and drove her crazy.
Working through the design we decided that the first things that had to go were the wall separating the kitchen and the living room, the peninsula, and that freaking drop down ceiling.
So the men got to work demoing, removing cabinets, and other manly things.
And since this isnt that type of blog there wont be any tutorials on how to remove a wall. So sorry folks, but I am not an expert at that.
Then like magic we move on to this:
Oh look! A new ceiling, can lighting and floors!
And from there we go to this:
Anyone with a pinterest account knows that white cabinetry and subway tile are all the rage, but sometimes it can just be so white. To balance the whiteness we used dark gray countertops (Concrete by Caeserstone) and dark grout in the tile.
The floating open shelving is made out of dark walnut and totally warms up the white.
Both of the vintage lights are thrift store scores (of course they are!! Would you expect anything less?)
We painted the wall at the far end of the kitchen with Sherwin Williams Iron Ore to tie it into the living room, and to tone down the white a little.
Before the reno this living room was never used (there is a TV room that is off the entry that we used WAY more) but now this gorgeous area is the center of the home.
Dont forget to check out the Living Room Reveal too! Questions? Leave them in the comments and I will be more than happy to answer them!!


")