If that post title didnt make you think of these guys then read it one more time. (FYI Court can sing that song better than anyone I have ever heard. Its one of those strange talents that make you love your husband more.)
Pretty much I am just popping in to say that I am here, still alive, and projecting (that would be project-ing not projecting) it up.
The last few days I have been working over at Sierra’s house for my Studio 5 segment and as we were finishing up (on Saturday) I just wasnt feeling the design the way I wanted to be. So I started over.
Because I am a freak. An OCD freak.
But, the good news is that it will all be done today, and I wont have to try and find ANOTHER outfit that I can possibly paint in that will still look good on TV, because let me tell you, THAT has been the hardest thing of all.
So tell me. When you are just not feeling the project love do you A) Step away and come back later…much much later? B) Take a paint brush to it and start over immediately? C) Use some choice words, yell at your husband because somehow it is HIS fault and then light it on fire?
Today’s What Would You Do? is a little bit more personal than most. You guys are like legit my favorite people in the world and I want to know what you would do to some projects I am working on!!
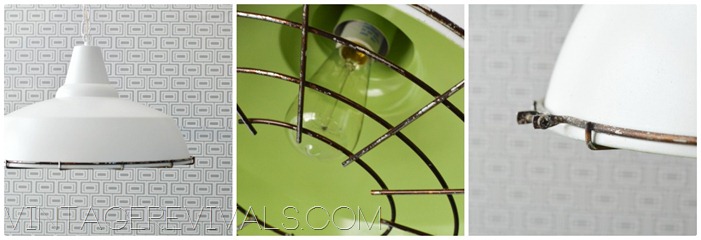
Up first is the Industrial Work Lamp that I posted about yesterday. Since our eyes first met I have been on the fence about leaving it vs. changing it. While the brown isn’t what I would necessarily choose I LOVE the character in it. In the pics it may look like chippy paint but it actually is a few spots where it was filed down, like it was on someone’s work bench and they used it to dull a file a little before they went to work. It makes me happy to look up and see it. So what would you do? Paint it? Leaf it? Leave it? I looked it up online to find out the value (its a Dazor Floating Fixture #602) and while they are going for $60-$100 I think its in fairly poor shape (because of the filing) and wouldn’t be worth much. So I am not opposed to busting out the spray paint.
I am doing a really fun segment on Studio 5 that will air on March 1st (mark your calendars!) called What Would Mandi Do? As you can tell by the title I am handing out decorating advice like its candy. One lucky viewer is actually getting an update. Check out this fireplace that Sierra shared with us:
It has an AMZING story behind it (that you will have to wait until the segment airs to hear about) but I am headed over today to work on it and make it super Mandilicious. I have a $100 budget (so keep that in mind!) What would you do to it?
The lighting around my desk as been evolving since conception. I mean, obviously you need lighting at a desk. And this is legitimately my work desk so it has to be functional AND freaking awesome.
I started off by falling in love with the industrial farmhouse light that I gave away in November. I loved the pop of color, I loved the industrial vibe it was giving and most of all I loved how it was off of the desk (freeing up more space!)
But alas…it was never meant to be mine.
Next up was the Color Pop Cord Lamp. I loved the exposed cord but the lamp was just too big for the desk, I needed more space.
Moving on.
Most recently I had a old school desk lamp that I gold leaved a little (someone PLEASE take the gold leaf away from me before I have golden underwear)
Loved the shape, but I actually love it MORE in Ivie’s room and just like me, it cant be in two places at once.
Yesterday I hit up the DI (Utah’s version of Goodwill) and found this:
(insert angels singing)
It was PERFECT!
This lamp had everything I loved in each of the other lamps combined into one fabulous package. Its like finding a man that looks like Ryan Gossling, has the adoration and manners of Matthew Crowley, the money of Bill Gates, and the personality of Jimmy Fallon.
Lets go over the happy checklist of perfection. Industrial Style? Check. Off The Desk? Check. Exposed Cording? Check. Vintage Desk Lamp vibe? Check.
Pretty fantastic find for $5.00 if I do say so myself!
Do you play musical (fill in the blank) until you find perfection? Or are you a “I am going to make this work regardless” type decorator?
Holidays always throw me off. Lets pretend today is actually Monday, that way when its Friday it will be like finding $20 in your coat pocket…
I feel like at least once a week I start off a post with “If you’ve read Vintage Revivals for a while….” and if I haven’t guilted you into it yet, you should know that is LITERALLY one of the biggest downfalls that I have, I assume that you guys know everything Vintage Revivals (even though in all reality I know that you don’t) So there is that tangent for you…back to the point.
I have been learning and DIYing my way from complete nothingness (I was a spray paint virgin when I started the blog, if you can believe that!) I LOVE learning new things and don’t love repeating projects/colors etc. because its just so much more exciting to try something new!! So that is what I have done for the last 2.5 years. I have fought to try new crap on an extreme basis. Extreme to the point that my house has been a bit like a crazy schizophrenic. Each room was its own entity and didn’t really tie in to each other except for the fact that I loved them all at some point. I can so clearly see the evolution of my esthetic from room to room, which explains the constant need for change.
But as I am typing this post from my couch something (or should I say some things) make me very happy.
I found this awesome (then brass) chandelier at the DI (Utah’s version of Goodwill) for $15.00. And wanted to do SOMETHING amazing.
So I spray painted it purple and hung it in my entryway. For a year and 1/2 it has been the lone purple soldier in the sea of rainbow happiness that my house is becoming.
Now after almost 2 years I have found something to tie my kitchen to my entryway (something I thought might never happen).
On Black Friday Rugs USA was having their infamous 75% off sale and I scored this over dyed electric plum rug for next to nothing. And how about that awesome table? Huh? Tutorial coming soon!!
So basically the whole point of this post is to tell you, that when you are fearlessly discovering your true style, don’t be concerned if things feel a little disjointed for a while. As long as you love something it will (eventually) come full circle and you will appreciate it all the more.
Happy Valentines Day!!! I just want you all to know JUST how much you mean to me. I know that 99% of my readers I have never met in real life but I think that you are fantastic, and my life would not be the same without you!! Thank you to everyone who voted during the Homies, you guys are wonderful! We ended up in third place, which is AMAZING!!
Hope you have something fun planned today, I think I am going to be a fun mom and throw a Valentines party for my cute family tonight. Time to head over to the vortex that is Pinterest.
Do you have fun Valentine’s Day plans? Share your ideas!! (and keep it clean!)
Thanks to everyone who has voted for Vintage Revivals for the Best Home Project/ DIY Blog over at Apartment Therapy! Today is the last day to vote and while we are in 2nd place, we are about 300 votes down. We need a Hail Mary to pull this off. So if you are the praying type now is the time to start, and if you haven’t voted yet (yes, I am looking at YOU!) We need you!! You can be our miracle maker!Vote here!
Do you find yourself saying the same things to your kids over and over and over again? The top 3 most used words at the Gubler’s (not including the ones that are mumbled under my breath) are “Be Nice.” “Leave Your Sister Alone.” and “Be A Happy Girl!” As a parent all I want is for my girls to be happy. Not the kind of immediate fleeing happiness that we seem to chase after but happiness in your core. This was my inspiration for this sign for Ivie’s room.
You guys know how I preach finding inspiration and running with it in your own direction? That is exactly what happened with this project. I saw this twinkle light headboard on Apartment Therapy and thought it was SO fun. So I stashed it in my brain. Then a few weeks ago over on Young House Love John framed some really cool deconstructed bike pictures by building the most simple frame ever. Noted John, noted.
So those ideas, married mine (I guess that would make them polygamous) and the Happy Girl sign was born.
So sorry its not lit up in this pic, I snapped it while I was staging and for some reason didn’t get a full shot once it was plugged in, but I wanted you to see the size of it!!
To make this sign you will need:
1- 30×36’” sheet of Plexiglas
16’ of 1×4” wood
16’ of 1×2” wood
Frosted Spray Paint
Spray Paint Color of your choice
Letter Stencils (you can use vinyl, painters tape, etc.)
1 Strand of White Christmas Lights
1 Extension Cord
Start by making a frame out of the 1×2 that is the same size or a tich smaller than your plexi. This frame is simply for support, it will not be seen. The outer edges of your frame should line up with the outer edges of the plexi. Make sense? Same size.
Notice that I made the inside pieces are shorter so they would fit inside the top and bottom pieces without having to cut a 45 degree angle and have mitered corners. We are going to simple folks…just the way (uh-huh uh-huh) I like it.
Nail your pieces together with a nail gun (or if you don’t have one available you can wood glue, or screw it together)
.
Once this one is finished you are going to make one exactly the same way but with your 1×4’s keeping in mind that this frame and your plexi need to fit INSIDE it.
To make an even outer lip on the sign use your scrap wood to raise the inner frame and nail it in place.
Make sure that your plexi glass fits and then give yourself a HUGE slap on the butt for a job well done. ps I totally recommend doing that in your garage where all your neighbors can see you.
For the signage I mocked it up in Photoshop to see size-wise what I was looking at. My letters ended up being just over 14” tall.
FYI that alternate title for this project was Frankensign. I only had a teeny bit of vinyl and I was NOT about to put this project on hold to wait for some, so I got creative and used my scrappy vinyl, transfer tape, and painter tape. They don’t call me The DIY MacGyver for nothin.
Remember when you are making your letters that you mirror them so that the front is sticky, otherwise you will end up with backwards letters and that is not awesome.
Ok now one thing that you need to remember when you are doing this project is that plexi glass is a very smooth non porous surface, and there isn’t really anything you can do to make it more spray paint friendly. If you are not careful this will scratch. That is why we are doing the painting on the inside and not the outside.
After you have your letters sealed off throw down 2 coats of frosted spray paint. This is the best kind of “primer” you can use on a glass surface. It will also seal the edges of your letters and prevent against bleeding.
Once your 2 coats are dry, spray on a minimum of 3 coats of your color. MAKE SURE YOU SHAKE YOUR CAN. I am an impatient sprayer and normally its fine, but the color that I used (Rustoleum’s Blue Slate) is one that has a light and a dark color inside (I have only seen this with Krylon’s Classic Gray before) you have to shake it for a solid 3 minutes to get it to spray in an even color. Because I jumped the gun my sign has a little color variation in it that isn’t ideal, but not a huge enough deal to start all over.
Gently peel off your letters and then spray a few coats of the frosted spray paint over the letters (otherwise they will be totally clear, this is just fogging them up a little)
Once everything is dry, place it in your frame (also if you are staining your wood you will want to do it before you do this, I used Restore a Finish in Walnut on mine for a really light color. You can read more about that here.)
Use a low heat glue gun along the corners of your plexi and wooden frame to secure it in place.
While your glue gun is still hot attach your Christmas lights to the wooden frame. I took mine all around the perimeter and then zig zagged across the back of the picture.
Use a dab of hot glue to hold the wire in place. Make sure its low temp glue, just to be safe.
Plug it into a simple extension cord and hang it on the wall.
Total cost for this baby was $45 and it is so huge it takes up a giant white wall that was KILLING me. Love that! To see what the other side of Ivie’s room looks like check out this post!
psst! The Homies Finals are happening RIGHT NOW and I need your help to win! I would love your vote in the Best Home Project/ DIY Blog category (we are currently in second place but a few hundred votes behind first) I will love your guts FOREVER if you will click over and vote, it takes just a few seconds! MUAH to everyone who has already voted!
Once upon a time (about a year ago) I started working on my daughter Ivie’s room. I was working like a crazy girl to get it finished and hit a brick wall when I needed a dresser and none were to be found (this is the ONE problem with thrifting, sometimes it teaches you patience when you dont want to learn it!) But a couple of months ago the clouds parted and I found this buffet for $60.00
I actually really love the top part of it but it wasnt practical for Ivie’s room so I took it off and it now resides in the hoard in my garage.
I moved the dresser into the spot where the desk originally was and I really love it.
There is just something so FREAKIN fantastic about the legs on a mid century piece.
I am having thoughts of doing something to the inside of the rectangular panels, what do you think? Also can you spy tomorrow’s tutorial in the picture?
Here are the links to the other tutorials for this room:
So what would you do? Leave it? Change it? Steal it?


 .
.


