Ugly Sofa Upcycled Into Leather Safari Sling Bench

By Mandi | 02/25/2014 | 95 Comments

So this tutorial is something that I wasn’t planning on posting until April (i know, its so far away.)  It is a project that I did for my nieces bedroom and because the makeover is for National Painting Week, it has to stay under wraps until then. But this project is just so good, I had to share it with you guys right away. Court was super stoked about hauling it back to my house (for the 4th time since it’s conception) so that I could shoot it.

DIY Upcycled Leather Couch to Safari Sling Chair


The world is full of horrifyingly puffy leather couches. You know that you agree with me. I mean,  there is no saving grace for them, they are just offensively unaware. Poor things. Until now. I promise after seeing this project that you will never look at an ugly sofa the same again.

DIY Upcycled Leather Couch to Safari Sling Chair vintagerevivals

Last week I showed you an amazing Michael Arnoult chair that I scored on Craigslist. Studying the structure was completely awe inspiring. It was held together with a few screws and wooden dowels. That is it. The design was so basic, I knew that it could be a doable project. Luckily for you guys, I made all of the mistakes and now you get to benefit from my failures. What can I say, it’s what I do best.

Skinning a couch for a project is nothing new to me, remember when I made Leather Pillows? This is like that, but on steroids.

First things first you need a leather couch. The one that I used for this project was a sofa that I found at ReStore for $75. $75 may seem a bit steep for a couch that you only want for it’s skin, but have you ever priced leather? Hot dang that stuff is expensive. Make sure that the leather is in good condition,  the thicker the better. This stuff was fantastic.

Start by skinning your couch. Keep the pieces in as large of chunks as possible. (i.e. the entire back section,  the arms and sides etc.)  Put them aside.

Now is the fun building part.

For this project you will need:

(2) 2×2’s @ 34” long

(2) 2×2’s @ 28” long

(2) 1×4’s @ 46” long

(2) 1×2’s @ 24” long

(2) 1×3’s @ 25” long

(2) 1/2” Wooden Dowels @ 16” long

(2) 1/2” Wooden Dowels @ 5” long

(16) Screws. I used bolts like these (because I love the way they look!)

7 Yards of Upholstery Webbing (this can be found at Joann’s for $.75/yd)


The tools that you will need are:

Miter Saw

Jig Saw

Drill

1/2” Drill Bit

1/4” Drill bit (depending on the size of the screws that you use you may need to adjust the size of this bit,  it is used to drill pilot holes into the wood)

Stapler


Start by cutting your 1×3’s down to 24” with a 10 degree angle cut at each end. (see picture below)

DIY Leather Sling Bench


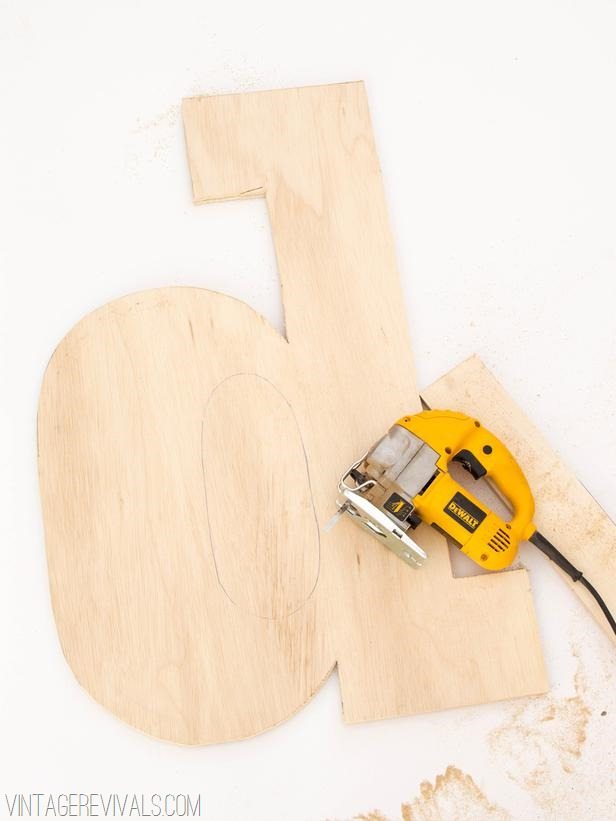
The next step is cutting out the grooves that will hold the leather and the dowel. Probably the easiest way to do this would be to use a router, but I don’t have one and I am sure the majority of you lovely folks don’t have one either, so we figured out a way that you can cut this channel with a drill and a jig saw. If you have a router, feel free to use it’s guts out.

Measure 2” in from the end and 1” from the bottom and drill a hole with your 1/2” bit.

Routing Without A Router


Using a straight edge measure 16” and drill another hole. Then mark 2 lines on the outsides of each hole.

Leather Sling Chair Building Instructions


Now you are going to take your jig saw and cut along the lines that you just drew.

Routing Without A Router vintagerevivals.com

Macie's Bedroom Makeover-7

After you have cut up one side, you are going to cut down the other. And you will have the perfect sized gap for your leather.

You are also going to repeat this on the 2x2x34’s for the back of your sling. They will need to be thicker, because the leather you are passing through is 2x thicker than the leather that you are passing through the seat and 6” long.

Now it is time to assemble.

We are going to start by attaching the front cross piece (1) 1x4x46 to the front legs (2) 2x2x2. Measure 12” from the ground and mark it. This is where the bottom of your 1×4 is going to sit.

Drill a pilot hole through the side of the legs into the 1×4. (Notice that we used some scrap wood to prop it up so that it was centered on the legs. Your scraps need to be 1/2” thick for this.

Macie's Bedroom Makeover-3


Then using a paddle bit, clear a spot for your screw to sit on the outside of the leg.

Macie's Bedroom Makeover-5


Then drive your screw into place.

Macie's Bedroom Makeover

Do this for both sides. Make sure that your board is level before screwing it in place.

Now you are going to repeat it for the backside with the legs that are 2x2x34. Measure 13” from the ground and mark. This is where the bottom of your 1×4 is going to be. Because of the slouchy style of this chair, you don’t want to put the back piece too high because it would be super painful if you rammed your spine into it. So keep the bottom at 13” and you wont have that problem! Here is a picture of the back piece, if it looks a little wonk it is because it is upside down.

DSC_0176

Next you are going to attach the seat cross pieces. These are the ones that you cut the channels into. Measure 16 1/2” up from the ground. The bottom of your 1×3 will stop there. The angle of the seat goes back and connects to the back piece lower than the front.

DIY Upcycled Leather Sling Chair-2

Drill your screw into the wood in the same manner that you did above.

Repeat for the other side.

Because of the nature of this chair, you want to make sure that these cross pieces are completely secured or else they will turn under your weight when you sit on the bench. I wanted the front of the chair to look as clean as possible so we attached another screw on the back leg and put a few finishing nails in the front.

The arms attach 3” below the top of the leg. Make sure that you are using a level!

DIY Upcycled Leather Sling Chair-6

Give the whole thing a nice little rub down with 220 grit sand paper to soften the hard corners. I conditioned my wood with Danish Oil, to make it look nice and finished.


Now for the seat. Are you still with me?

Sewing the leather was admittedly the most frustrating thing of this entire project. My sewing machine is not fantastic, but it worked okay (there are a few spots that are not my finest workmanship but it’s fine.)  It did wonderfully well sewing 2 thicknesses’ of the leather, the part that I had trouble with was where the seams from the original couch were. Especially when it was doubled over (like the hem in the front)  So just keep in mind that you have to go really slow over those parts.

To sew leather you NEED leather needles. Like don’t even try this without them. Stock up, I went through 3 packages. You also need upholstery thread that matches your leather (as close as you can find)

Here is the basic cut guide and pattern. 3 large rectangles, sewn together just like they are pictured below.

Leather Cut Guide

The base of your seat needs to be 58”x17”

Start by sewing a hem on the front. You have just over 1/2” seam allowance in the cuts.


The leather from this part of my seat came from the back of the couch, in case you were wondering!

The measurement for the back of your seat is 44”x15”. I had to piece 2 different sections together to get something big enough for the back (notice the seam running down the center)

Leather Sling Chair

Center the back piece on your seat base with the right sides together and sew it together. You will want to go over it a few times to make sure that it is reinforced,  this seam is holding it all together.

Your top section will measure 54”x7”  I was running low on thick pieces so I used a second piece that was also 54”x7” along the back to strengthen it. If you have a piece that is wide enough (like 14”) you can just fold it over and you wont need a second piece.

To sew this one in place, put the right sides of the top and middle piece together (make sure it is centered!) and stitch it in place.

Then take your back piece and put right sides together with the top section. After it is sewn together fold it down and stitch along the very top of the middle piece to hold it in place.

DIY Upcycled Leather Sling Chair-4


To make pockets for your dowels, just fold over the edge and sew it down.

When we attached the leather I had a little bit of a complex about it over stretching. In order to sleep soundly at night and not have nightmares of teenagers ripping my amazing new bench,  I stapled a few rows of Upholstery Webbing between the wood and the leather.

Upholstery Webbing

Make sure to staple it on the sides and on the top. (Learned the hard way that it can pull through the staples if you just staple it along the top.)  I also doubled up the back row, because that is where most of the weight is.

Feed your leather through the grooves and slide the dowels into place. You my need help doing this if your leather is really tight.

Wooden Dowel Furniture


You might want to run a line of hot glue along the edge of the webbing and attach it to the underside of the leather just to make sure it doesn’t poke out of the front.

DIY Upcycled Leather Sling Chair-3


Now all that is left is to sit back and enjoy the fact that you just made, literally, the coolest bench known to man.

DIY Upcycled Leather Couch to Safari Sling Chair


And just because the before and after is SO good…

DIY Upcycled Leather Couch to Safari Sling Chair vintagerevivals

I cant wait for you guys to see it in Macie’s room!

If you have any questions, leave them below!!

Also. If you loved this tutorial, I would be ever so grateful if you would please please pleeeeeeeeease hop over to the Homies Finals on Apartment Therapy and vote for Vintage Revivals for the Best DIY Blog. We are about 300 votes behind as of this morning and could use a boost!

Love Your Guts

Rock What Ya Got || Pom Pom Pillow

By Mandi | 02/24/2014 | 27 Comments

It’s Party Time! Let do this!!

Every month we are celebrating clearing a project out of our stash of unfinished hopes and dreams pile. Congrats to you and your hubby are in order. I am so proud!

My project this month is more of an idea hoard, and not so much an actual hoard. You know when you have an idea and it just hangs out, in your mind, resurfacing when you least expect it? Yes. It is one of those projects.

Meet the Pom Pom Pillow. Literally.

Pom Pom Pillow Tutorial

I dug around in my fabric stash for something long forgotten. Remember back in the day when I made an entire duvet cover from fabric scraps? This pillow is made out of white vinyl, black felted wool and black yarn.

I freehanded the letters so that they were a little imperfect (because that kind of stuff just makes me so happy!)

Then I made a simple simple pillow cover using this tutorial. If you can sew 4 straight lines, you can make this pillow.

Pom Pom Pillow


After I figured out the placement, I glued them on with Fabri-Tac. That stuff is legit.

Pom Pom Pillow-2


I used this secret ninja technique for making giant pom poms and used upholstery thread to attach them to the pillow by stitching around the center of the pom. It doesnt have to be pretty, it just has to be functional.

Pom Pom Pillow-3

I love that this is a 30 minute project, because lets face it,  sometimes you just need to accomplish something. Unlike cleaning the house, this project stays done. Warms my heart just thinking about it.

Pom Pom Pillow Tutorial

Pom Pom Pillow-5 Now it’s time to show off your #rockwhatyagotparty projects. Please follow the rules below!

Rock What Ya Got Party

And just a humble reminder that we are in the final voting round of the Apartment Therapy Homies and would love your support! xo

Love Your Guts

Creating With The Stars 2014: Be My Partner?

By Mandi | 02/22/2014 | 10 Comments

I thought that a Saturday post was in order to shout from the rooftops that Creating With The Stars is back for another round of competition!! 

CWTS logo A

CWTS is a competition held over on East Coast Creative that pairs a contestant with a “Blog Star” we use that term very loosely around these parts.  The Stars help mentor and give advice on projects to their partner, and every week is a face off of epic proportions with huge crazy prizes.  Sounds awesome right!?

Want to know who the Stars are?  Of course you do!

CWTS Blog Star Banner

Kristin >>> The Hunted Interior

Jen >>> Tatertots & Jello

Michael >>> Inspired By Charm

Mandi >>> Vintage Revivals

Brooke >>> All Things Thrifty

Jamielyn >>> I Heart Naptime

Shelley >>> The House of Smiths

Katie >>> Bower Power

Kari >>> U Create

Beckie >>> Infarrantly Creative

Karianne >>> Thistlewood Farms

Kate >>> Centsational Girl


So what do you say?  Want to give it a go?

Lets have a brief nostalgic look back (cue soft music and fuzzy memory flashes)

When Vintage Revivals was 3 months (or so) old I entered what was then Crafting With The Stars and won.  It gave me a huge confidence boost for my little baby blog and got my name out there in a way that I wouldn’t have been able to.  You can see my CWTS projects here if you want a serious walk down memory lane. 

So if you are on the fence, DO IT!!  What have you got to lose?  And the best part is that we might be partners!  How fun would that be!!?

You can get all of the deets here,  over on EC2

Love Your Guts

Happy Happy!

By Mandi | 02/21/2014 | 20 Comments

Happy Friday!! 

You guys, I am so happy!  Not because it is the weekend,  not because Dylan woke up this morning with Pink Eye,  not even because its 8 am and I have had 2 Twizzlers Pull and Peel for breakfast. (psst dont tell Court, he gets sort of judgy when I eat candy for breakfast…)

We always say Happy Friday (as in have a great Friday),  but what if we changed it to Happy Friday (where we just talk about happy things on Friday)?  I think that is a great idea.  So in honor of Happy Friday,  I am going to share some of the things that are making me happy, and then you can chime in with what is making you happy today! 

I am happy because for the last 2 weeks I have been working non stop on a room makeover for my adorable 15 year old niece Macie.  And there is light at the end of the tunnel!!!  Unfortunately it will not be making an appearance on the blog until April for Sherwin Williams National Painting Week, but I just had to explain why there have been zero tutorials for the last little bit on the blog.  It was one of those redo-everything-twice-to-get-it-right rooms.  But it is DONE!!  And I think it is my favorite room ever.  It includes a complete overhaul of this little ditty:

IMG_3611


I am happy because my tall Fiddle Leaf Fig that has been dying a slow painful death,  is starting to regenerate leaves at the bottom of the trunks (if you can call those wimpy things trunks).  Literally every last leaf fell off of them and I was ready to throw it out, when I noticed a little peek of green at the bottom.  I am feeling very excited about it,  isnt nature just amazing?

Fiddle Leaf Fig


Happiness is being able to laugh at all of the ways that you are coming up short.  Like the fact that my Christmas Tree is STLL UP.  WHYYYYYYYYY?  Please tell me if you are also in this club.  I need to feel better about this situation.

Remember that horrifyingly embarrassing picture I posted on instagram about the couch guts that were sitting on my driveway?  Good news.  Its gone.  That is happiness that spreads to my neighbors too.  It just warmed everyone’s heart.  (Sometimes Dylan likes to play in the dirt when I am working outside.  It adds to the white trash factor.)

 image


Monday is our next Rock What Ya Got Party!!  This weekend is the perfect time to dig through your stash and find a project that has been on the list.  I cant wait to see what you guys have done!

Do you ever have something brought to your attention and then every time you do it you are like, oh my gosh, that is embarrassing.  I was talking to Cara yesterday, and she said that her husband can tell instantly when she is taking to me.  Want to know why?  Its because I say “Right” all the time.  So she says it too, and then he knows.  Now every time I say “right” I am super aware of it.  Maybe I need a t shirt or something. 

Right


This is a little bit of awkward happy.  Vintage Revivals is up for 2 pretty huge honors right now.  The Best DIY Blog over on Better Homes and Gardens, and The Apartment Therapy Homies (we are currently sitting at #6, just below the Top 5 cut off.)  I wish that these things were not voting based, but since I can only vote for myself so much, I need your help!

If you think VR is deserving of either of these titles, I would massively love a +1. 

Click here for BHG (it is a one click vote, no log in required)

Click here for Apartment Therapy (you need an AT account but it is simple to set up if you dont already have one!)

So tell me my friends,  what is making you happy this fine day?

Love Your Guts

#ColdDeadFingers // 4

By Mandi | 02/19/2014 | 30 Comments

I have been fighting a bug,  the Why Can’t I Find What I Need To Finish A FREAKING Room bug. Its a doozie. And one that just seems to be lingering. So of course when I get feeling like this, I like to check out all of the fantastic finds that you guys have in your homes. It makes me feel like there is hope in the universe again.

To be honest, things haven’t been all bad,  I did find this amazing leather sling chair on Craigslist about 2 weeks ago. Want to hear all about it? Of course you do!

I popped on the Craigslist app one night just to see if anything new had come up (St. George doesn’t get a ton of new listings, so it is easy to catch up.) when I saw a listing for a Unique Leather Chair that had been listed about 20 minutes prior. I clicked in.

IMG_3454

It was love.

It was magic.

It was going to be mine. (said in my best BatDad voice)

I sent a text to the seller and waited about 10 minutes. Nothing. So I called and left a message when there was no answer. Nothing. I was starting to have horrible thoughts racing through my head and I just knew that someone was going to swipe it right out from under me (remember when that happened here?) But I didn’t want to seem crazy (humph) so I used my sister in law’s phone to call the seller. Sneaky right? Different phone number = not crazy.

I heard angels sing when she answered the phone. Our convo basically went like this:

Me:  Hello, I need the chair that you have listed on Craigslist  Please tell me it is still available? (The last sentence gets audibly higher .)
Seller: Yes, I still have it!
Me:  Great! When can I come and pick it up? Is now a good time?
Seller:  Sure, now is great!
Me:  Fantastic. I am leaving right now. Don’t sell it to anyone else before I get there iamleavingrightnowokbye! (click)  {Toss the phone football style to my SIL and run out the door}

Luckily I remembered to grab my shoes.

When I got to the seller’s house I was overjoyed to see that the pictures didn’t do the chair justice. It was soooo good!! The seller said that she had bought it from an old farmer who had built it and showed me the branding from a cow on the back. Even though it was a little rickety I just had to have it, so I paid the $75 asking price and hauled it away.

Mid Century Leather Sling Chair

After doing a little bit of research on Google, I came across this little treasure.

Do you know what that is?

image


That is my exact chair. For $1200. Granted it is in much better shape, but still,  same chair,  significantly higher price tag.

Vintage Leather Chair


It was a style of chair designed by Michael Arnoult in Brazil in the 1960’s. And is apparently really hard to find.

Leather Sling Chair

The moral of the story is,  if you love something buy it. Whether you think it is from an old farmer in St. George UT or an amazing Mid Century designer piece,  it is still a #colddeadfingers treasure if it warms your heart.

Now for a few favorites from your #colddeadfingers. If you have no idea what I am talking about, let me give you the rundown. You know those pieces that you find that you are like. “Yes,  marriage between me and this table should be legal.”? The type of pieces that can only be pried from you Cold Dead Fingers? We are celebrating those. If you have some, snap a picture on Instagram and #colddeadfingers so everyone else can see it and be super jealous!

This rug is amazing for $300. How do you feel about Rachel getting it for $5? Yep. The same price as the kids meal that I fed my daughter last night so that I could finish up a project. That is way better than the prize she got.

image

Instagram: creationsbyrachelw

$5 yard sale rug #colddeadfingers #yardsalelove

//

I love the two tone wood in this hutch:

image

Instagram: elisabethhates

This is less than 200 bucks. Shut up, Small Town Illinois! #colddeadfingers

//

Since I am feeling the worn leather vibe today…

image

Instagram: airgreenwood
Website: Carson Avenue

This #beauty came home with me from the#thriftstore // my best find to date // I haven’t quite yet decided how to style her pretty and such but I feel that she is quite lovely next to our tree stump from #utah // my father in law will be so happy that they were put to good use, along with the #amazingvintage industrial stools he gave me. // boy am I#blessed and #loved //

//

Sometimes it doesn’t have to be huge things that we never want to get rid of. Sometimes it can be small thrift store finds that just make everything seem so great that day.

image

Instagram: jadeandfern
Website: Jade and Fern

Scored this shiny copper bowl at a thrift store. I’m in love.

//

So there you have it. Anyone else feeling the itch to go thrifting? Lets do it!! Make sure you tag your favorite furniture with #colddeadfingers on Instagram and you just might be featured next time!!

There is just one more bit of information that I would very much love to share with you guys. I got the craziest email last week. Like I almost deleted it because it was just SO crazy.

Vintage Revivals is one of the top 5 Best DIY blogs hand picked by Better Homes and Gardens Editors. I KNOW. WHAT IS GOING ON!?

They just launched the first ever BHG Blogger Awards and I would LOVE to win in this category. I mean, I am against some extremely talented folks, (with really crazy super fans…Young House Love anyone?)  So if you have a second I would love a virtual slap on the butt for a job well done. You can vote once an hour (not that I would ever expect that,  that is like really intense) but if you have a second I would be ever so grateful! Voting runs through March 5th so I will periodically be sharing a friendly reminder!!

vintage-revivals (1)

Also, I heard if you vote for me,  your caloric intake for the day automatically drops to zero. Cookies and votes for everyone! Huzzah!!

Love Your Guts

Giant Marquee Letter Sign Tutorial

By Mandi | 02/13/2014 | 19 Comments

I have this thing where I always go into freaky project mode right before a deadline. I dont know why, its crazy. But my best ideas seem to come right at the end (of course). In true Mandi fashion, the day before HGTV Mag knocked on my door I had a project idea strike.

Insert a giant marquee letter stage left!

Photo courtesy of David A. Land for HGTV

The full step by step tutorial (with pictures!) is over on HGTV.com right now. You can pop over and check it out here!

I just want to take a few seconds of your time and thank everyone for all of the amazing support that you guys have given me with this fun announcement. Reading your comments and seeing your tweets just makes me feel so good, so thank you a million times over! I value the time that you are here so so much and I am so happy that we are internet besties!

Now, who wants to dance?

Love Your Guts

Remember My Big Fat Secret? Its Time To Let The Cat Out of the Bag.

By Mandi | 02/11/2014 | 98 Comments

If you remember last November I mentioned something amazing that I couldnt talk about.  It was a top secret project that every hope and dream that I had rested on (dramatic much?)  Well today is the day that I can spill every little detail!!

You may be familiar with this little magazine…

HGTV Magazine Vintage Revivals

If you flip to pages  60-62 of the March 2014 issue, you may also be familiar with these little faces…

HGTV Magazine Vintage Revivals-2

EEEEEEEEEEEEEEEEEEEEEE!

I dont even know where to begin.  I am assuming that you guys want to hear every detail, so I will share as much as I can!

Last summer I had a week that was crazy.  I had 3 different magazines email me about featuring Dylan’s room.  I was trying to pick between them and just kept feeling like “Man, I wish this was going in HGTV Magazine.”  So I decided to take matters into my own hands.  I tracked down an email address and sent an email to them.  Stuff like this doesnt usually scare me,  but I was SO nervous.  Basically I said that if they wanted to feature Dylan’s room,  it was theirs.  They were interested (and I almost had a heart attack!) and over the course of the next few months we worked out a time to have them come and shoot.

Fast forward to September.  What do you do when a magazine is coming to your house?  You make a giant mess trying to get it perfect of course.  The new tile in our kitchen had been grouted the day before.  Literally the fridge was still in the living room.  It was in true Mandi fashion.

HGTV sent out a stylist to make everything magazine worthy.  Elizabeth (aka Lizzybell according to Dylan) was SO.MUCH.FUN. I wish that she and the photographer David Land lived in St. George so that we could all be best friends all the time. 

image

She came over the night before the shoot to get a feel of the room and decide what needed to be changed up and how she wanted to style it.  When she came in the next day with bags full of art supplies Dylan didnt even know herself, she was so excited.

After doing a few test shots,  David and Elizabeth made the executive decision that the amazing metal cubby shelf was too dark, (you can see the before here) and we decided to spray paint it gold.  I love it so so much.


(image from HGTV)

It was really cool to see how they set up a shot.  I was doing it completely backwards.  I would set up a room and then shoot the entire thing.  They dont do it like that.  They only care about one shot at a time, and will usually move furniture out of the room to be able to get it.  Who woulda thought that to get a room magazine worthy you have to tear it apart time and time again?

Here are a few behind the scenes pictures I snapped:

IMG_2476

IMG_3864

IMG_7911

IMG_0282


In the end it turned out to be one of the most amazing days of my life!  I never in a million years would have thought that THIS is what my life would turn into.  Holy cow, its crazy.  I cant think of anyone I would love to share it with more than my favorite internet besties!

Love Your Guts