Holy. How is it already Thursday?! Just an update, Dyl is doing pretty good, she is not sleeping well and complains that her pins hurt at night, which means no sleep for us. But during the day she is almost back to her cheerful self (thank goodness!)
You know how hindsight is always 20/20? When we moved into our house and put down all of our hardwood, we made the choice to leave the tile in the entryway.
That my friends, was a bad choice. One that I have been unhappy about for a long time. (This SUPER high quality picture shows you exactly what I am talking about.)
The one problem is the preexisting wood. It is a glue in tongue and groove plank, unlike the fab click install that you can reconfigure if you must, ours doesnt have that option. The glue we used is permanent in the most literal sense and so cutting out the wood with the tongues still attached is a feat that is beyond. So we are left with the whole Rock What Ya Got scenario.
We have 3 options. I would love to know what you would do (or have done if you are in this same scenario!)
Plan A: Use a grinder to cut a groove at the end off all of the planks to install the wood. The problem? There will be a seam where all of the planks end and the new ones begin.
Plan B: Put in a threshold piece to cover the ends of the planks. The problem? Its a giant threshold piece. In the middle of the floor. Where there should logically not be one.
Plan C: Tile. To be totally honest, this plan has like a 1 in 1000 chance of happening because I dont want tile there. I want wood.
Plan D: Something else?
My brain hurts. So. What do you think? Have any ideas?
You know when you have a few days of chaos and it feels like it has been weeks since you latest contact with the outside world? That is how I am feeling today.
Last Friday I was out of town working on Cara’s office, all was right with the world, until I got a call from Court. He was headed to the Emergency Room. Cute Dyl was playing Beach Party with my nieces (it is a whole game that they’ve made up with a song and everything.) According to her this is exactly what happened.
“Um so we were dancing… me and Soph were dancing and we were playing (for full effect sing the next part) Lets go down to the seashore. Waves are rolling in, waves are rolling in. Take my hand jump into the water…SPLASH! So um I jumped off the bed and I land on it weird.”
She broke it right above the elbow. The hospital staff adored her (of course) and her new nickname is Chubby Cheetos because of her puffy iodine stained fingers.
My adorable Mom and Dad drove down from Salt Lake and spent the next couple of days with us and we loved every second of it. I am so grateful for our families, they are the best in the entire world. And needless to say, I haven’t opened my computer for days, so if you have recently emailed me, hang tight I will get back to you!
If you follow me on Instagram then you know that we hit a major snag in our Kitchen Reno. After we demo’ed the tile and thinset, I pulled out the hardwood that we had ordered. I feel like I need to preface this by saying that I did not expect a perfect match to the hardwood that we have now 4 years later. I knew that there would be a possible snag, but the online image and the samples that were sent were great, so we went ahead with the order.
So after proper acclimation time (1 week) we pulled out the wood and it didn’t match. The new wood is the very darkest color in our floors, with no color variation. Our floors have HUGE amounts of variation in them. The samples looked fine because one or 2 rows would have worked, but a whole room would have looked horrendous.
With that option taken off the table, we were heartbroken and left with tile. The bottom left is the one that we have chosen. I think it is going to look great, I am still just a little frustrated by the whole situation. You guys will get the full story as soon as it all plays out.
The winner of the $500 Home Depot Gift Card is Colette Nasworthy! Check your email lady and huge congrats!
Have you guys enjoyed this weeks Pillow Confessions? I have had a BLAST sharing them with you!
You cant talk pillows without talking about the pillow chop.
A pillow chop (for those that are unaware) is when you fluff a pillow and then chop the top of it and put a large dent in it.
There are 5 different degrees of Chop-ology, or Hell, if you are not a chop fan, that I want to bring to light today.
If you are as much of a Bravo addict as I am, you will probably remember Chad from the first few seasons of Million Dollar Listing.
He is the quintessential Over Chopper, also known as The Chuck Norris. There is major brute force involved in getting these pillows chopped…so much in fact, that you have either:
a) Hurt yourself…yes, on a pillow
b) Severely damaged the unfortunate furniture that the pillow was resting on.
This is what The Chuck Norris does to a pillow. I mean, it is basically changing the pillows entire DNA structure. Doesn’t it look like it is in pain?!
.
Level 2 is The Botox Chop (also known as a mid chop) is something that I do fairly often. It makes the pillow look younger, fresher. Like it has someone to look fancy for. To achieve this look, I lightly chop the top and then pat the pillow twice on the front. Like it has a big belly. This softens the top chop a little. And always makes me think of a fat man. So there is that fun visual for you.
The third level of Chopology is the Gigli Chop aka the Barely There Chop. You are looking at it, and cant actually tell if it has been chopped on purpose, or if the pillow was just made with a dent in it. This look is easily achieved by lightly chopping an overstuffed pillow. Or by pulling the upper corners out after you chop.
Fourth on our list is the Bimbo Chop aka the Fluff . This look is achieved by shaking the pillow so that it fills up with air. There isn’t a ton of dimension to this chop, and there is definitely no channeling your inner Mr. Miyagi. (I know in the picture below that the lack and white pillow is a little chopped, but for this example look at the other ones.)
And last but not least, level 5 is the Ke$ha Chop. Which means, you guessed it, the pillow is what it is. There is no sprucing, no fluffing, no washing. Nothing. You sit on it and leave it exactly how you found it. Squished and not attractive.
.
I know people have strong feelings toward the chopping situation, and I am SUPER excited to follow along with the debate in the comments, so weigh in below my lovies! Are you pro or con on the chop?
Great fabric is hard to find, let alone on trend fabric in the colors that you want. Why is that? It is such a frustrating design dilemma that I run into every time I make over a room. The proverbial brick wall in my design life.
By the time the fabric I am dreaming up comes into my reality, I am 9 months over it and already given birth to something else. Its just the way that it is.
And it is stupid.
So like I always do, I have found a way to take matters into my own hands.
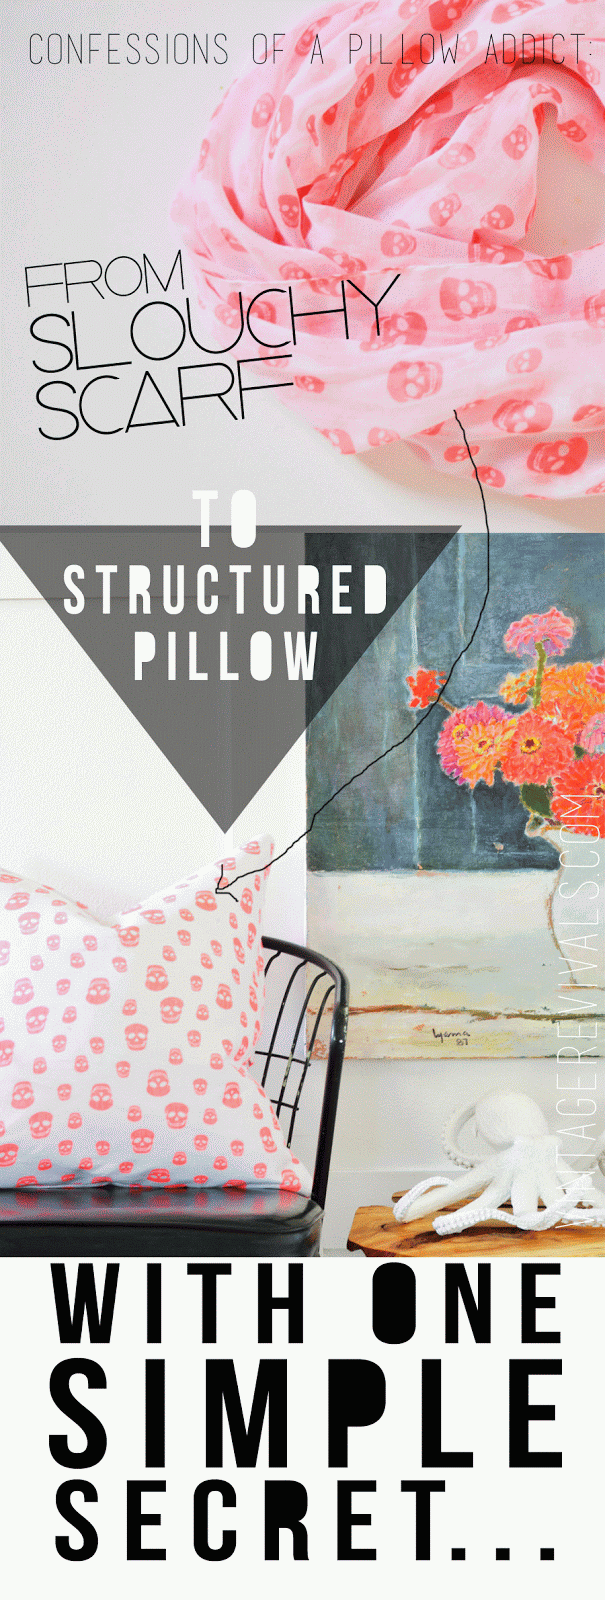
Are you ready for my biggest pillow making secret?! This is life changing.
I dont know why, when everyone else looks at things and sees fashion, I see home decor. Pants? I always think about cutting them apart. Skirts? Poor things dont stand a chance. Its a gift and a curse. And it happens every time I see a scarf.
You can imagine how this puts me into hysterics during my 4x a week Target habit.
I have quite the collection building up.
Do you recognize that stripe scarf from my Headboard Reveal? Its a game changer folks. Ok. So are you dying to know what the secret is?
Dun dun dun…
Fusible Webbing.
Scarf fabric is typically very light and gauzy. I have tried to work with just the scarf and it is a nightmare. Because there is no weight to it, it is impossible to work with. And it is see through, so if your pillow form has any sort of discoloring from feathers or children (and lets be honest, we can probably add husbands to that list) then your pillow will always look dirty. You need something strong to give it strength and make it pretty.
My go to scarf stabilizer is Duck Cloth. You can get it in a rainbow of colors at Joann’s for $10.99/yd (use a coupon!) All you need is a piece cut to fit your pillow dimensions (If you are unsure about the cutting dimensions check out this post)
Once your canvas is cut to size, sandwich the fusible webbing between your fabric and your scarf.
There are about a million different types of webbing. The one bit of advice that I have is to not over-think it. You probably dont need anything super thick and heavy duty, especially if you are using Duck Cloth. I gravitate toward the least expensive option (its usually around $2.00 a yard) You dont need anything fancy. Just make sure that it is fusible on both sides, some interfacing only attaches on one side.
With your iron set on high with no steam, press the entire length of your canvas. Make sure to overlap your ironing sections as you move it down the ironing board so that you don’t get bubbles.
Let the fabric cool completely so that the webbing can fully fuse before you start sewing.
Once your fabric is cool, trim off the excess scarf and its time to start sewing!
And because I know you are dying to ask…the octopus, sheepskin rug, and wooden cutting board are from Homegoods. The table base, chair, copper vase, books, and art are all thrifted.
I am heading down to Vegas today to hopefully (fingers crossed!) finish Cara’s office. Please start your fasting now, it is going to take a miracle to get it done. The problem? We haven’t seen each other for like 3 weeks, which means that we have a lot of catching up to do, and that seems to take priority over everything else. You have friends like that too, right?
Tomorrow’s Confession of a Pillow Addict is all about The Chop. So get ready to weigh in, I am really looking forward to the debate that is bound to happen in the comments. You guys rock my world.
Remember when I told you guys that this Wicker Headboard was the starting inspiration for my entire master bedroom makeover and most of you were a little scared? Its ok, you weren’t the only one.
Today I am putting your wondering mind at ease with the reveal. Oh and totally setting a new trend. NBD. Jump on board now my friends, because these puppies are hard enough to get when everyone still thinks they are ug.
I feel like this post should start out with 2 things.
1. DUN DUN DUN DUN DUN DUN DUUUUUUUUN!
And 2. Finally.
I loved using colors from the same family so much in Dylan’s room that I had to give it a shot in my bedroom too. Luckily my boyfriend Sherwin Williams has direct access to my brain waves and tracking down the perfect Spearmint green was simple. (It is Eco Green BTW, and make sure you buy a sample pot because you wont need much!)
I love when you can take something that people give a sideways glance at and make it a show stopper. This is why I will forever be a thrift store addict. Its just so gratifying.
Paint dipping or color blocking (however you choose to phrase it) is a VERY simple technique with a ton of impact. If you are on the fence about painting a piece of furniture, maybe start here, it will give you a pop of color without having to commit to the entire thing.
If the piece is small enough you can actually pick it up and dip it in paint. If it is HUGE like my headboard?
Probably not the best idea.
So here is the cheater way to get the look without spending $5000 on a zillion gallons of paint to fill your bathtub.
Start by taping off where your paint line will end. I 100% recommend ScotchBlue™ Painter’s Tape for any taping needs, its my favie.
When you are painting something like Wicker, with all of its dips and grooves, you are not going to get a perfect paint line, your just not. But it is ok, because all of those dips and grooves are going to hide it. Press your ScotchBlue into all of the spots that you can reach. If you are taping off a flat surface, check out this post for my secret for PERFECT paint lines (its sort of life changing.)
As you are painting (especially on the paint line) start with your brush on the tape and brush away from it. If you are brushing toward the tape then you are likely shoving paint into all of the grooves that we are trying to avoid.
Once my paint was dry enough, I flipped the headboard over and painted the backside.
Remove your tape and grin at the fact that you are amazing.
To joint the 2 headboards together I used clear fishing line. A few readers gave the suggestion of binding them together with wicker strips. If I was planning on repainting the whole headboard, I TOTALLY would have done that, but because I was not planning on repainting the white, I McGyvered it a little.
So now that it is starting to come together a little bit more are you a believer? Or are you still on the fence (don’t worry, by the end of it the fence will be a distant memory…)
If you are in dire need of other inspiring projects there is a HUGE Ready, Set, Paint Blog Hop going on with all of your favorite DIYers, so make sure you check their goods out…you know what I mean.
Ok, I know I lost some of you at the swear word that is Sewing. But hang tight. I have a paper bag for you to breath into at all times and I promise that this is the SIMPLEST sewing tutorial you will ever have the pleasure of being inspired by.
First lets determine if you are actually ready to sew a pillow. This is a very important test that everyone should take.
Do you feel like you are ready now?! I feel like I should be wearing a sweat band and jumping around getting people excited about pillow making.
The way that I make envelope pillows is different that most people. Mostly because I like to take shortcuts to save time. That is a good thing…right?
**This is for a standard 19” full form down pillow. If you are using a cotton insert, or something that is sort of flat, you will need to take 1 1/2-2” off of the pillow cover size to “plump” your pillow up a little.
(palm fabric & geometric fabric are both HGTV Home available at Joanns. Stripe fabric tutorial is coming on Thursday!)
I am feeling like we need to have a confession week. I have a not so secret, secret. I love pillows. But. I am cheap mama. So I have lots of little tips and tricks when it comes to getting the most bang for your pillow buck. All this week I am going to be sharing my Confessions of a Pillow Addict. It is going to be a little bit life changing so you might want to get your Pin It finger ready.
Have you ever made a really amazing pillow and then spent 3x more on the insert than you did on fabric?
It used to happen to me to.
Pillow inserts are EXPENSIVE. Don’t believe me? Do a quick Google search. It is crazy. Even for a lumpy cotton insert from Joann’s is 24.99. Speaking of lumpy insert. My friends at IKEA have the best priced one, but you are still getting a sub par pillow plumper.
I am a bit of a pillow form snob. They have to be down inserts. The weight of down is SUPER important to a great throw pillow. Its sort of like gravity. You don’t understand how it makes such a huge difference in your life, but you are freaking glad it does. And they chop so much better.
If you are on the hunt for a good down form, average price is around $40. FORTY DOLLARS. That is such a rip of. This is one area that you can stick it to the man and no one will mind.
Here is my secret for high quality CHEAP down pillow insets…
1. First head to your local HomeGoods. Waaaaayyy in the back there is this section called Clearance, you may have heard of it.. It is usually filled to the brim with pillows of all shapes and sizes. Some good, some not so good.
2. Track down the right pillow size. In my case I was on the hunt for Euro pillows (26×26”) to fill my DIY Leather Pillows. I prefer to find the ugliest ones available. I love getting weird looks from people in the checkout line.
3. Make sure they are all the right/ same size and have removable covers. Most will, but every once in a while, the goods are sewn inside.
4. Giggle all the way to the bank because these puppies just cost you $12 instead of $48.
5. When you get home, remove the offensive cover and donate it (someone is bound to think its the most amazing thing ever. Some people have really bad taste.)
What you are left with is a perfectly new down filled insert that is 1/3 of the price as a brand new one. If you are super lucky you can score pillows for as low as $5.00. I always check the pillow clearance to see if there are any super deals that cant be passed up.
6. Stuff, chop, and enjoy.
Do you have any pillow hunting secrets? Share share!
Up tomorrow in our confession series? Fashion for your bed.