You know the saying “Diamonds are a girls best friend”? Well. I (apparently) have taken that to heart because I want to put them everywhere!! Blush may be the new Black, but guys, Diamonds are the new Triangle.
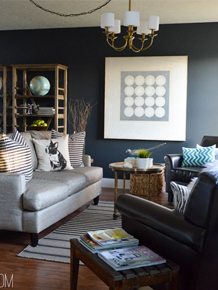
Ashy’s room makeover is in full swing and I am loving it oh so much! One of the easiest ways to spruce up a space is with a painted focal wall. Today I am teaming up with ScotchBlue™ Painter’s Tape for this fun (and simple!) tutorial.

I found this retro painting by Kenneth Noland and fell in love with the colors and style of it. Ashy and I decided it would be a perfect accent for above the dresser.

Start by deciding on the size of your diamond. First things first, we moved the dresser into place so that we could make sure the scale was right.
We started by using a pencil marking the center of the wall and the width of the diamond.

Then measure 1/4 of the total width up and down and mark.

Connect the dots to make the outer edge of the diamond.

Take the total width of the diamond and divide it by 6. This number will tell you the distance between marks. (Please note that you are making 5 marks, but creating 6 sections)

Now take the width of one edge of the diamond and divide it by 6. Mark the 6 sections down both sides of the diamond.

Connect your dots.


Now it is time to tape. Our wall was freshly painted (wait at least 24 hours) so we used ScotchBlue™ Painter’s Tape for Delicate Surfaces with Advanced Edge-Lock™ Paint Line Protector (2080EL) (the orange one).
Tape along the outside of the diamond pencil marks. Because of the nature of the stripes (with no white space between colors, you have to break the taping up into 2 rounds. Tape along the outside of the 1st, 3rd, and 5th stripes.

![]()
One of my favorite tricks for PERFECT paint lines is to paint the wall color onto the tape before you start painting with your new color. This will ensure that any bleeding is the color of the wall, not the new color that will be noticeable.

After your paint is done for those 3 sections, gently pull off the Scotchblue Painters Tape and let it dry.

Once it is dry, you are going to line your tape up against the edge you just painted and tape along the edges of the 2nd, 4th,and 6th stripes.
Bleed your tape lines with the color that it is against. (For example before painting the yellow stripe we bled the taupe and the navy on the left and right, and white on the bottom and top.


This technique, coupled with ScotchBlue™ Painter’s Tape will give you perfect paint lines every time.

I am so in love with how it turned out. It is the perfect Desert Nomad vibe that we are itching for.


So now for the part that will really get you excited! Everyone loves winning money right!? Well you can enter the Home of ScotchBlue™ Painter’s Tape Contest at www.scotchblue.com/homecontest October 1, 2014 through November 15, 2014 and you could win $5,000 to put towards a home makeover! The first 500 to submit an eligible entry will receive one (1) roll of the new ScotchBlue™ Painter’s Tape with Advanced Edge-Lock™ Paint Line Protector!

Check out this project as a featured project example in the contest! There are also mounds of idea on HOSB’s social pages! ScotchBlue™ Facebook page ScotchBlue™ Twitter page ScotchBlue™ Pinterest page
And stay tuned, because this room makeover is on the fast track to amazing!

Contest open to legal residents of the U.S. and D.C. (excluding AZ, MD, NJ, ND, TN and VT),
who are 18+ (19+ in AL & NE and 21+ in MS) at the time of entry. Void where prohibited. Enter from October 1, 2014 at 12:00:01 a.m. CT through 11:59:59 p.m. CT on November 15, 2014. All contest communications, entry/judging criteria and details subject to the full Official Rules. To enter and for Official Rules, visit www.scotchblue.com/homecontest. Sponsor: 3M Construction and Home Improvement Markets Division, St. Paul, MN.
I am proud to be a 3M sponsored blogger, and, as part of my responsibilities, I get the
opportunity to evaluate products from ScotchBlue™ Painter’s Tape. Opinions are my own and
additional product used in the project were selected by me.


Those are crazy good paint tips, Mandi!
I love it. Great color choices, can’t wait to see the whole reveal.
Love it!! If ever there was a blogger who had a “brand”, you ma’am, are IT! If I had never seen this before and saw it on stealbloggerscontent.com (not a real thing), then I would be e-mailing you in a hurry saying OMG MANDI, THEY TOTALLY STOLE YOUR PHOTOS! 🙂
I would like to get inside your brain for 1.5 seconds just to see all the amazing ideas swirling around inside. What an easy projects that creates a crap-ton of bang for the buck! Would you care to share the paint colors you used? Or, more specifically, that red/orange color? I’ve been looking for something similar – in my head it is called “Santa Fe,” but in reality, I just can’t seem to find it!
This is cool. I like how the whole thing looks. I need you to come and style all of my dressers and side tables and such. I never know what in the world to put on them. I always try to make everything I put on them functional…probably doesn’t have to always be that way. Great job. Thanks for posting as you go. It’s fun to see the progress and know that not everything works right the first time(although this one did.)
I have to agree with Jenna, you definitely do have a brand. I don’t really know what to say besides I love this!! I have a wall that I’ve been looking for something to hang on it forever. I think you’ve finally given me a solution. Thanks, girl!!
This is so cool and creative, Mandi! The colors are awesome together! Can’t wait to see the rest of the room 🙂
This is such a simple but bold feature piece! I like that it is directly on the wall or you can make it on canvas!
https://www.fashionablyspeakn.com/2014/09/meet-cast-rebel-chic.html
What a cool idea. Can you tell us where the rug is from? I’ve been eyeing the “whale cord rug” from Pottery Barn for a while, and I’m thinking this is it?? Either way, I love it.
your tip about painting the wall color first just blew my mind 🙂
Omg. Best painting tip I’ve EVER heard!! And you just rattle it off like its nothing, while I think it should be on the evening news, dramatic lead-in music & all! And I have no doubt that we’ll be hearing it everywhere in about 6 mo… much like the Rachel Ray intern’s tip for cutting cherry tomatoes in half using deli lids? I’ve seen that on every cooking/talk show since with no credit given to the originator. Too bad you can’t copyright/patent that tip!! And the design is beyond cool. As always. Brilliant, baby, brilliant!
Love this one. The colors, the shape…it’s great. And a fresh way to add a trendy shape.
High fives girl. High fives.
Wow, what a great painting tip — and what a cute project!
Fabulous! Love it! BAH – after seeing this & Orlando Soria’s recent dining room update, I am so inspired to paint shapes everywhere. I think I just had a huge brain child about a hexagon on my bathroom wall. Tee hee – thanks girl.
loving this project! can you tell us the paint colors you used?
yes, please share what paint you use (brand and color) but ALSO tell what sheen you used on this and what sheen you generally use on a whole wall.
I am IN LOVE!!!!
This is so fantastic! I am totally stealing this idea! One question though- you remove the tape before the paint dries?
I take it off when the last layer is still wet! Such a good question!
Thanks! I am going to do this over my buffet in my dining room, I am so excited!
Love! Love! Love!
Can you share what the paint names are? You are amazing as always.
If this doesn’t go viral, the internet is broken. STRIKING!
Holy Moly girl, this is super duper Mandilicious!!! I love the colors in this and love that you figured out and shared all the measuring and taping how-to’s for us!!! I have been loving the new surge of southwest on decor lately and this is no exception… Great job! Your projects are always amazing!!!
I heard somewhere that you can simply use water instead of actual paint to seal the tape edges and get that crisp line. I haven’t tested this hint yet but I thought maybe you’d want to test it. Much easier clean up if it works. Thanks for all your inspiration and for saying your fearless, that word helps push the rest of us past the trepidations.
You are absolutely killing me with all the diamond ideas!!! I <3 them all! Or should I say them all! (corny I know)
I love it!!! I also love that light, where did you get it?
Such a beautiful project! Can’t wait to test out this tip too. I know it’s already been asked but … Would you mind giving us the name of the paints you used? It’s the first time I write something down, your blog is a powerful source of inspiration. Thank you for sharing with us!
Perfect paint lines! Holy, I’m in love.
ack, so cute!! and i hope there’s a tutorial for that light coming soon!? i neeeeeeeeeed it!
Why, why, WHYYYYY did I not read your tip for perfect paint lines before I painted my living room last night?!?!? *Sigh* While I’m cringing at the thought of my upcoming evening of touch up painting, I love this idea and the color palette!
OMG! I LOVE THAT LIKE CRAZY!!
Hello
Thank you for this painting. But I wanted to know where I could find the furniture (drawer). I love it (but live in France)
Thank you for your prompt answer!
Isabelle
Can I ask where your beautiful Buffett table is from?? Thanks!
I love this so much! I’m definitely going to do this once I find the perfect place.
My room is a rental so unfortunately I can’t paint this on the original wall. What I am planning to do is to use plywood to cut it out to the diamond shape and then paint on it. I hope it will turn out pretty when I hang it above the headboard <3
WOW! I love this! Every element just fits together perfectly. Great job 🙂
WOW! I love this! All the elements fit together perfectly. Great job 🙂
The painted focal wall looks so beautiful. Thanks a lot for posting these interior designing tips Mandi 🙂
Love it! Can you please share the paint colors that you used? Thank you!