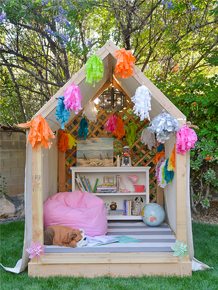
You.Guys. As I was writing the tutorial for the Outdoor Summer Reading nook/Playhouse post I was HORRIFIED at the pictures that I had taken. I guess full sun and full shade in 115 degrees for 8 hours will do that to you.
They were that bad.
So I am trying to figure out a way to salvage this tutorial, when one of my great friends Rayan from The Design Confidential offered to help me. This girl is LEGIT. Her site is full of amazing building plans with step by step instructions (think Ana White but more modern and West Elm-y) I pretty much I owe her my 3rd born (no, this is not a pregnancy hint) and undying love and devotion. So huge huge thank you Rayan!
Now lets get on with the fun.

This is a very simple build. The finished size of the playhouse is 5 feet x 8 feet.
You will need:
(2) 2×8’s @ 60”
(3) 2×8’s @ 96”
(4) 4×4’s @ 60”
() 2×6’s @ 60”
(2) 2×4’s @ 37”
(2) 2×4’s @ 41”
(1) 2×4 @ 93”
(13) 2×6’s @ 60”
(2) 2×6’s @ 50”
(1) 4×8’ Sheet of Lattice
(12) Corner Braces (pictured below)
(2) 90 degree angle braces (pictured below)
(6) 2×4 braces (pictured below)
1 Box of 1 1/2” Deck Screws
1 Box of 3” Deck Screws

Start by building your base box with the 2×8’s. This makes it a really great height without needing to put in a step. It will measure 60”x96”. If you have a Kreg Jig, use it to attach your boards together, or if you are like me and live in the stone age you can just use deck screws.

Next you are going to attach your 4×4’s. Make sure they are nice and flush with the corners of your box. Use corner braces (pictured below) to attach the 4×4’s to the box.


One you have your posts up, attach the center joist to the box using the same corner braces.

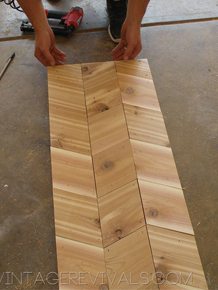
When that is all done, its time to attach the 2×6’s that will be your deck floor. They need to be cut at 60” long. If you have a way to transport it home, buy 10’ boards to save the most money and waste. Start by attaching your first board directly behind your corner posts so that it sits flush.

Space your boards as you are attaching them (we used a screwdriver) and screw them directly to the base. Also if you need to stagger the boards (if you have to use 2 to make up the 60” width) just make sure that it is centered on your joist.

To fill in the gap and add a little flair to the ends of the floor, I left a little bit of an overhang to make it more step-like. Cut these boards to 50” to fit between your 4×4 posts.

We made the pitch of the roof as absolutely simple as possible. First things first you will want to buy (2) 90 degree braces that looks like this (also please note the baby Preying Mantis that apparently wanted to be famous.)

The boards are not mitered at the top to form the 90 degree angle, but you will need to miter them at a 45 degree angle to fit flush on top of your posts. Also you will need to cut a 90 degree angle off of the end of the 45 to make it line up with the end of your 4×4. If that is confusing, look at Rayan’s sketch below, this is why she is a professional folks.

(It is really easy if you assemble the entire roof on the ground and then put it on once it is built.)
Attach your brace to the pitch

Then attach the 2×4 brace to the backside of the front pitch and the frontside of the back pitch. You may need to read that a few times.

Now place your 2×4 cross bar in the braces. 

Before you can put on the roof you need to attach braces to the top of your 4×4’s.

Use every ounce of energy you have left (just kidding, its actually fairly light) and put the roof in the braces that you just attached and screw it into place.

And TADA! You have the entire structure built!

If you are planning on attaching lattice to the backside, you will need 1 4×8 sheet. Cut it down to size and attach it to the bottom half of your Nook.

We attached the remainder to the pitch of the roof and then used a Sawsall to cut the excess off. Lattice is really thin and delicate, so be careful with it. One thing that you will notice when you are attaching it to the pitch, is that the corners will come up short on the bottom, because its just not quite wide enough. Use the extra scraps to lengthen the pieces that wont quite reach. (Sorry I don’t have a picture of this process, it was dark when we were finishing up!)


Oh and go give a huge fat hello to Rayan wouldja?


We can provide you with a wide range of CAD Drawing & Drafting services , from 2D Building Plans, Electrical CAD Drafting, Electrical Drawings, Electrical Wiring Diagrams, Circuit Diagrams.
Building Plans –
How did you make the cloth roof and what did you do to make it stay on? I am going to try this this spring! It is a very cute idea!! Thanks for sharing!
It looks like they used canvas drop cloths.
What kind of wod did you use? How much do you think it cost you to build? Hoping to do this project this year.
This is post has absolutely the most beautiful and complete building instructions I’ve seen. I love the combination of photography and schematic drawings. This is what DIY should be – you’ve made me believe I can do it myself. You’ve nailed it. Thank you!
Is that praying mantis making a tiny duck face?
Just saw this beautiful nook. I love it!!!!! I want to do it before the end of summer. What kind of lumber did you use? I love the color of the wood it is light and my kind of style.
Its just pine, you can find it at your local Home Depot!
xo
What do you do when it rains wouldn’t it leak through
Just wanted to send you a little note to thank you for sharing your adorable fort. We just finished building it as per your amazing instructions and it turned out great! Thanks for making it so easy for us!
What a beautiful nook! How many 2×6’s do you use?
I built a treehouse for my children many years ago and used corrugated fiberglass panels to make the roof waterproof so that they could leave their toys and whatnot inside.
Wow! Amazing ideas. It can be great fun in hot summer. I just want to make for my kids reading. I think kids will inspire in reading with fun. I will also spend my ideal time with my kids. Thanks for sharing such a nice ideas.
Thanks for putting these plans up! My daughter and I built this last month, and it’s been a grand success.
I made two changes that are worth mentioning – The 2x6s for the floor were very heavy, and I didn’t want to use pressure-treated wood for a surface where people would sit. Instead, we got pine tongue and groove flooring, and sealed it with water seal. I used pressure-treated wood for the structural members. The whole thing is very sturdy. Because of the deck screws, it can be taken apart if we move.
The other thing that we did was switch the roof from a peaked design to a 15-degree lean-to. That allowed me to tuck it all under a tree in the yard. We added clear corrugated roofing panels (Palruf). It has rain protection and the clear panels give it all an airy feel.
The end result is something like a stage. We added a rug, a beanbag chair, and put curtains around the outside. Its a great space. Thanks for putting up these plans.
I love the instructions. One thing has me puzzled Is the 2×4 brace for the crossbar on the roof really mounted half-on, half-off the corner brace? That doesn’t cause funny angles? Also, am I right I need a hole for that or else be prepared to drill? In your instructions, the corner brace is pictured twice and doesn’t seem to be the same brace in both shots –, once on its own (no hole) and once mounted (extra square hole).