This post is sponsored by Sherwin-Williams®
We hear a lot about how to do things the right way. Especially in the DIY world. The right way to paint, the right way to build, the right way to caulk, and a million other right ways.
But what happens if you dont do it the right way? What does it look like!? Does the universe implode?! Given that this is the year 2020, we should all make a group pact to not test it. Pinky promise!
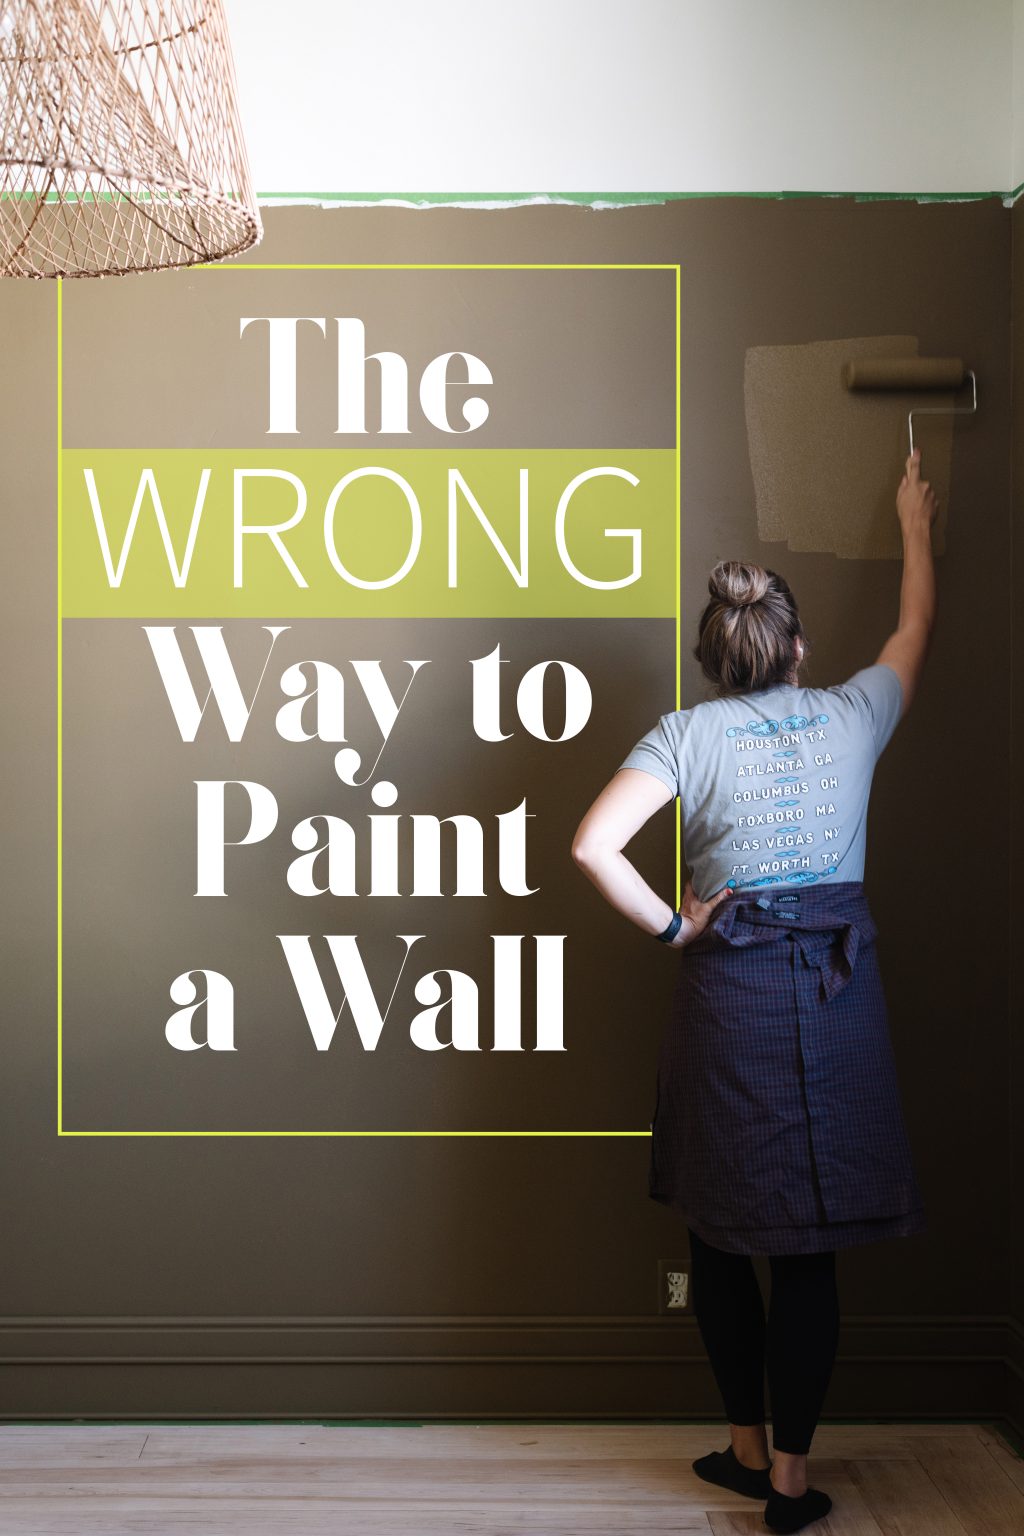
Today we’re talking about the right and wrong way to paint a wall! If you love fail videos, this post is for you! I am taking all of my best paint tips and showing them side-by-side with what not to do. Cause sometimes you have to see what things look like when they’re wrong before you can fully appreciate when they’re right! A lot of these tips apply if you are using a roller/brush process vs. a paint sprayer. If you want tips on spraying check out this post!
Supplies
Raise your hand if you buy paint supplies based purely on price. The cheaper the better right? WRONG-O. The quality of your tools can drastically affect the finish of your paint job. And, it’s not always about price, it’s just about using the right tool.
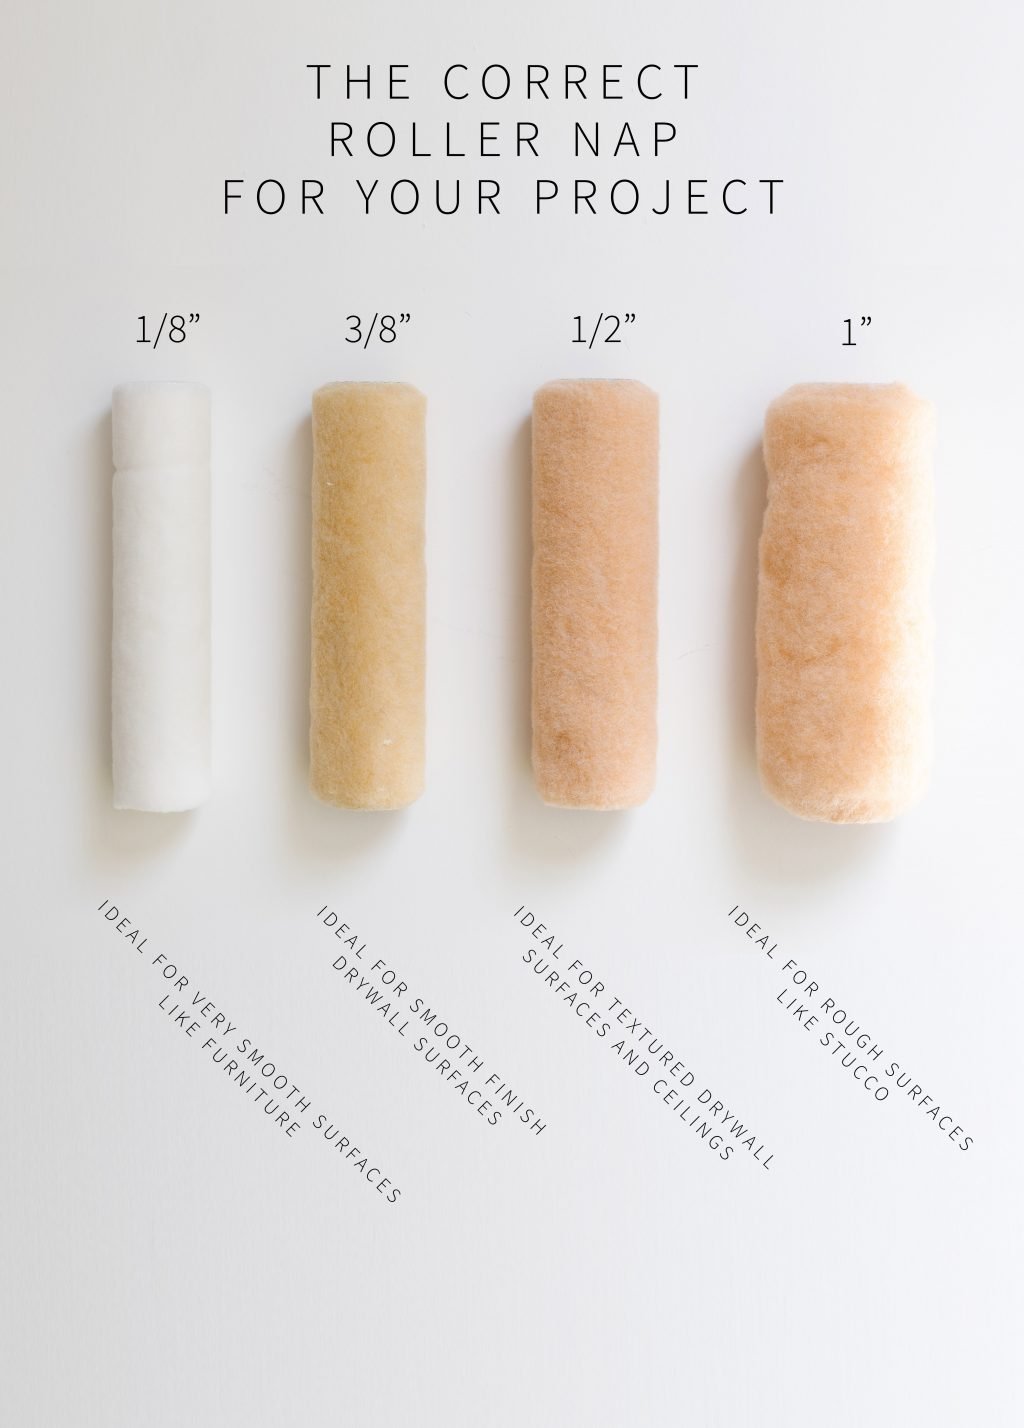
Mistake# 1: Using The Wrong Roller Nap
The nap on a roller determines how long the length of the material is from the center core of the roller. Picking the right nap depends on the finish you want and the texture of your walls. The longer the nap, the more texture it adds!
Fix:
If you have smooth walls the goal is to keep them that way! I never go longer than 3/8″ nap on our smooth walls. 3/8″ is a sweet spot for coverage and minimal texture.
If you have textured walls you can compromise a little on the texture in favor of quicker coverage. The longer nap fills the negative space in the wall texture and helps with coverage. 1/2″ nap is great for orange peel and knock down wall texture. If you are painting brick or stucco, a super long nap like 1″-1 1/2″ will be your best friend!
Mistake #2: Using the Wrong Brush
One thing that you never never never want to cheap out on is a paint brush. Investing in a good brush will give you a significantly higher chance of a smooth, brushstroke- free finish.
I 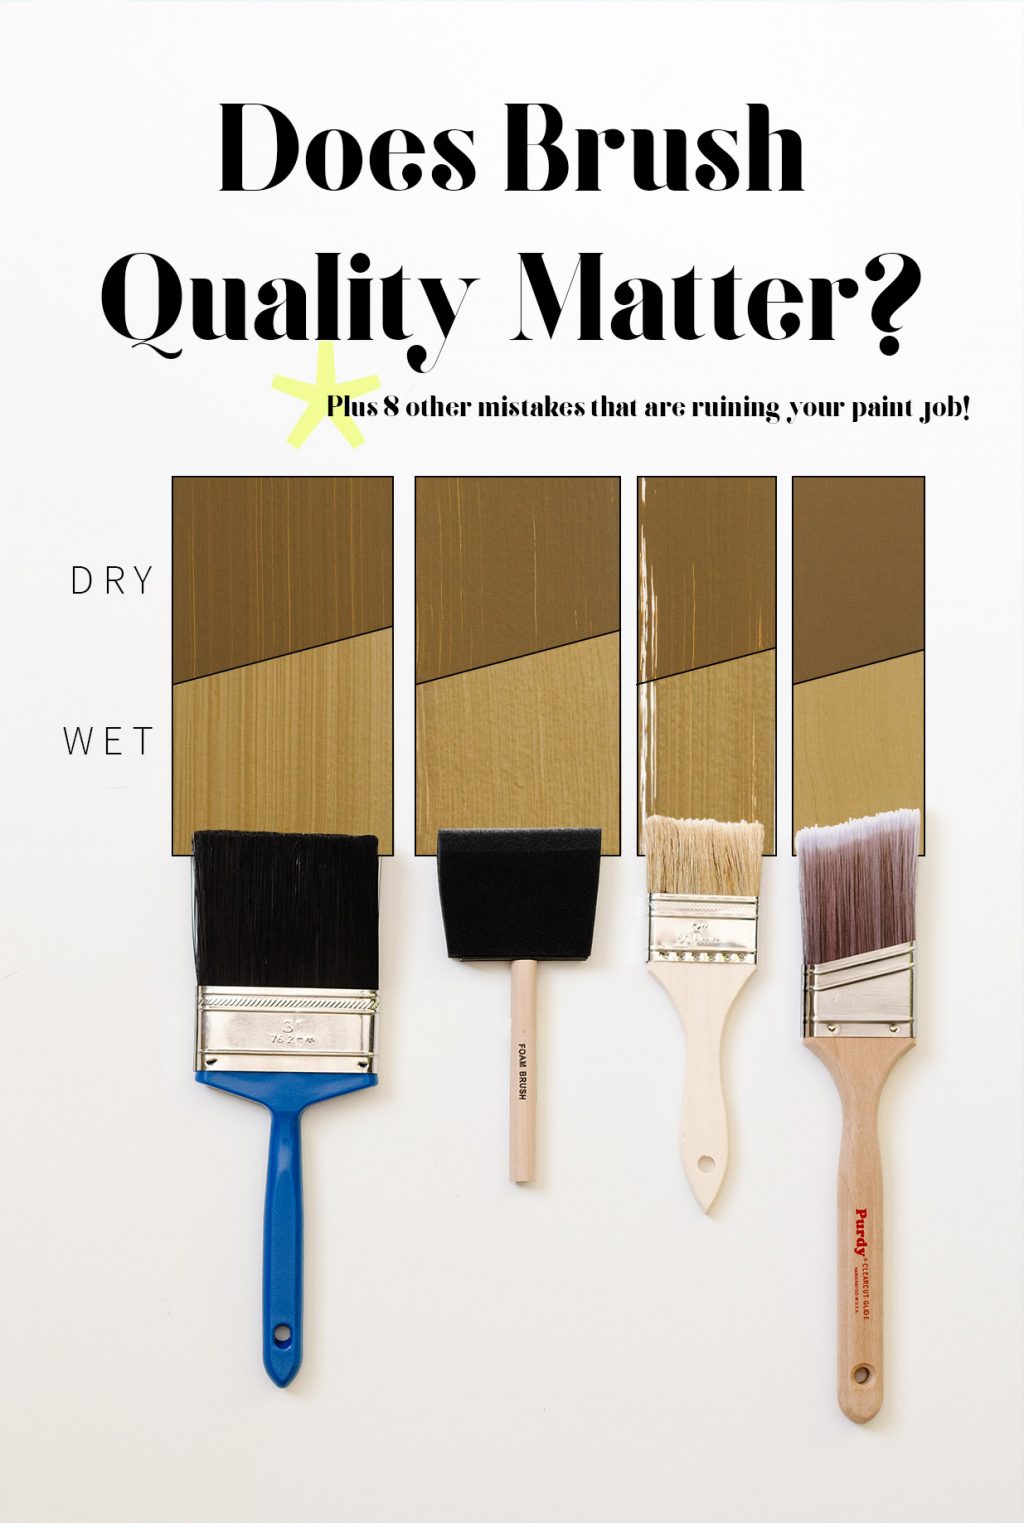
Fix: Using a High Quality Brush
All of the above brushes have their uses, but my go to gold standard is a Purdy XL Glide.
Insider Tip: Are you using the right roller for your paint formula?
Buckle in cause I’m about to blow your mind. Did you know that your paint formula has a soulmate roller?! It’s TRUE!! There is a perfect pairing for each type of paint! There is an in-store char at your neighborhood Sherwin-Williams that will tell you exactly what combo is right for your project!!
Mistake #3: Not Re-Mixing Paint Before You Pour
Unless you are painting within a few hours of picking up your paint, always grab a few (free!) stir sticks. As paint settles there are a lot of things that happen.
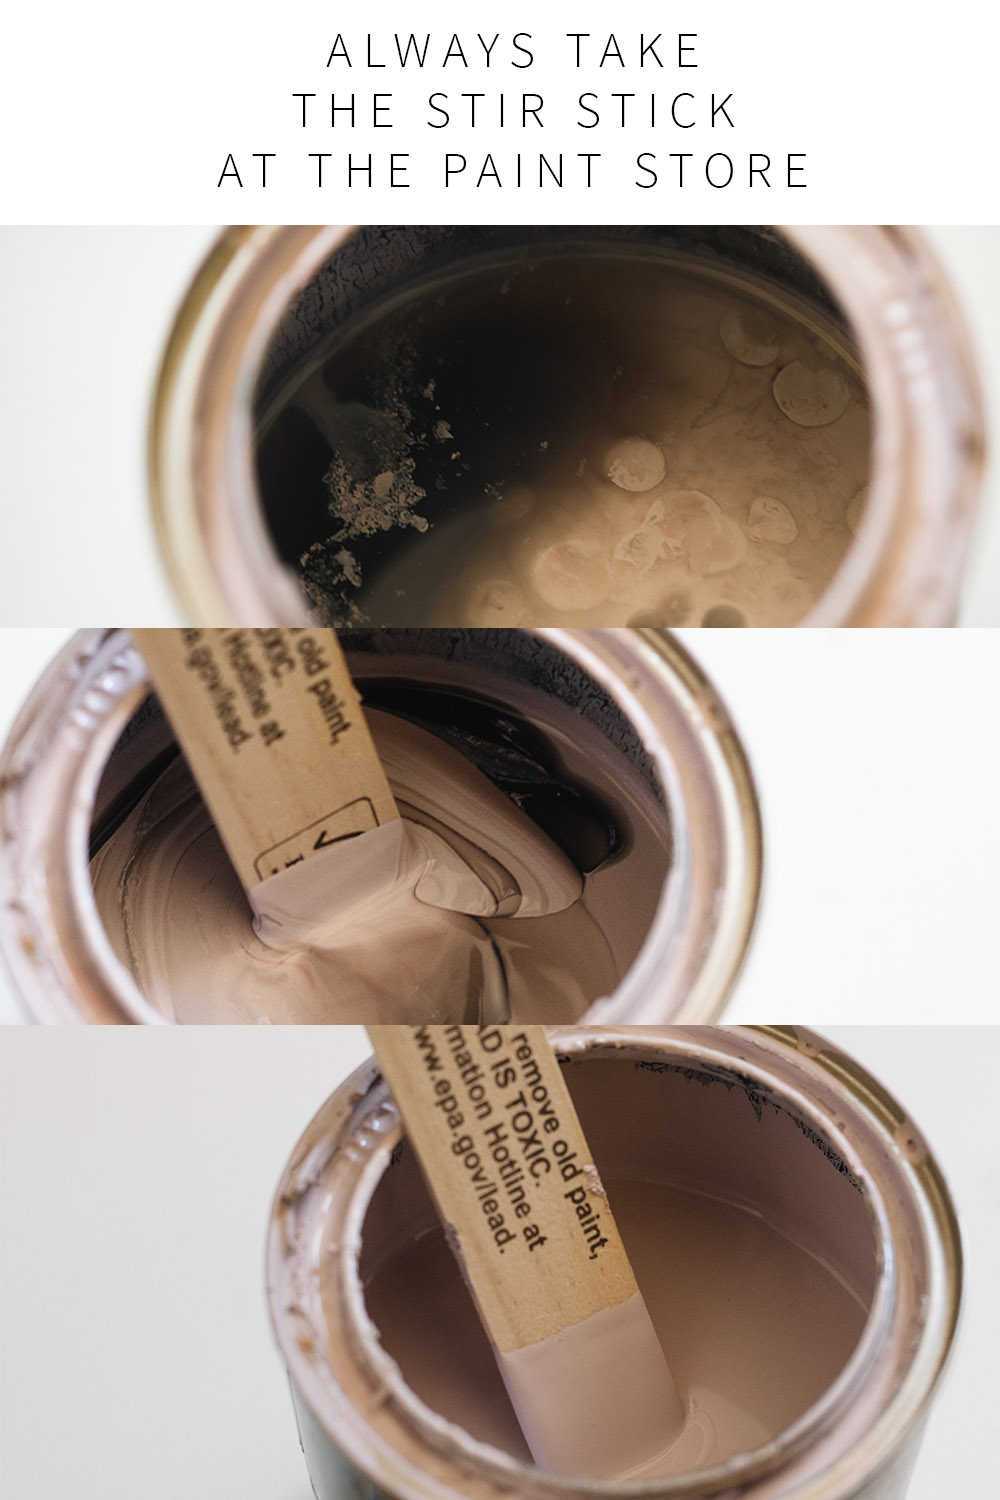
Color Separation
Color pigments have different weights and will settle on the bottom of your paint can. If you don’t thoroughly mix it, then you’re setting yourself up for an uneven color on the walls! Some colors seem to settle more quickly than others (green is the worst offender IMHO!) Always shake your can or stir the paint before you start using it! Make sure if your paint has been hanging around a for a while that you purposefully scrape along the bottom of the can.
Sheen Finish Separation
When your paint is mixed, it’s not only incorporating the color pigments, it’s combining the sheen. The higher the gloss, the more separation happens! If you don’t do a through job mixing your sheen, you can end up with flashing (where dry paint has different sheen marks when light hits it, making it *flash* before your eyes) and it will make touch up a BEAST, because even if the color is correct, the sheen isn’t exactly the same.
Fix: Remixing Your Paint
Revisit your store: If your paint has been sitting for a while, you can always take it back into your neighborhood Sherwin-Williams store and have them re-shake it! If you are mixing it at home you’ve got a few options!
Shake it: Make sure your lid is on tightly and shake the can back and forth, alternating directions for at least 5 minutes. This is the cleanest way to mix your paint because there is no clean up but it also takes the longest!
Stir it: Using a stir stick, stir the paint for a minimum of 3 minutes. Make sure to pull the color from the bottom of the can by scraping it and pulling it up with the stick.
Blend it: There are really awesome paint stirrer drill attachments that make stirring paint quick and easy. Picture a kitchen beater, but bigger, and not for food. They work especially well if you are using 5-gallon buckets!
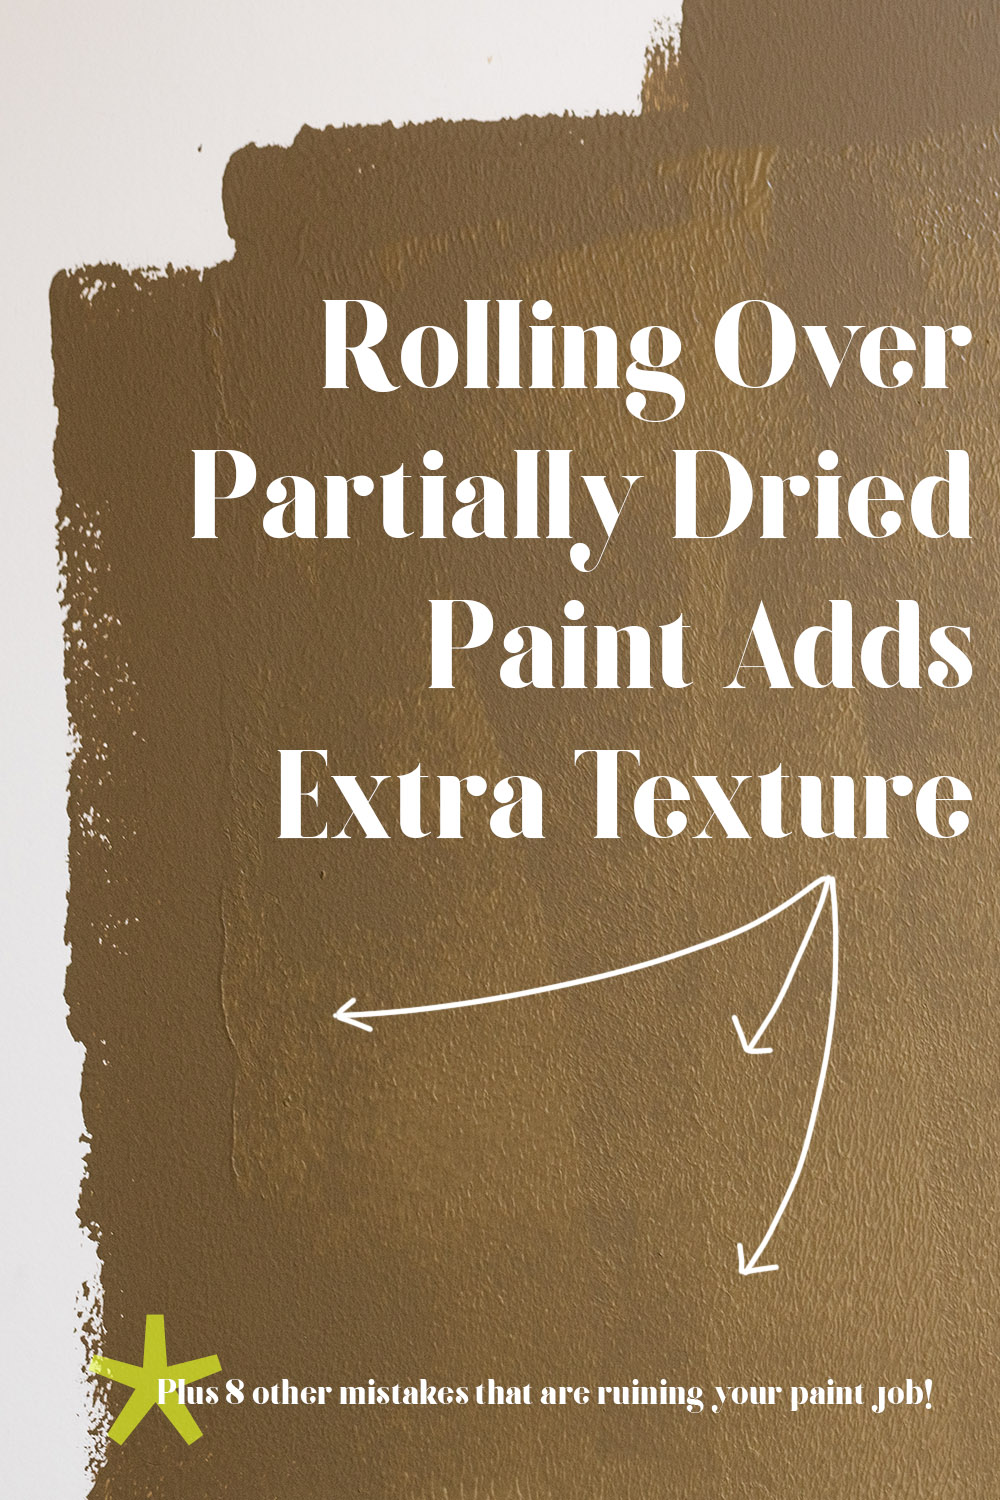
Mistake #4: Not Fully Loading the Roller = Paint Acne
The simple act of loading a new roller with paint is where things can easily and quickly go sideways. One of the biggest mistakes people make is that they don’t fully saturate it! What happens is they will load the surface, but underneath close to the core is still completely dry.
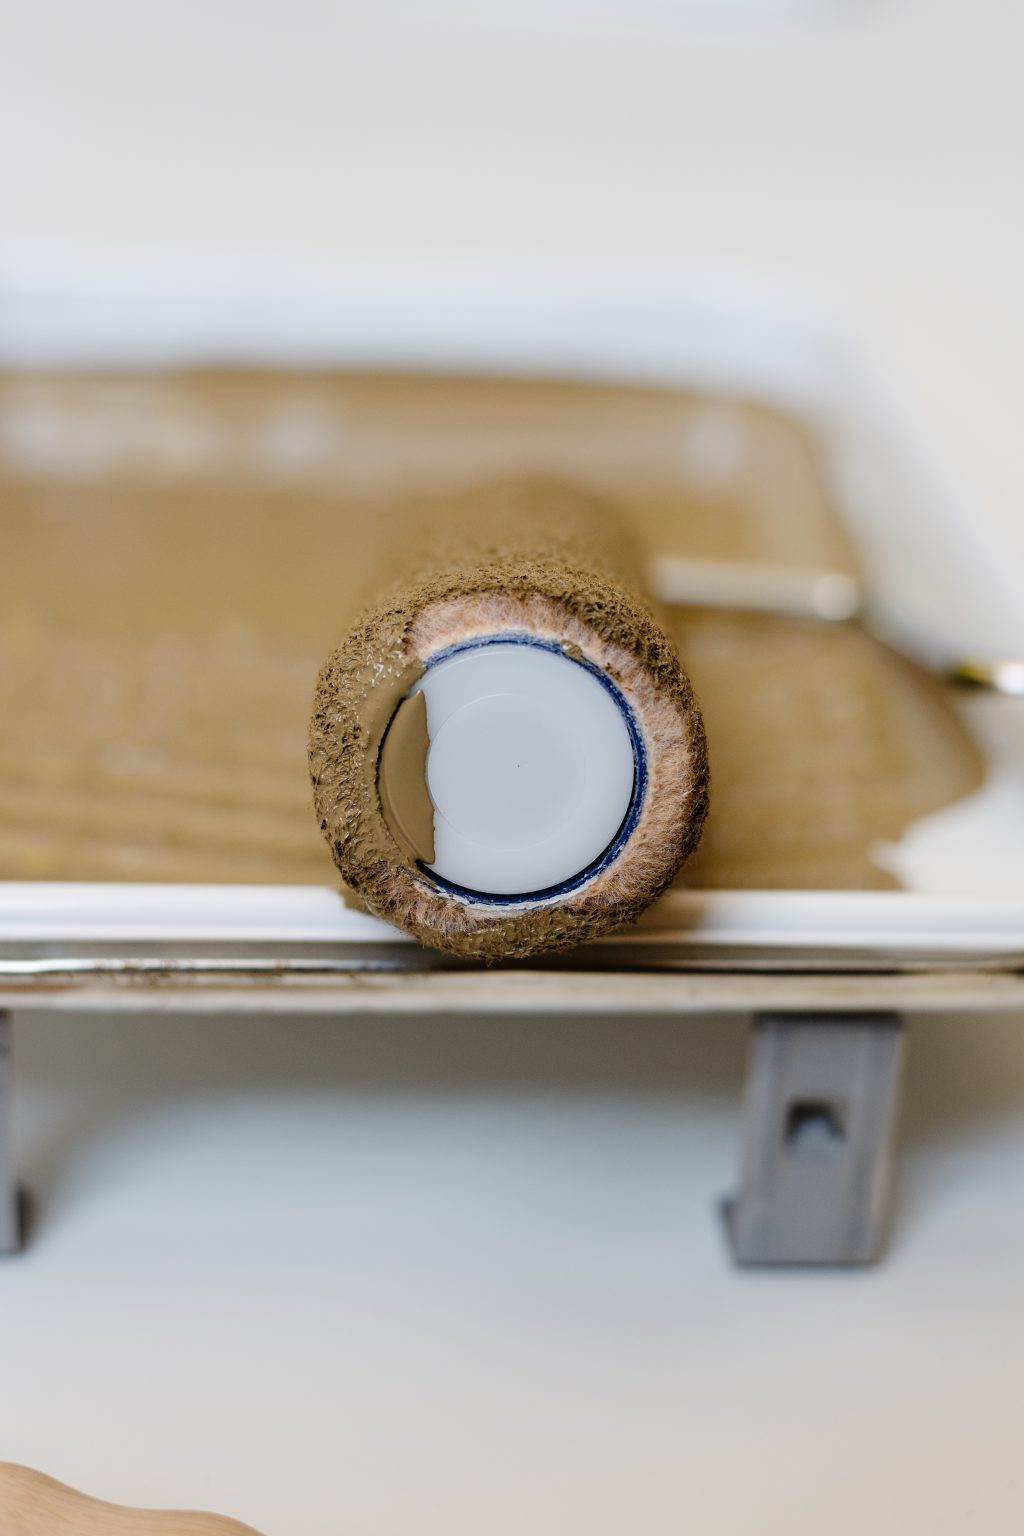
This is a problem because as the paint is being applied, the pressure on the roller forces the air trapped at the core to come to the surface and creates hundreds of tiny bubbles on the wall. Sometimes they pop leaving little craters in your paint, and sometimes they stay unbroken.
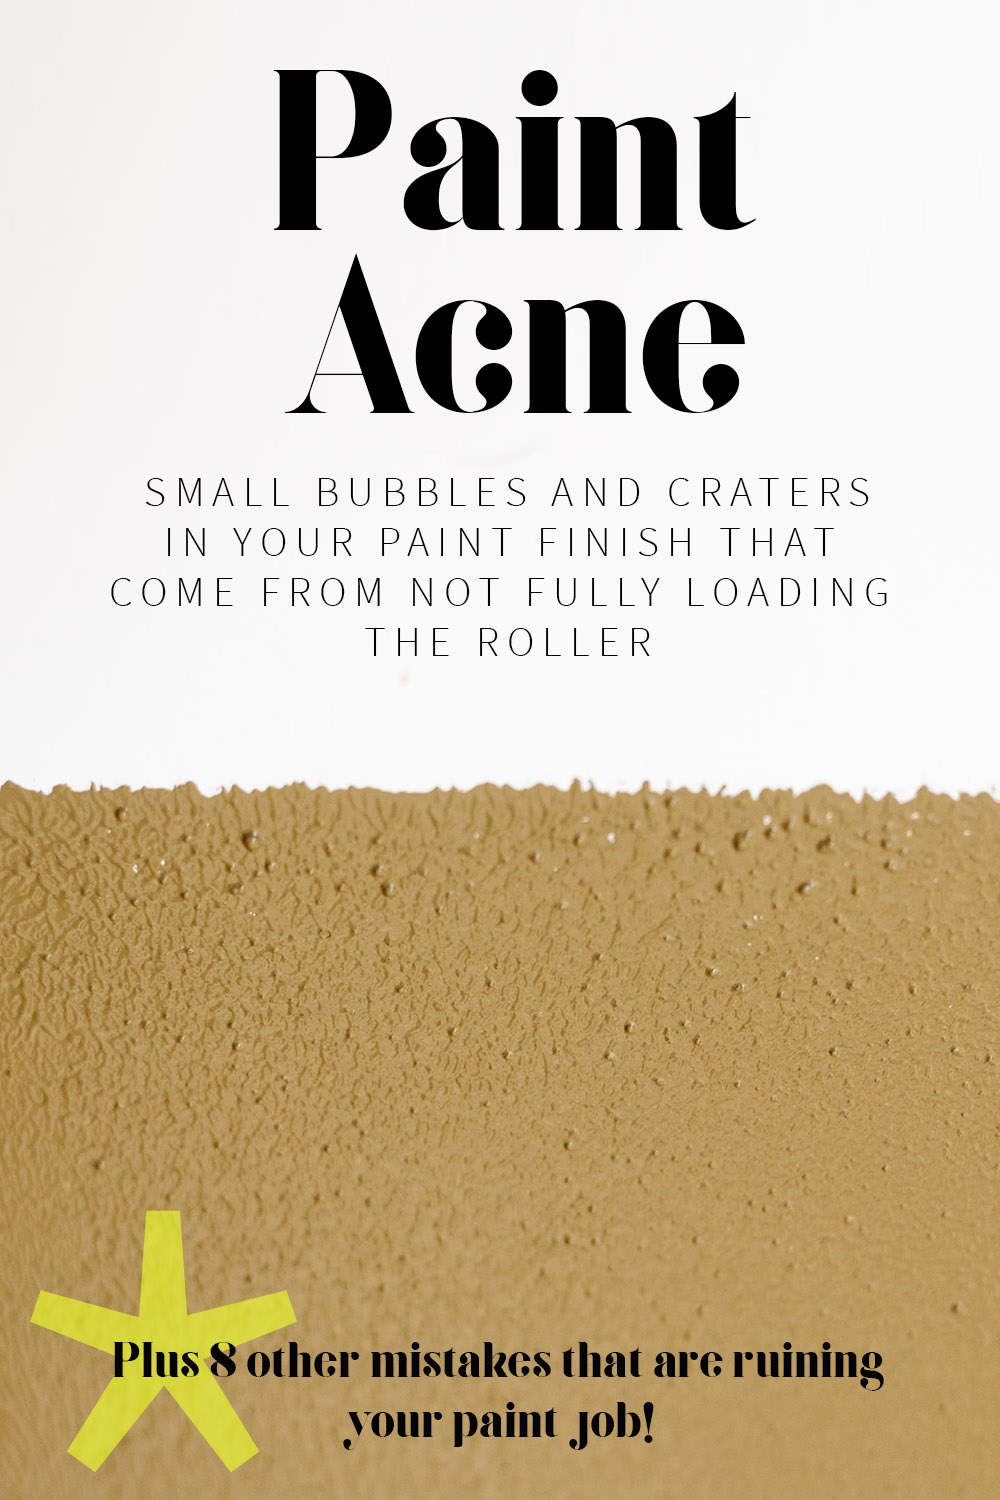
If you aren’t fully saturating the roller, you are creating the texture of an acne-ridden teenager’s face on your walls! Guys, that’s not the look we’re going for!
Look I, more than anyone, understand the excitement of getting that first swipe of paint up on the wall, but taking the time to saturate the roller will start you off on the right foot!
Roll it back and forth in the paint and on the roller tray until all of the bubbles are gone and the roller feels heavy. If you’re getting bubbles in your finish you need to roll it in the tray longer!
Mistake #5: Using the Wrong Amount of Paint
So now that we’ve talked about properly loading our roller, lets unpack how much paint you should be putting on the wall!
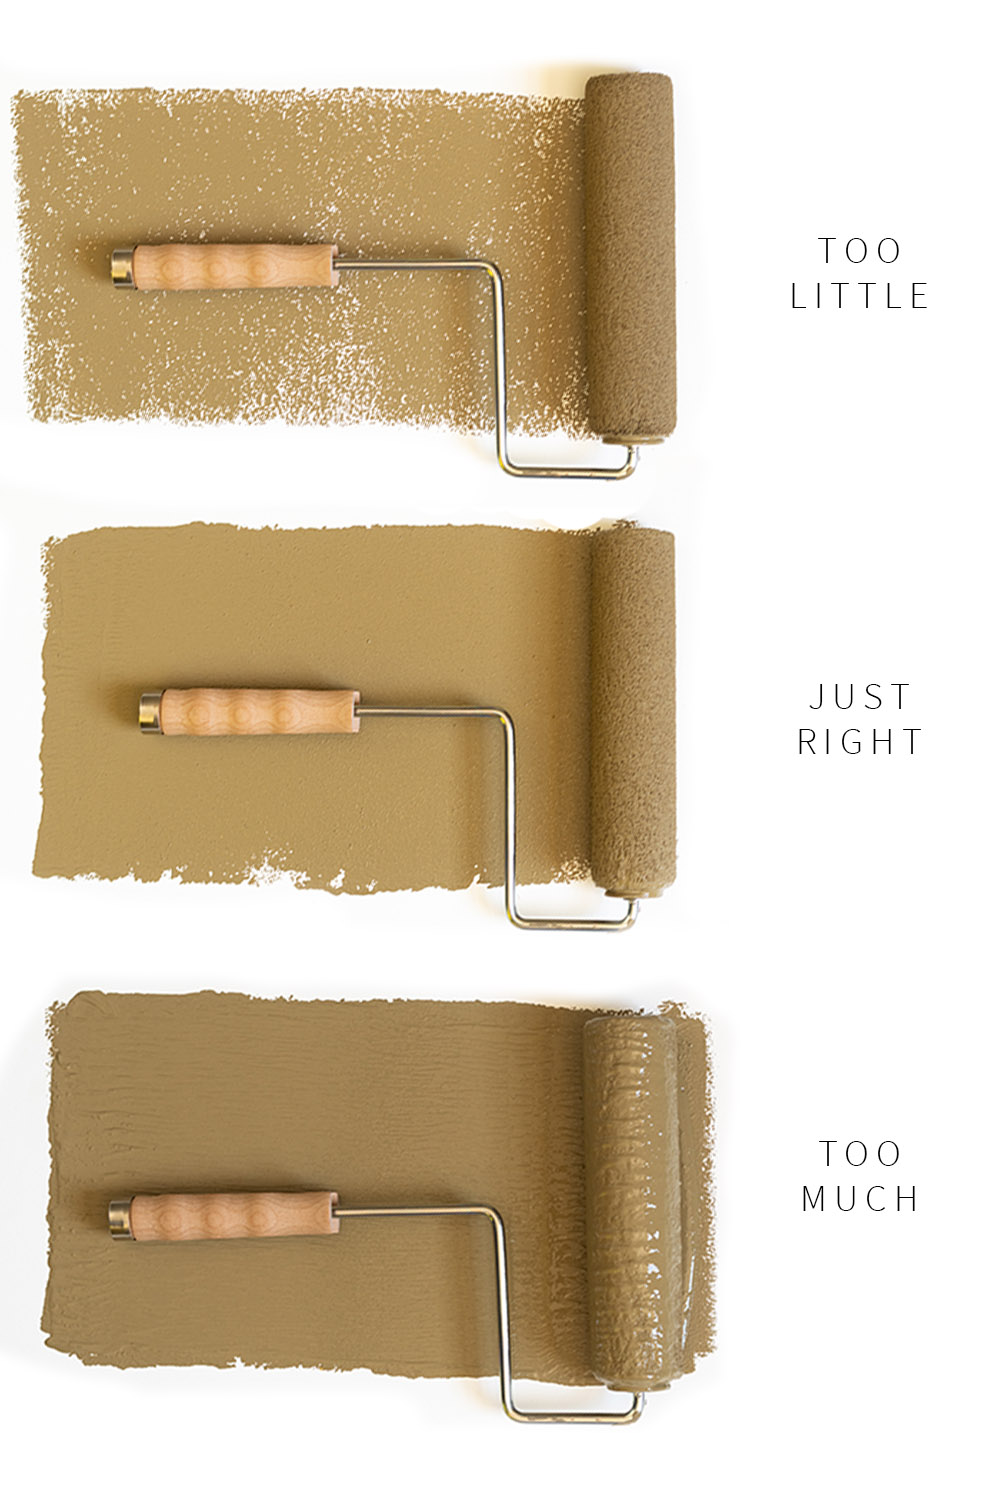
Mistake # 6: Using too much paint
you will have drips and sagging. Sagging is when a whole section creates sort of a giant drip. It doesn’t usually run the way a drip does, but it shifts and leaves a big wavy line. Using too much paint will extend drying time, which in my case extends the space between coats and my patience. 😂
Mistake #7: Using too little paint
is actually the most counterproductive way to paint. Thin coats means that your coverage is as non-existent as a Tootsie Roll Egg in December. Without proper coverage, you are adding unnecessary work because you’ll not only have to do a second coat, but a third and maybe even a fourth. You are also adding texture! If paint dries before it has a chance to settle, the finish will have more texture. That’s a lot of time and effort committed to a sub-par paint job!
Fix: Using The Right Amount of Paint
The right amount of paint will let you paint a solid 3×3 square without running (too much) or spotting (too little). After your square is painted, reload the roller and go again. Work quickly and methodically and always work off the wet edge.
Watch for roller lines as you go. Roller lines are heavy trails of paint that are from the edges of the roller. They are usually unavoidable, but can be quickly and lightly feathered in by gently rolling in the opposite direction.
If you overlook some roller lines and notice them after you’ve moved on to another section, LEAVE THEM ALONE. Which brings me to our number 1 painting sin…
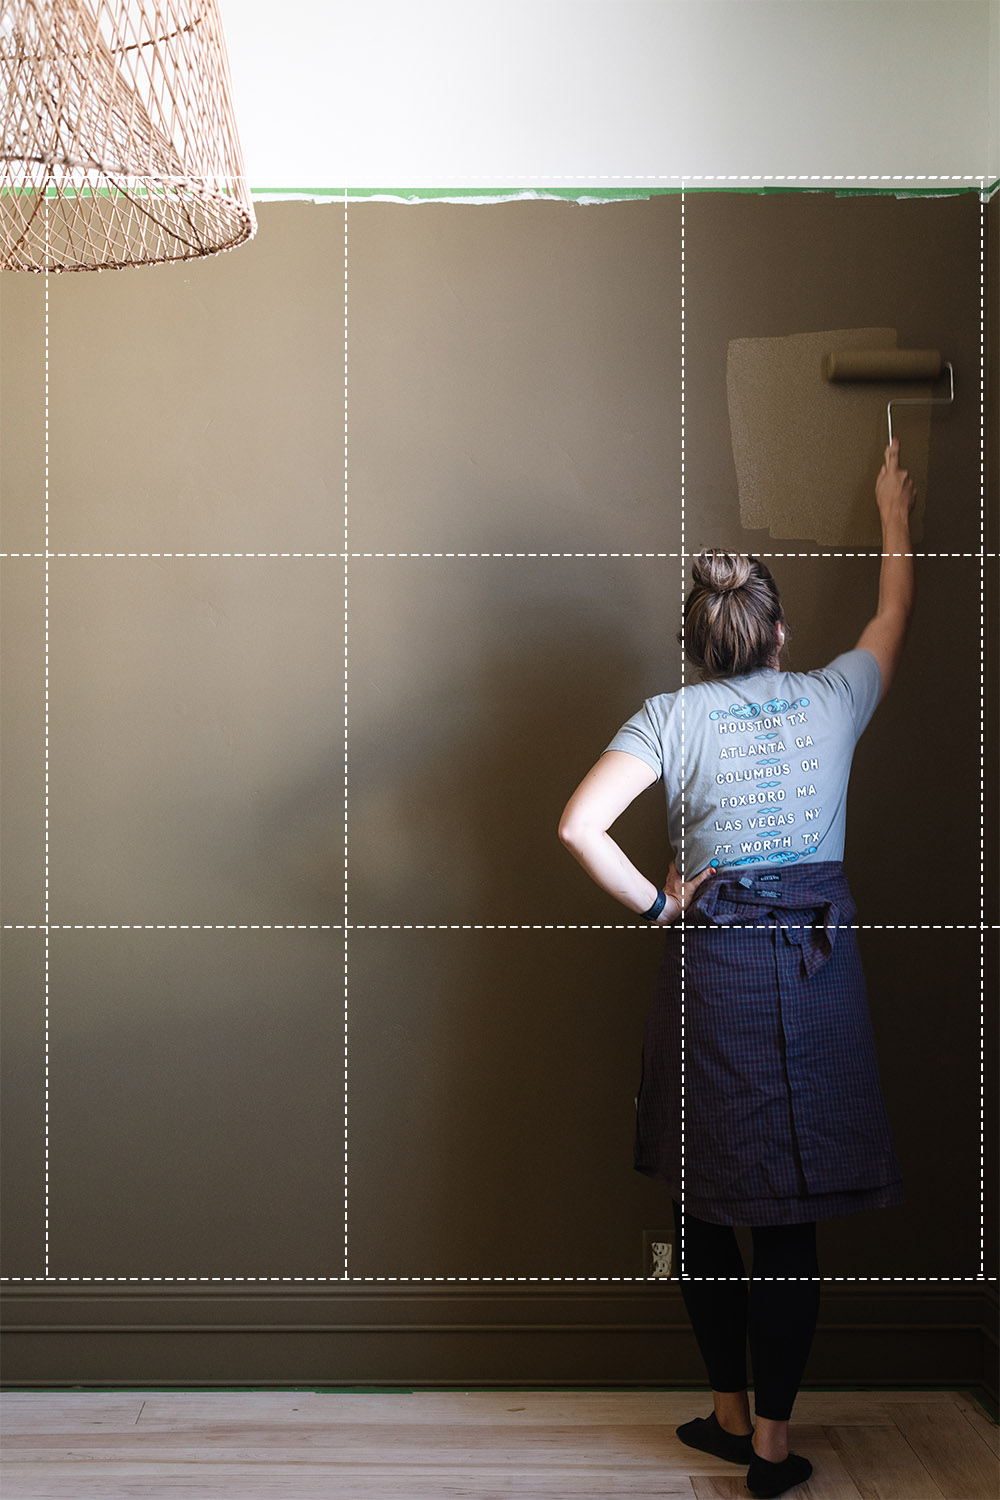
Mistake # 8: Overworking the Paint
If you hear nothing else today, hear this. OVERWORKING THE PAINT IS THE WORST THING YOU CAN DO. What does overworking the paint look like? Well friend, huddle in.
Once paint is exposed to air it’s like a ticking time bomb. The more surface area of the paint is exposed, the quicker it will dry right? Paint spread out on a wall will dry faster than an open gallon.
As you are rolling the paint, your time is ticking. Paint dries from the surface first. Which means you’ve got to get it on, and then leave it alone. Once the surface has started to dry, rolling back over it to fix a drip or a roller line, or add more coverage is doing more damage than good. You’re mixing all of the surface dried paint with the wet paint on the roller, and the wet paint underneath the surface. All that you’ll end up with is a big goopy texture-y mess.
It takes massive amounts of self-control and sometimes leaving the room (no shame in knowing your weaknesses! 😂)
So what is the right technique?
When I’m painting a wall, I like to work in 3 foot squares. The reason is because I can really easily control the coverage and fix any imperfections before I’m off to a spot halfway across the room. Work quickly and off of the wet edge of your square.
Mistake #9: Not Waiting For The Paint to Dry Before You Re-Coat
As the paint starts to dry, the surface will change colors. The best indicator of when your wall is ready for a second coat is when the color is uniformly dry. If your paint looks splotchy and has an uneven color it’s not dry!
Ok friends, these are my best tips. Did you learn anything new!? Make sure if you are heading to your neighboorhood Sherwin-Williams store that you use the coupon below to save $15! You can use it as many times as you like!
P.S. The paint I used for this post is Sherwin-Williams Emerald Interior® in a Matte finish, in the color Verde Marron SW 9124


Such great tips!! Love the way you explain everything so clearly. Currently working on ideas for my girls room. Love the color you choose.
Paint acne. 😂😂😂 You crack me up! This came at the perfect time! Thank you!!! And thank you for the coupon too! ❤️
I ALWAYS prefer to use Purdy natural bristle brushes, no matter if I’m using latex and synthetic brushes are suggested. Over many years of painting professionally and (lately) just for myself and family, I’ve found that properly cared for natural bristles leave less brush marks and last much longer.
I LOVE painting but noticed like 3 things I’ve been doing wrong. I thought smoother nap would make my walls smoother?! DUH. Thank you!!!!!
What’s the best way to clean a brush? How often do you wash them? I’ve found that paint starts caking in my brush and even washing them really well with soap every night never seems to get it all out! If I’m doing a multi-day paint job the brush is just ruined by the end with all the paint I can’t get out of it!
They make a new product called “Brush Cleaner.” You can soak even the hardest-dried brushes in it and after a few days, they clean out with soap and water. Both oil and acrylic.
If you’re just finishing and it’s acrylic dried up in your brush, soak it in rubbing alcohol, then use a wire brush to get the junk out. Soap and water. .
Shellac based primers use household ammonia, both dried and wet.
Oil? Well, paint thinner, mineral spirits, or turpentine and a wire brush.
You are my hero! Also what do you suggest for prepping the wall before painting. My boyfriend insists that a basic interior wall has to be cleaned, sanded and then cleaned again.
This is great information! Can you also touch upon the proper way to clean a paint brush? I, too, only use Purdy paint brushes but every time I paint, it seems to damage my paint brush even further. The paint (latex) dries on the bristles quickly, and it’s near impossible to wash it all out. I end up buying a new brush every few paint projects.
Love this post! So well written. Videos would be helpful too but it may be hard to show the little errors. Another issue I’ve had with paint is knowing when to use a primer. I know most paints today have a primer built in but if I’m changing colors in a room sometimes the primer can save me the cash I’m spending on extra coats of paint and sometimes I don’t want to waist time on the priming so it’s kind of a gamble. Do you re-use your rollers? I hate washing those things they hold so much water and the nap is never the same once they’ve been used.
Happy Painting!
This is great- next painting doors! Help!
As someone who paints for hire, I would like to add one more tip. My husband who works in construction told me the union painters use this trick: before rolling, defuzz your roller by rolling it over the sticky side of some painters tape. This way you won’t end up with any little pieces of roller lint on your wall. Works like a charm.