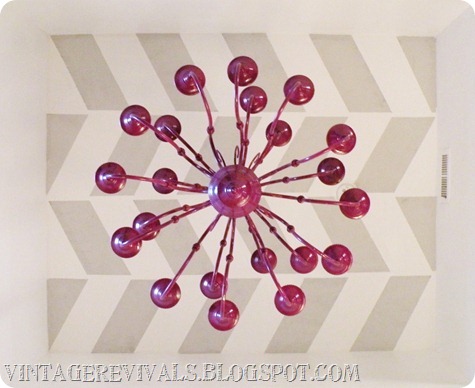
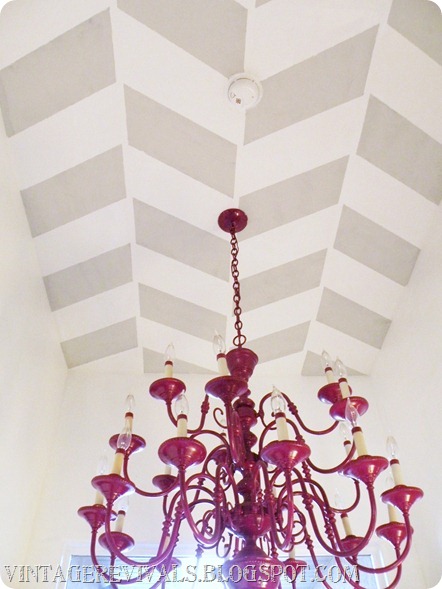
Wahoo! The entryway and Master Bedroom are DONE! You have no clue how excited I am! Today’s project comes from the Entryway. It started off a few months ago with Octy the Purple Chandelier. We have all seen the beautiful herringbone walls that are floating around blogland and Pinterest like this one from Girls With Good Taste. So so beautiful. I decided to change it up a little though. (I know you are shocked.)
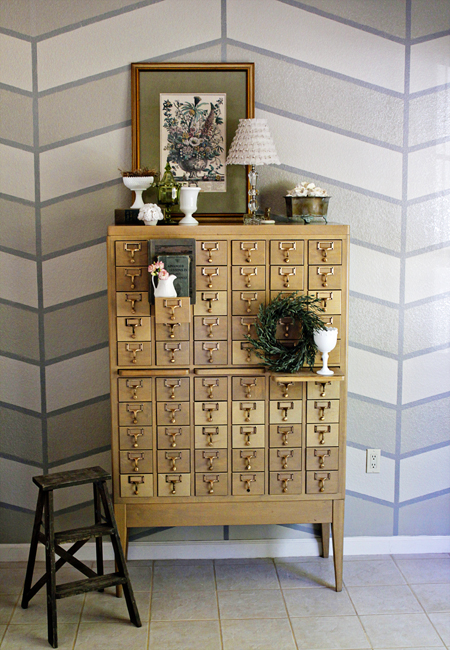
Most Herringbone wall treatments have the same color for the entire horizontal row, like this one from Girls With Good Taste:
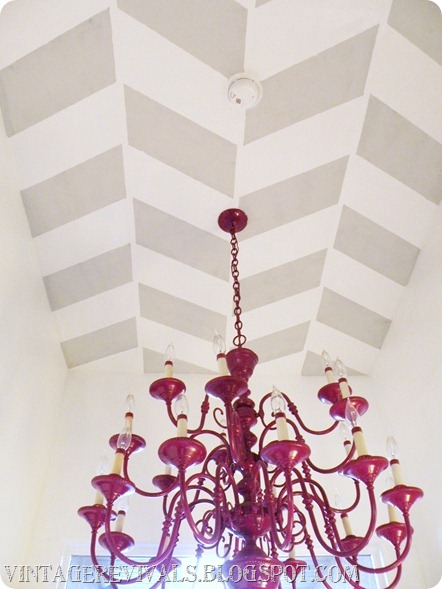
It is so cute but I wanted the color to alternate spaces which was probably more work but I think it turned out amazing!
I used flat paint so that the texture of the ceiling doesn’t take away from the herringbone pattern and I am SO glad that I did.
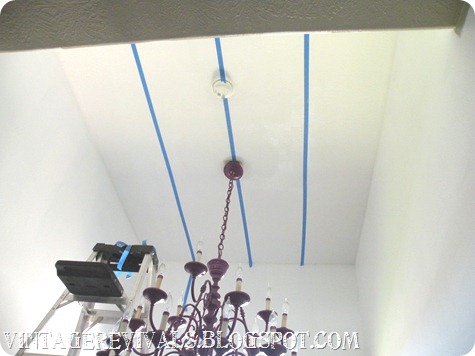
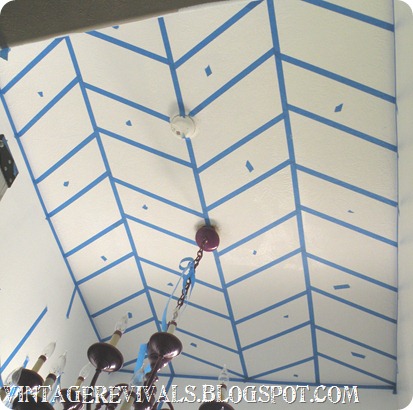
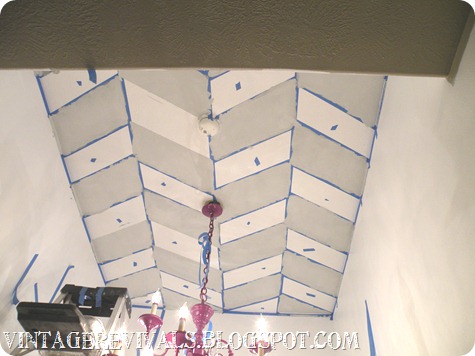
Start by finding the center of your ceiling. Then divide your space evenly. I have 4 sections in mine. Remember to take into account the width of your tape and adjust accordingly
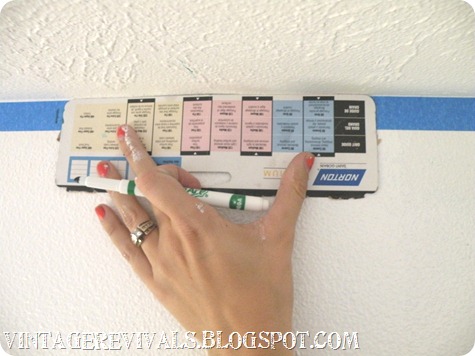
I used a template to mark my spaces for the horizontal lines.
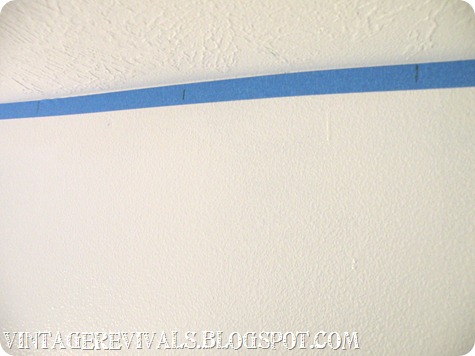
You will want to mark almost the full width of the tape because you will be using that mark from both sides.
Starting in the left corner I marked at the full width of the template. Same for the second line. The secret to having perfect even lines is to take mark #1 from one side and connect it to the corner and then take mark #2 and connect it to mark #1.
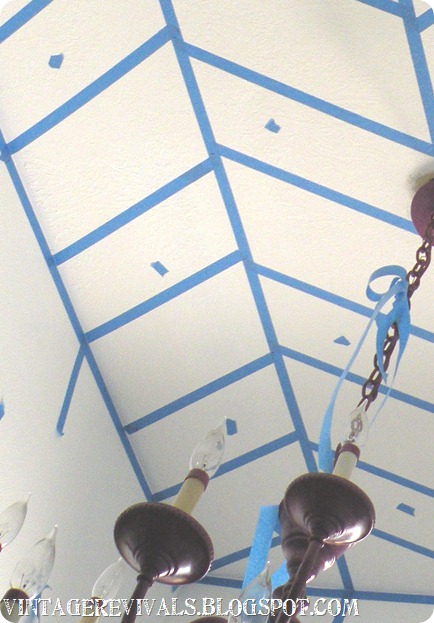
Now if that made your brain hurt hold on cause its about to get worse. To alternate colors and have them the same sixe when you are finished you need to adjust to accommodate your tape. The pieces that are staying white have a little tape mark in them so that I don’t paint them. You will also notice that the tape is always on the INSIDE the tape of the unmarked section. They best way to do this is to tape on the inside of your marks when you are doing a section that is the same as your base color and on the outside of your mark when you are doing a section that is the new color. And if you mess up its ok, step back and try again!
Hooray!! You have made it through! Now you are ready to paint!
Paint each section that is not marked and remember if you paint it with your base color first and then your accent color it will prevent any bleeding! I cant give you the name of the base color because it was something that I mixed myself! Sorry guys!
When it is done peel your tape of and go get a Diet Coke cause you deserve it!




SO awesome, mandi! maybe my fave project yet of yours!
Good grief you’re fantastically creative! Love it!
So amazing and very elegant!
Wow. Just wow. You are amazing mandi!! I love it so much!
Oh my gosh, Mandi…are you kidding me right now???? I wish I had half your talent & creativity…you are so awesome!!!
Get OUT!!! This is too cool. Kudos to you – both for the herringbone AND the ceiling! I do anything I can to avoid painting art on ceilings.
Any chance of you moving to No. Calif :p
Ok I love this!
this.is.amazing.
that adds such depth to your ceiling — wowza!!
WOW!! This is really awesome Mandi!
It’s flippin’ fabulous!
AMAZING!! That is about all I can say…
Wow! No words for how fabulous that is! LOVE 🙂
So fun! You know I love me a painted ceiling 😉
Oh my goodness! This is seriously like soooooooo awesome!!! You have so much patience! It seriously looks 3D!
shut up. you are amazing. i love that shot from right under the chandelier. love it so, so much.
That is MEGA! SO fun and creative! So you… it looks great with the purple chandelier! I want to see the rest of the entry way….
Amazing Mandi! I would sleep in the entry so I could stare at it as I go to sleep.
Mandi you are totally awesome. To figure out the how was tough but your tutorial was very clear. The purple chandelier pops and the ceiling looks SO high.
Joy
Looks great girly! xoxo
Do you have a textured ceiliing? I have a beautiful tray ceiling in my room that I’d love to do something fun with but I’m not sure because it is textured
Callie!
I do have a textured ceiling. You can see it pretty well in the template picture.
Love your guts
mandi
wow it looks amazing xxx
GIRRRRLLLL…Fabulous!! I LOVE it!! My eyes were weirding out a little…I was like, “what a cool ceiling how it comes down in the middle!” Heeeheee! It was the lines that were playin’ games on my jacked up eyes. I really do love it 🙂
Rock on sistah!
Jen
AMAZING!!!! I absolutely love a herringbone design, and I never would have thought to put it on a ceiling! Absolutely incredible.
I want to make out with your ceiling. Fore real! LOVE it!!!!
I love this! Looks fantastic and really makes the chandelier stand out. Amazing work girlie!
Looks amazing!
Oh my gosh this is stunning, looks like a lot of work and it was well worth it.
Wow…that is awesome. Love the illusion it gives that the ceiling is vaulted.
You are BRILLIANT! it looks AWESOME!!!!
I love it!
When it comes to thinking Out of the Box, you BURST out with full force! LOVE IT! My hubs would never let me do this but I’m SOOO glad yours does, so we can all admire and dream of what could be!
Whoa! This is awesome!!! It kinda seems to trick the eye a little bit, but it looks amazing with the purple chandelier. You seriously come up with the coolest ideas. This one is definitely a fave!
Super coooool! Love the gray with the pop of purple!
You just rocked my socks off. This is why you are a force to be reckoned with! Just awesome.
Loving this graphic art. It captures attention..and with that light! Truly a wonderful display of how creativitiy with paint can make a dramatic impact.
This is gorgeous, Mandy!!!! Kudos to you for hanging in there and painting that whole thing!
Holy crap, that is so dang awesome. I can hardly stand how cool that looks!!!! Gah!! You are full o’ skilz, girl!!!
That is absolutely beautiful. And the part about alternating the tape spacing made perfect sense. Love it!
I’m one of those white-only-for-the-ceiling kind of girls, but this is soooo pretty! I would’ve never thought to paint my ceiling, let alone paint a design on it. Stunning! (And I love the optical illusion it creates up there!)
This looks amazing. Says #41 in the comments. 😉
A-MAZE-ING! It looks like your ceiling is pitched! Fabulous!
Susan
Hi, Mandi
Awesome!
Vanessa
Thanks Mandi! Can you tell I looked @ that on my phone?! It’s amazing how much more you can see on a computer screen 😉
this is totally rad! love it.
This is absolutely amazing!!!
That is ridiculously fantastic!! Can you just design my whole house for me?! Love it!!
Oh, this is so utterly cool! Doesn’t it just drive you crazy, though, if someone has the nerve to come to your house and NOT look up?? I’d have to keep rolling my eyes to the ceiling to give them a hint!! 😉
Holy moly…I cannot believe you did this!! It is totally amazing.
Seriously? You blow my mind every time you reveal a new project! I am so in love with your ceiling right now, I am not even kidding! Also, I think it looks more like herringbone having the color alternate like you did it rather than have one whole row the same color. If I were you I would just be laying in my entryway staring up at my ceiling all day. It is perfect!
Love it! You’re so clever!
Wow that’s crazy, so creative! Love it!
Mandi you are SUPER amazing!! I absolutely love this!! love how it makes the ceiling look like it has peaks!! LOVE LOVE LOVE IT!!!!! Plus, as you already know, I luuurrrvvve your purple chandy. Sure wish I could find a space in my home for one!!!! “love your guts” Nicole
Holy Cow! This ceiling is amazing. The thoughts of doing that work on a ceiling gives me anxiety. 🙂 Truly amazing as always!
wow, thats pretty elaborate for a ceiling! it made my neck hurt in compassion for all the working about your head stuff! but it does look amazing!!!
Looks amazing! Ceilings are so awesome painted, but man it hurts your neck!!! The finish product is worth the pain. lol
seriously Mandi… you are AH-MAZING!!!! Love the herringbone ceiling! Considering it for one of our smaller rooms or maybe the bathroom! You might just win the title of “creative painting queen!”
Love. I saw a picture on Pinterest and I actually thought the ceiling was angled! It’s a perfect backdrop for the chandy.
Stunning!! Just stunning!
Aloha,
Charlie
This is so FAB!! What paint colors did you use?
Hey Mandi! In the process of copying your herringbone ceiling on the stairwell ceiling to my finished basement 🙂 I’ll send pics! saw it on Nate Berkus, so glad to have found you!
I’m a huge fan and follower, starting with THIS ceiling, AMAZING! I’m hosting a chevron party on my blog and would love you to link up!
https://burlapanddenim.com/2012/03/party-on-mondays-2/
Holy crap…that must have been exhausting, but well worth it!!!
Taped up the wall in my son’s room at the house we’re moving into last night, painting today. Hope it turns out half as well as this.
Walls are already blue; we chose a color that coordinates with them and with his new Ikea rug. I did not put the long straight pieces down the middle of the sections–figure that leads to more space between the color spots. Do you think that will work?
Me again. That wall of my son’s room is complete, but based on comments we are trying something different for the adjacent wall–op art that either swirls into a tunnel “out” or
Got done with that wall of my son’s room. Now plotting the adjacent wall. It will start with the same kind of herringbone, alternating colors, but then will either wrap into an op art tunnel or the grid will become wavey until it splashes off water droplets at the end. Haven’t decided yet. Hoping to get help from his art teacher.
Thanks for the idea that got us started!
I have been SEARCHING for ideas for my teeny tiny bathroom and when I saw this I could finally sleep!! I love it and thank you for sharing your AAaaaamazing talents!
Thanks for the great idea! Painted the spare bedroom sub-floor with this herringbone pattern. I’m very pleased with the result! So glad to have come across your website! You have inspired me!