You can build this DIY Platform Bed in literally 3 steps. Do you have a Saturday afternoon? Good, because you can make this bed and still have time for a leisurely stroll through Home Depot.

When I was designing Macie’s room, (and lets get real here, any bedroom) one of the nagging problems is that of the box spring/bedskirt. Its just not my favorite. So I decided that a DIY platform bed would be the perfect solution.
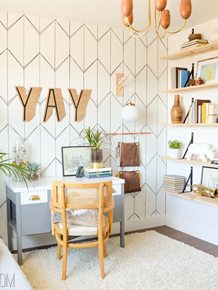
The was a little bit of criteria that it had to have. It had to be normal bed height, without using a box spring, it had to be sturdy, and it had to be pretty. I had already finished the Macramé headboard, and felt like it needed something behind it other than the wall to make it feel more headboard-y and less wall hang-y. That is where the giant wall panel comes into play.
DIY Platform Bed Supplies:
(2) 4×8 pieces of premium plywood. I recommend using the 3/4” thick pieces.
(3) 8’ pieces of premium 1”x4” pine.
(5) Heavy Duty Top Plates (available at Home Depot)
(5) 15” Parsons Table Legs (available at Home Depot)

Cut List:
Please note these measurements are for a standard twin size bed.
Pro Tip: Have the plywood cut at Home Depot before you bring it home!
- Your first 4×8 sheet needs to be cut every 19 inches to make 5 pieces. This is for the headboard.
- Your second sheet needs to be cut to measure 78”x41” (cut 18” off of the top and 6” of of the side.) **If your twin bed is an XL you will need to cut your base piece to measure 82” and adjust all of the measurements accordingly
- Measure and cut your 1×4 pine to (2) at 41” and (2) at 80”
Building the Platform Bed
Step 1: Attach your mounting plates
Measure an inch in from the edges of the platform piece. Attach one in each corner as well as the middle. Screw the legs on, and flip it over.


Step 2: Attach the side boards onto the platform base.
Make sure that your boards are flush with the bottom edge. We used finishing nails to do this, but if you are putting a bed in a room where they might get stepped on I would use screws at least on each corner and in the middle.

Step 3: Attach the Headboard
Find the place that you are going to mount the headboard (in my case it was the center of the wall). Use a stud finder to mark where the studs are. Attach the pieces of wood to the wall using a nail gun. Start at the ceiling and move down.
By some miracle our boards fit perfectly, but if your ceilings are higher or lower you can add more or less at the bottom (that way it will be hidden by the bed!) Shhhhh under the bed secrets!! Mix up the order of the pieces so it looks uber custom, and not just like a giant piece of plywood on the wall.

(Yes, that would be 2 grown men standing on the bed, its really sturdy!)
And that’s it! The last step is to attach the platform to the wall, just use longer screws and L brackets on the underside and make sure you hit a stud.
Can you even believe how easy this was?


Itching for more info about this amazing room? Check out all of the tutorials here! The IKEA Rast hack and Upcycled Target Lamp Sconces are my favorite!

do you think this could be modified for a full sized or queen bed?! super cute!
Fabulous room Mandi! Love the macrame headboard, will you post a tutorial for it soon? Thanks!
Hey Linda! I do have a post for Macrame coming down the pipeline!
Hi Mandi! Did you ever post a tutorial for the macrame headboard?!
I too despise the dreaded box springs and bed skirts! I’ve been racking my brain for what seems like for-ev-er to come up with a solution for our king size bed. The skirts get dirty and twisted so easily and it’s a real circus around here trying to swap them out from under a ginormous mattress to wash them. Love this clean, simple, platform number you whipped up!
Thank you so much for taking the time to write this tutorial, Mandi! It will come in handy when I redo my boys bedroom in the Fall! Do you have an estimate of how much it cost to make this bed minus the headboard? I LOVE how the room turned out! The painted ceiling and ceiling height headboard really sets the stage for the rest of the decor. Great job!!! 🙂
Oh I know I’m going to be super thrilled about this when my little girl gets older! Thanks for sharing!
Can you adapt the measurements for a full sized bed?? I don’t trust my adapting skills! Thanks. Love the idea and your site!!
Mandi,
Superb! You always make me feel like I can do anything myself- thank you for that!
Just like Christine wrote- I’m thinking I really want to do this w/ my queen size mattress? What do you think? More legs? More reinforcement? I’m thinking I’m going to roll up my sleeves & get goin’!
Thanks so much!
Julie
PS. You had posted about the rattan hanging chair that got away? I think you can do easily do rattan or jute or cotton rope (around the outside) & use a “bucket style chair” by just taking the legs off. Really, all you need is the metal frame (even a bucket style outdoor chair would do) and you could use any material, even leather/faux leather across the seat & around?
SO perfect for that room – and with that macrame headboard! Great tutorial! Newsflash: beds don’t have to be expensive to be fabulous! 🙂 Love it.
Hi Mandi,
though I do like the look of the bed, I would be afraid of mold growing under the mattress since there is no ventilation from beneath. In Europe we usually have slatted frames (or whatever you’d call them in the US) to avoid this (I think the Ikea beds in the US use the same construction – in case you’re wondering what I am talking about). A friend of mine once left her mattress on the bare floor because she couldn’t decide on what kind of bed she wanted. About half a year later she picked it up to flip it and it was all moldy underneath. Hope this doesn’t happen to this beauty!
Best,
Sarah
I was just thinking the same thing! I think you could drill large holes in the plywood base to allow for ventilation. I have seen that done in other DIY platform beds.
It is sooooo dry in Southern Utah that I doubt she will have that problem! That’s a good thing to think about for more humid places though.
Maybe in other climates you could drill 1″ holes everywhere in the plywood underneath? The middle support post would possibly need some extra bracing since the plywood would be riddled with holes, but i feel like that would do the trick for ventilation.
Love this quick Tut, my favourite being the macramé part of the headboard.
Hi, Mandi!
I absolutely love the way the bed look and I think your style is absolutely awesome, but I do agree with Sarah over here. You need to look out for mold under the mattress, and remember to flip the mattress regularly. If you’re building a bed that is going to be used a lot, and by the same person, building the bed with a slatted frame would also be ergonomically better, as it improves both support and comfort. A mattress on a flat and whole platform is pretty much like a mattress on the floor, and you’ll need a very high quality mattress to make up for that.
Best wishes,
Andrea
Happy blogiversary! I totally remember that yellow VR blog header, & the tinfoil nightstand & anthro acid mirrors were some of your first projects that got me hooked on VR!!!
Omg…stupid smartphone posted this on the wrong blog post!
That macrame wall hanging is amazing! Did you make that too?
I need that tutorial for the macrame! I want to make that for our Master! 🙂 excellent job on this room! so pretty!
Do you mind sharing a cost estimate for this? Just curious what the investment was for the bed frame alone!
forget the bed, can you explain how the macrame was made?? 😉
I just made this bed and I’m pretty happy with it. I did have to make adjustments though.
To answer a few questions:
1) The price is around $90-100 total to make, about $60 in wood, $25 legs, $15 misc. (top plates, screws, etc.)
2) The bed frame is quite a bit larger than the mattress, which was a bummer because I thought it was going to be a tight fit. There are gaps all around the mattress, even with the blankets tucked in.
3) The finishing nails weren’t enough to keep this bed together, safely, in my opinion. I added screws, about 5-6 on each side. Then I had to cover the screws with wood filler to hide.
Even with these issues, I was still satisfied with the overall project. It was an easy project, less than an hour to assemble. And I had everything cut at HD so I didn’t have to do anything but hammer/drill.
The bed frame is much better than the metal frame/skirt I had prior so it’s an upgrade for sure.
Hope this helps everyone. and thanks Mandi!
You really do make this look pretty easy. But I can’t imagine myself actually building a bed.
Lovely! Do you think this design could translate to a queen size bed?
Hi, Mandy! I just LOVE watching your videos, and reading your blog! I’ve been following you since (I think) you started on the Nugget re-do! I love your ideas, I pin them, I copy them, I send them to my sisters, and my daughter. I’m never going to do MOST of them, but that does not stop me from thoroughly enjoying every second of them! You and your family are just adorable, and I’m so proud of the work you’ve done on the Merc! Keep up the great work, and thank you all for entertaining us so well!