You Guys. I am so excited for this week of hilarious DIY fails. I am loving all of the submissions (if you havent had a chance to send yours over yet you can get all the info here)
The most common denominator in a DIY fail is this little thing I like to call Project Mode. I am pretty sure that it is a super human power sort of like survival of the fittest, there is no way that you are giving up until it is DONE. I mean what else would give you the ability to ignore what a disaster your house is, feed your kids ramen for 3 days, think it is a good idea to use kitchen utensils in place of tools that you cant find (because of your house being a disaster), rationalizing the most ridiculous things away, and keep working until the project is a) done b) gone so horribly wrong you have to step away and compose yourself or c) ruined for all of eternity. Project Mode can be such a jerk.
This desk from Melanie is the perfect example of the haze that Project Mode puts us in:
Hi Mandi! I love that you’re doing craft fails, Blog land is most often so picture perfect, but DIY-ing is totally trial and error. Happy to share on of my many errors .: )
This is my Chevron reclaimed school desk! Like many projects-I just started on a whim the second I felt motivated. Unfortunately, I didn’t have any white paint. I did have some OLD cream colored paint though; I was in project mode and I was using it! We can see how well that worked out. Turns out, paint DOES go bad! After some extra elbow grease and a trip to my beloved Home Depot, I started again with some fresh white paint and went with stripes instead.
There are few people who have had the experience of having a major DIY fail on national television. I am one of those lucky people (you can read all about it here) To this day the word Birdhouse triggers my Craft Wars PTSD and I start explaining my side of the story. It is really quite embarrassing.
Lucky for all of us, Sunday sent in a clip of her televised DIY fail…
What’s a good DIY project fail unless it can be televised for all to see? Take for instance my “pallet art” project. Which, mind you, I worked diligently on for a few days only to proudly present my great project on TV.
“be joyfull, give thaks, pray always.”
The host of our local show were great and we all had a good giggle!
The kitchen overhaul has begun, and like I promised, I am keeping you guys up to speed on all of the decorating projects and budget (I am trying to work with a real person fix it up budget).
Since the day we moved in I have hated the color of our countertops. When we bought the house the cabinets were lovely reddish oak (WHY!?) This in turn made them look really peachy. It was like a freaking peachfest-a-palooza.
When we moved in we had someone come in and restain our cabinets, which is a whole other can of worms that I will open when we start talking about the changes that they are getting.
Restaining them took the peach down a little, but it was still not good. Oh and please remember the motto when it comes to unstaged house photos…don’t judge me. This was the only one that I could scrounge up that was at the same angle.
The plan all along has been to follow in my girl Kara’s footsteps and use Feather Finish to put a concrete overlay on the existing countertops. It is a really inexpensive way to change the entire look of your counters. You are basically putting a few thin layers of concrete over you existing counter tops.
But.
As I was doing a little more research the reoccurring theme that I found was how easily concrete countertops stain. This has more to do with the sealer than the concrete btw.
This type of scenario comes up a lot when you are DIYing. Lets say you find a great chair with ugly fabric and you want to try your hand at painting it. You have to change the fabric out anyway so if you hate it then you are no worse for the wear.
That is how I am feeling about the counters. There is NO WAY that they are staying the way that they are. The new tile is too gorgeous and it doesn’t match, the way that mom jeans on a Victoria’s Secret model don’t match.
So do I try it out, hoping that the warnings that I read online are a little dramatic and it is amazing? All the while knowing that there is a good chance that they will need to be replaced in a few years? And then I can give you guys real life updates on how well they are holding up…
Or do I save the $100 and put it towards new countertops entirely and blow all hopes of redoing the kitchen for a few grand out of the water?
Do you have concrete counters? I WANT TO HEAR ALL ABOUT THEM! And if you know what kind of sealer was used I want to know all about that too!!!
My countertops lives are in your hands. No pressure.
psst! I am still accepting submissions for the DIY Gone Wrong Series that is happening next week! Find out all about it here.
I am really struggling to find a way to start this post so please bear with me as I fumble through it.
I have been through some hard things in my life. All of which pale in comparison to what my friend Amanda is going through. Amanda has been my sister Miranda’s best friend since elementary school. She is so wonderful and such a great mom to her 4 little kiddies. Can you guess which one is my sister?
A few weeks ago I got a call from my mom. She told me that Amanda had just found out that her 2 year old son Boston had Acute Lymphoblastic Leukemia. Cancer.
There were no huge red flags that pointed to cancer. It took weeks of testing to find out Boston’s diagnosis. Can you even imagine?
All I wanted to do was hug them tight and promise that I would do whatever I could to ease this trial that they have been given. In that moment I was overcome with gratitude for you. I am only one person, but I have been blessed with a whole bunch of internet besties that are beyond awesome. I knew you could help.
Are you familiar with PS I Adore You? It is a shop started by 3 moms that are personally affected by childhood cancer. A portion of the proceeds go to cancer research. Every month they feature a Cancer Cutie that you can donate to specifically. All of the money that is donated to this cutie goes directly to the family of the child.
Our Boston is the Cutie for the month of November. And I am pretty sure that they couldn’t have named it better. It doesn’t get any more sweet than this face.
But.
The best part of this entire endeavor is that every donation that Boston receives this month is being matched by Millie’s Princess Foundation.
I believe that when something is built on love it has a strength that cannot be comprehended. I feel this strength from both of these amazing foundations. They were born out of love by parents who are not willing to give up on their kids or anyone else’s.
I know that Amanda and Matt and everyone that loves them will be different because of this. The level of compassion and gratitude that they will have when all is said and done is not something that cannot simply be taught. You have to be changed. And they are in the fire right now.
I know that this time of year is hard for a lot of people. Stories of strangers dealing with insurmountable trials touch our hearts. They make us pause and hug our kids a little tighter, but then we move on. The reality of our lives takes hold and things like homework and holidays require our attention. But the pain that we felt for the moments that this stranger’s story touched us is their reality. Day in and day out.
So while you are here in this moment with them please do something. Share Boston’s story, donate, pray for them, tell your kids how much you love them. Because to me they are not strangers.
(Insert team huddle)
We have 3 weeks and 1 day to give this family the biggest financial head start we can on the next 3.5 years. (That is how long treatment for Boston’s ALL will take.) Matt and Amanda need to be able to focus on Boston’s fight, not the fall out from all of the financial expenses. So what do you think? Want to help?
Click the link below to donate (and remember that all the donations are being matched!)
And if you are not in a place to donate we still need you! Thoughts, prayers, and kind words are just as important (if not more!)
Annnnnnd BREAK!!
I hope you guys have a great weekend full of happiness, because you absolutely deserve it.
Happy Thursday my lovies! So, you know when you start watching Vampire Diaries and then all of a sudden its 2 days later? No? Just me?
Last week as we were chatting about the kitchen tile, I may have mentioned my most embarrassing/horrifying/take me down 15 notches on your DIY respect scale project. And that one day I will share it with you.
That day is coming.
Welp, because no one likes to be the only one drowning in a pit of judgment, and because EVERYONE loves a good laugh, I thought that it would be WAY more entertaining to show you a whole week of DIY gone wrong projects. Right? Cause lets be honest…there is a bit of a learning curve sometimes.
So.
I will tell you about mine, if you will tell me about yours. I would LOVE for you to submit stories and pictures showcasing your worst DIY fail. Like so epic you will bring shame to your children’s children.
Send me an email to vintagerevivalsblog at gmail .com with DIY Gone Wrong as the subject line and tell me all about it. Keep it as short and sweet as possible and by all means pictures are a must.
You should know that I am not above bribery, or paying out of pocket for laughs. Every project that I feature will receive a $10 Gift Card to Homegoods with one grand prize winner receiving $100.
You have until next Friday Nov. 15th to submit your failures.
You.guys. I am so sorry to leave you hanging like that yesterday. When I had the entire post written it was like a 45 minute read and I mean, I know that Vintage Revivals is totally your favorite blog, but that is just asking a little too much.
Because I was unwilling to put in wood that didn’t match in such a large open area that was directly connected to the old wood (though I know it can be done beautifully) I was left with the option of tile.
I think that picking tile goes back to my tip on picking carpet. If you are feeling overwhelmed, stop what you are doing and walk away from the beige. Unless of course that is what you have your heart set on, then by all means, be my beigey guest.
I ordered 4 different samples of tile from Build Direct because I believe in second chances and we had such a great experience with our original floors. These are they:
I knew immediately that the lower left hand sample was the winner. It is called Silk White and can be found here. The other ones just weren’t right. The lines were too bold and the white was too white (and I just realized as I was linking to it that it is actually wall tile. So don’t order it for your floors. Okey dokey?)
So I called the customer service rep up again and placed an order for my tile. We were becoming fast friends he and I. The price per sq foot was $2.19. I ordered enough to do my kitchen, my laundry room and both bathrooms. I learned my lesson. The total cost for the tile was $814 and the shipping was $435. Ouch.
One of the downsides from ordering something like this online is the cost of the shipping. I did this because even though increased my price by over $1.00 sq/ft it was still less than buying it from a local retailer. Total price including shipping was $3.31 sq/ft.
The size I ordered were 12×24”. I love the modern vibe that it gives off.
There are a few ways that you can lay tile of that shape/size without having to make cuts.
One of the biggest complaints that I had with the tile we already had was that the grout was always dirty looking. Originally it was sort of a reddish brown, but no matter what I did to it, in the high traffic areas it was always dark gray. Except that time I tried to clean it with Kaboom Toilet Cleaner and bleached it…that TOTALLY changed the color…to gag me tangerine. Lesson learned.
So I decided that if the natural color of the grout was always going to be dark then I wasn’t going to fight it. Everyone recite the Serenity Prayer with me. I knew this was a battle that I was not willing to fight. AND I love dark grout especially after using it in Alicia’s Kitchen.
The grout that I chose is Mapei Sanded Grout in Charcoal. I believe that you can buy this at Lowes, but I bought mine at Contempo Tile. It is around $15 a bag.
At this point we were down to 3 weeks before the looming deadline.
I was starting to get stressed. The hardwood still had not been picked up, the tile was coming from Virgina and wouldn’t be here for 2 weeks. This is what I would like to call All Hell, right before it breaks loose.
After close to 2 weeks, the tile finally arrived.
It was beautiful.
It was glorious.
It was going to be laid by a professional.
*Insert record scratch.
Are you guys disappointed in me?!
First off, let me explain myself. I have literally the most patient husband in all the world. He is up for anything and gives me all the creative freedom that I want. He never says no to a project. So when he told me there was no way that he was laying tile, I had to believe him.
Plus there was the whole 1 week left before the deadline of my life scenario. Learning how to lay 12×24” tile in a herringbone pattern with 1/8″ grout lines? That was not a beast I was willing to poke. Mostly because I know it would have eaten me alive.
I had talked to a few different tile guys about doing the job, but everything kept falling through.
I needed a Hero. Ps. if this were an actual movie, this song from Bonnie Tyler would TOTALLY be playing right now.
You’re very welcome for getting that song stuck in your head for the rest of the day.
I needed someone that could come in the next 3 days, and have it done in 2. I needed someone that wasn’t going to charge me an arm and a leg (remember my realistic person budget?). And for goodness sake, I needed someone who would let me take pictures of them.
Enter a Hero.
Meet Jamie. He was recommended by a friend and was everything. EVERYTHING. If you live in Southern Utah and want someone that has the Mandilicious Seal of Approval, you want him. He can be your hero too! If you want his phone # leave a request in the comments below and I will email it to you immediately.
It was so interesting to see how a professional did things vs how my brain would have done it. Simple things like setting a diagonal chalk line. I would have set a horizontal one and lined all the tips up. Such a smart man.
‘
Or not setting the tiles that were right in the middle of the door frame until all of the tiles in the pantry are set. The reason he did this is so that he could kneel on the tile without gushing out all of the thinset. I never would have come up with that. I would have had a tile that was 1/4” lower than all of the other ones.
And there is definately something to be said for having the right tools for the job.
One thing that I thought was really awesome were the spacers that Jamie used. I bought the little t ones from HD and he saw at that moment what a complete novice I was. These horseshoe shaped ones make things so much easier to set AND to remove. They don’t sell them at box stores, you have to get them from a tile shop.
He had the entire floor laid in 7ish hours. WHA!?! I would still be trying to work with a freaking horizontal chalk line after 7 hours. Ok lets be honest. I would have been curled up in the fetal position in my pantry underneath the paint shelf after 3.
Jaime came back the next day to grout.
Like the hero that he is Jamie finished the day before my massive deadline. My fridge was still in the freaking living room when the biggest event of my blogging career happened. “Oh hello, welcome to my house, please sit down, and if you are thirsty you don’t even need to leave your chair. The refrigerator is fully stocked a mere 2 feet from your seat. Also, don’t mind that there are more paint rollers and brushes in there than food.” It was comical. Really.
Here are the 3 other tile samples that I ordered against the winner.
Now back to the wood. It was picked up about 3 weeks after the return had been requested, which was really frustrating, because that is a lot of money to just not have around, you know?
So the question becomes, would I buy from Build Direct again? I have to give a big fat resounding YES! They have really great prices, and the quality of products (at least the ones that I have experienced) are comparable to the much more expensive materials that you find elsewhere. Their return process was easy and they were really understand about my situation. But I will issue a word of caution. if you have to utilize their return policy, just know that it can take a few weeks until you have your money back in hand.
While the wood would have been fab, the tile is amazing. I love every single thing about it. I love the brightness that it brings to the space. I love that (while it may not be a new trend on the internet) it is very forward for Southern Utah. Which means in a few years when we may want to sell, it is going to be just catching on and people will be obsessed.
Now to answer the question that you have been dying to know. How does it hold up to dirt? Does it show every single thing?
I am going to say yes and no. Regular dirt and Wallie hair isn’t noticeable. Anything that has color? Yes.
But.
I would much rather have floors that show where they need to be cleaned, than to mask it so well they get filthy because I am blissfully unaware.
I have been moping them once every 10 days or so, and spot clean spills and they don’t look like you need to call Child Protective Services on me. So that is a win win.
As for the rest of the kitchen, I have lots of big plans. But that is another post for another day.
Questions? Leave them in the comments, and I will answer them there!
You know how when people get their first gray hairs they are usually named after their children? Not mine. Mine are going to be named Kitchen and Floors.
I shared a little bit of what was going on with the kitchen floors a few weeks ago in this post, but I wanted to give you guys the nitty gritty details(because those are totally my favorite kind.) and because I really do want to share the good the bad and the ugly. You might want to shield your eyes.
Ok, settle in, cause this story has it all…tears, disappointment, a hero, gnashing of teeth, a beautiful maiden, and finally after a really long struggle between good and evil, a happy ending.
When we moved into our house 4 years ago the one thing that I wanted was hardwood floors. That was all. I would have been content without a refrigerator as long as I had wood floors. After doing a fair amount of research we ended up with Aspen Birch Engineered Hardwood from Build Direct.
Blast from the past I found this picture on our old family blog of the installation. Hello infant Dylan!
When we ordered our flooring it was a great price, I want to say less than $2.25/sqft. The reason for the killer pricing is that it was being discontinued. We got the last of it and we have loved it. It is a great floor and I would not change anything about it.
Fast forward 4 years.
I have had the itch to update the kitchen. The St. George reddish beige cheap tile that is so builder basic it makes me weep openly, was just really grating on me. I could only cover it up so much. It made everything look redder…and crappier. A few of the tiles…(ok one of the tiles) was cracked and the grout always looked dirty. It was just not working.
Here is a rare picture from the early days of Vintage Revivals. Remind me one day to tell you the tale of the most embarrassing DIY I have EVER done.
My itch was scratched away when I happened to go on Build Direct and saw that our discontinued flooring was back in stock. The heavens opened, angels sang, yada yada yada.
I immediately requested a few samples from Build Direct to make sure that it was going to work out. But I really felt like this was a great option to continue the flooring all the way through the kitchen. It would flow so well with the wood from the living room.
This is the best picture I can find of where the wood ends and the tile begins.
The sample wood arrived really quickly and looked great. So I immediately ordered enough for the kitchen. The customer service rep was great and I was so excited about elevating the design and value of our house.
While we were waiting for the wood to arrive the demo on the tile began.
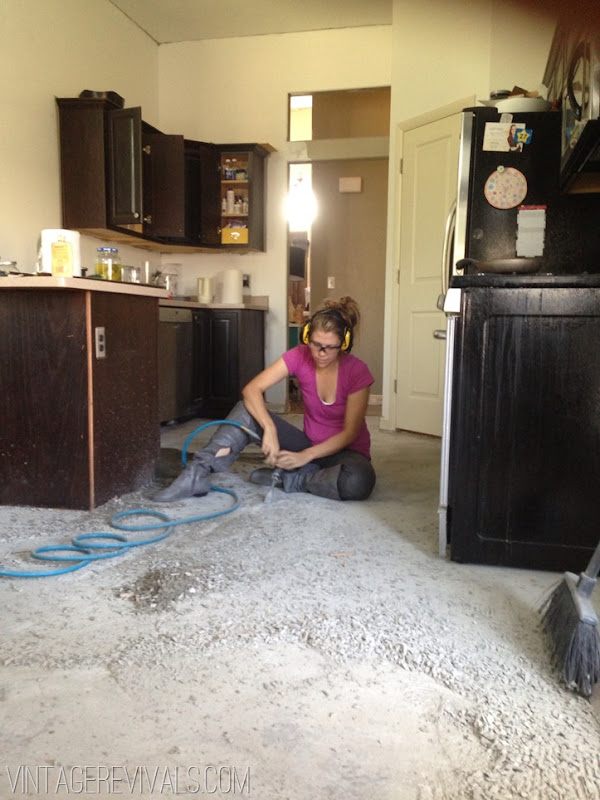
It was a sucky sucky job.
Made a little bit less sucky by an air chisel and this man’s muscles.
Insert fair maiden stage left with her trusty power chisel:
At this point all of the thinset was cleaned up and we pulled the wood out of the boxes.
There was a slight problem.
I mean, if its not immediately clear, that problem was the the new didnt match. In some lighting it did, but in others it didn’t.
It didn’t have as much color variation as the old wood. If you look at the picture above you can see that in the top left of the picture there is a plank of the installed wood that is the same darkness as the new wood. But the color spectrum was not there.
I was so bummed.
Insert wailing and gnashing of teeth stage right AND stage left…and audience participation is also encouraged at this point.
I immediately jumped on the phone with Build Direct and told them what the problem was. They have a great return policy and after I sent them the above picture they agreed that the wood was not an accurate representation of the image and agreed to fully refund my order.
This is where it gets a little hairy.
I had 4 weeks to get the floor put in before a huge deadline. 1 month. Seems like a long time doesn’t it? Heh. Heh heh heh. That is my maniacal laugh.
So what is a fair young maiden to do?
Hardwood was out of the question. There was no way that I would find anything that matched, and I didn’t want to install something completely different. So that left me with 2 options. 1. Tile. or 2. Give up on life completely and live in a construction zone for all of eternity.
Tile won.
I hate to end the post here because that is SO annoying, I know. But it is getting really long and there is still so much more to share. I will be back tomorrow to finish the story (and show you the happy ending!)
Time for you to see all of the amazing furniture possibilities that you couldn’t have created in your wildest dreams.
Time for you to become insta-BFFs with these people…because one day far far away they might want to sell, and you have to secure your first place in line. I know I am.
This of course means that it is time for the next Cold Dead Fingers post, where I show off YOUR favorite pieces of furniture to the world so we can all oogle and be inspired! Make sure you hashtag #colddeadfingers on Instagram for your change to be featured!
I think that this campaign buffet is pretty much the most amazing thing of my life. I would honestly trade any piece of furniture in my house for it. I mean, this is like the Hope Diamond of campaigners.
We all have furniture people will have to pry out of our #colddeadfingers $75.00 yard sale find; comes in 4 pieces plus bases… Started out bright yellow!
//
Sometimes I dream about things. I think about how much I love them for a really long time and then hope that one day I will be blessed with it at a thrift store. Do you know what has been on my list for at least a year? A Pendleton Blanket. Like this one…
Sneak peek! Almost done!!! Eek! #newheadboard #goldobsessed
//
I love little tufted velvet side chairs. They are a great first DIY project because they arent horribly hard to update. This one is SO beyond amazing though. The circles make it so unique and delish and the velvet looks like it is in pristine condition…lucky girl!
Sometimes the best finds are ones that make you take a second look. These pieces usually turn out to be my favorite. You know that ones that at first glance you say “Hmmm. I dont hate it.” Then at second glance you realize that you cant live without it? That is totally what I would have done with this light fixture. Amazing score!
My recent Craigslist find! A sweet little light fixture. I named her Flora. A#colddeadfingers find for sure.
//
I cant stop it with the midcentury wooden dressers. Like they are just so good at being gorgeous with no effort. If I were a piece of furniture I could NEVER be as cool as a MCM dresser.
Too excited to share to wait for a Rental Revival post. This dresser is HUGE and takes up half the wall, but it’s slim and fits ALL OF MY CLOTHES (except the ones hanging up) with one drawer to spare! It was only $60!
//
Ok my lovies, do you have a piece you want to show off? Upload it to Insta and tag it #colddeadfingers.
We are starting a movement here. Remember when Paris and Nicole started “That’s Hot”? Well I feel like Cold Dead Fingers has HUGE potential. Lets use it in a sentence shall we?
Me: Holy man alive. I just scored the greatest dresser at Goodwill!!
You: On a scale of 1-10 how good is it?
Me: Cold Dead Fingers.
You: *GASP* Shut up! I might have a heart attack if I dont see a picture of it right now.


")