How is that title for a spoiler alert? Every once in a while you get a project that seems so easy. But is like the Pandora’s box of swear words and frustration. Yes. This is one of those projects. Good news? I have had enough trial and error for the both of us.
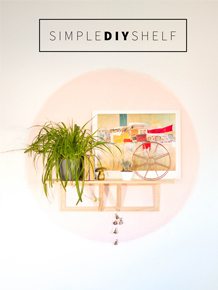
I am pretty in love with these simple shelves in Macie’s Bedroom. They are not hard to install, no tools required other than a drill.

Here are the supplies that you will need:
Shelving Brackets (I used these 12×8 ones from Home Depot)

Wood (I used 2×10’s)
Hex Screws (the kind with the point on the end) (2 per bracket for your studs):

Hex Bolts (the kind with the flat end) (2 per bracket for your shelves)
Cap Nuts (2 per bracket for your shelves)

We are using bolts and caps to hold the shelves on because we are mounting the brackets upside down. I would hate to use a screw and then have it strip because of the weight on the shelves. This is the safe way to do it.
Before we get started on the tutorial, let me tell you our fun little experience so you know what NOT to do. Arent you glad that you can learn from my mistakes?
When we were working on Macie’s room we were under a crazy fast deadline, so the thought process was under stress.
That is the only excuse I can come up with…
I measured the wall that the shelves would be living on and decided that I wanted them to be 30” wide. I was so pumped about this little project, I jumped into my car and headed to Home Depot. I bought the brackets, the screws and the wood. While I was there I had them cut the board into 30” pieces. You guys, I was smiling the ENTIRE time. I just kept thinking about your adorable faces and how much you were going to love this simple inexpensive project.
When I got home we realized that I hadnt figured out where the studs were on the wall. They were spaced 33” apart *palm to forehead. Fail #1.
So I went back to Home Depot and had them recut a piece into 35” sections. Got home, and it BARELY fit on the brackets. I hadnt factored anything in for an over hang. Such an idiot. Fail #2.
At this point my adorable and patient husband was not amused. So he decided to take matters into his own hands. He went to HD and bought a piece of wood and decided to cut it at home. That way we could measure 970 times before we cut it. Great idea in theory. He used my 16 yr old sister in law’s truck to pick it up. The board was 10 feet long, so to avoid a really large overhang he opened the sliding back window, and had the board resting on the tailgate and on the window seal while he got into the truck. Once inside he reached over and pulled the board forward so that more of it was inside the cab (can you see where this is going?) This caused the other end to fall off of the tail gate, and like a teeter totter from Lucifer, it made the end inside the cab pop up and crack the windshield.
Imagine his delight.
The good news is that we were able to get the shelves done. The bad news….well, you know…everything else.
Now that you know what not to do, lets go over the right way to do this.
Start by finding and marking your studs.

Decide on the width of your shelves (make sure to factor in the overhang!)
Attach your brackets to the wall. While you are doing this remember to add the thickness of your shelf + the amount of gapping that you need to get the shelf height that you want. Use a level. Eyeballing is not your friend.

When you are using such large screws, always drill a pilot hole so that you dont split your stud.

Once your brackets are in place, center the wood underneath. Mark the holes that need to be drilled. Drill it with a bit that is the same size as your bolt.

Then using your bolts and cap nuts, attach them to the brackets.
Also it helps if you put a fern on them to get the full effect.


Very doable.
Think of all of the fun places that you can hang them! I might have another suggestion in Friday’s room reveal. Just sayin.
Before you go on your way for the day, I have one favor to ask. My Creating With The Stars partners Classy Clutter, are in FINALS!! Today is the last day to vote and it is SO close. I cant tell you which one is theirs, but I can tell you that it is very amazing. So please pop over and vote for your favorite, they have worked extremely hard (as have all of the contestants) and deserve to win!!


I’ve been thinking that you used this shelving unit from Ikea for this! I love that you DIY’ed it! I’ve been wanting to buy the shelves for awhile but now I can adjust my widths to be perfect! Love this! Sorry about the car 🙁
https://www.ikea.com/us/en/catalog/products/S59891235/
Did you use any type of stain or sealant for the boards? Or did you sand them at all? Also do you have an estimated cost for all of the supplies?
love these! I actually saw them in the reveal last week, and went ahead and bought supplies at Home Depot over the weekend! Glad I waited for your post to install though…2 questions — why did you install the brackets to the wall first, rather than the board? also, do you think it would work to use wall anchors, or do you have to find studs? I’m so excited to try these in my bedroom!
Laura, the reason that we installed the brackets first is because the wood is REALLY heavy. It was just easier to get the brackets on and level when they were bare. If it were me I would for sure find studs, or at least one to hold the majority of the weight. Hope this helps!!
xo
m
holy friggin crap dude!!!! I hate when projects turn into such a mess but SO glad they turned out amazing! You’re a rock star! Thanks for being the best “star” we could have ever dreamed of for CWTS! Seriously couldn’t love you more! xoxo
First off- that sucks but you learned, right?
Second- your husband totally looks like David Beckham in these pictures! 🙂
Live and learn right?! I think those kinds of stories are always the most fun to read because let’s be honest, it happens to all of us 🙂 You’re def not alone!
Just for curiosity’s sake, if I wanted to put this on a wall where the studs were inconvenient – could you not have used anchors for the screws? Or do the size of the screws needed make that difficult/impossible? Or was it a wall material issue (like plaster, which can be a pain with anchors)? We have drywall, so there’s a ton of anchors rated for different weights – I feel like I could use some heavy duty ones to make this work.
Just curious why you decided to hang the brackets upside down? I guess this was one of those ‘all’s well that ends well’ projects 🙂 Turned out lovely! When we have projects go a bit pear-shaped like that I tend to find some urgent reason to go to Sephora or the oral surgeon. Anywhere until the worst of it (and the swearing) blows over…
Pretty much just to make them adorable! xo
I’m just wondering if I’ll ever have a chance to work “like a teeter totter from Lucifer” into conversation, because that made me giggle like crazy.
Awesome! My husband is not the only one to do things around the house with his shirt on inside out! lol
Only, it’s because I probably just didn’t turn it after it went through the laundry 😉
Voted! And I’m so glad you shared the story of the shelves- it had me chuckling the whole way through and it was totally something I would do. So it’s a relief to know that stuff like that also happens to you. 🙂
Simple. And perfect. Great idea!
wow! sounds like my kind of project!! ughhhhh!!! why can’t our brains just work!! lol well i love the shelves and im in need of some just like this for my art space!
Did you leave the wood raw, or did you put some kind of finish on it? I love the look of raw wood much more than the darker (sealed) look, but not sure how practical it is for me.
“Teeter totter from Lucifer” – Bahahaha! I’m so sorry, that stinks but if it helps this was one of my favorite posts ever because I can SO RELATE. Love the shelves, and the room!
Mandi! I don’t usually comment but I really had to let you know that I (effin’) love your taste in decoration! Not only that, your posts are always interesting to read. Just thought I’d let you know 🙂 thank u and keep doing what you’re doing, it’s working! xoxo Jen from Montréal, Canada
Omg, your story is too funny. And horrible. So sorry about the windshield. At least you can use the wood.
I had my husband put these up in our bedroom based on your notes and instructions and they look great! He had a couple of his own hiccups but your instructions were so detailed that it saved us a lot of time and guess works. We left the wood raw but sanded it down so the shelving looks a little more polished. Thanks for posting this one!
I want to install shelves like this above my washer and dryer so badly!!
Omg. I adore this. So creative so beautiful and sophisticated and clean looking. I just love this california comfy look. Thank you for sharing. What’s the color on the walls?
Neat, organized and impressive. Just the way I like it! Is it only me who thinks the brackets should have been placed upside down?