Dudes! We are overhauling a 1972 Bell Travel Trailer! Follow the entire series from the beginning here!
When we left off last week, we had just made some major repairs…in the form of new walls. The next step was prepping the entire interior for paint.

There were lots of little flakey patches on the walls.
Sort of like psoriasis for a trailer.
So that needed to be addressed. There were lots of holes, and some pretty substantial cracks that needed to be filled.
First things first was the filling. I used my favorite 3M™ Patch plus primer . If you have ever patched a hole with a sub par product before and then painted it you will know why I recommend this. You know that sheen variation that happens? Like the paint finish is just completely sucked up into the patch? That is the problem that is magically resolved with this product.

(This step by step process is the same for the walls in your house too!!)
Locate the holes. I will say there was a surprisingly large number in the little Nugs.

Using your fingertip press Patch plus primer into them, and then spread a small amount around the outside of the hole. Leave a small mound above the hole that can be sanded off.


Let it dry! (You will know if you are sanding too soon because the putty will ball up and roll as opposed to turning into dust.)

Another thing that we did to prep for paint was caulk the seams.
Fun fact! Did you know that most caulking guns have a small hole on the handle to cut the tip off of the tube?! Dude. I was SUPER impressed about that million dollar idea.


We also had some pretty major seams and the remnants of the bunk to repair. Once we had it out to work, we sort of fell in love with the space. So we decided to leave it out. The only way that we could get the boards out was with a grinder, so as you can image, there was some hefty damage.
We used Patch plus primer and a putty knife to fill them, because the seams were so deep we did this in a few layers. You can see the first layer on the bottom below.

Once everything that was patched and caulked was nice and dry it was time to sand.
For the love of all that is good in the world, Please wear safety gear when you are doing these type of projects. Safety goggles or glasses, a respirator, and hearing protection will be your 3 best friends. You are like the Plastics, without all of the backstabbing and the word Fetch. Did you know that there is a specific order that they should be worn?
First, if you have long hair pull it back. Then is your respirator, then goggles, then hearing protection. And because I thought you guys might love to see me sans makeup, I made you a safety GIF.

The sandpaper that we used was 3M™ Sandblaster Advanced Abrasives . I have to say, I have never used it with an electrical sander before (I tend to be more of a sanding sponge type girl, but this job needed some true grit). The backside is very tacky and I was blown away at how it adhered to the pad on the sander. Like it had to be peeled off, but didn’t leave a residue. I recommend using 150 grit for this type of project. We had the wall texture that we wanted to tone down, and the flakey patches that had to be smoothed out. 150 is such a great grit for power without major scratching.

Check out how well the walls patched and sanded! It is as smooth as glass.

The last paint prep step after all of the dust was wiped off was to tape edges off with ScotchBlue™ Painter’s Tape . My trick for a super sharp paint lines is to rub the roll of tape over it before you start painting. You can get some pretty fantastic leverage and pressure that you cant get with your fingers!

Prepped and ready to go my friends!!
I have to tell you guys the funniest story. So 3M sent a few randoms in the package of tape and sandpaper. One of which was this automotive electrical kit.
Court was over the moon about it. See, he likes things to be nice and organized and compartmentalized. The problem is that I am literally the messiest creative person on the planet. I mean, there is stuff just everywhere. So as you can probably guess, he swore that if I touched his electrical kit that he wouldn’t step foot in the Nugget again.
I feel like it is an epidemic in my life to have off centered lights. When there is a logical place for the lighting to go, it is NEVER there. Every light in my house is like that. So imagine my lackluster enthusiasm when history started to repeat itself in the Nugs.
Because we took out the bunk, the main center light could be moved so that it was hanging above the table.
We started by drilling a hole in the spot that we wanted the light to live. Then Court posed for a picture I like to call “Fishing But Coming Up Short”. Apparently all his days on the lake did nothing for his wire fishing skills. Good thing I have a hidden wire fishing talent.

Once the wire was poking out of both holes, he attached the extra wire from the kit to one end, and pulled the wire out of the original hole.

The 2 wires were joined together with wire clamps (which is basically a tube that you put the wires into and then clamp them shut.)

We pulled them into the ceiling and tada! new light location!!

The next day I patched the hole and now that it is painted, you can’t tell at all! Also it is not required to have chippy nail polish, however it does add to the hard working laborer image that I have been working on. So there is that.

Massive thank you to 3M DIY for sponsoring the paint prep for our little guy. As always, I only work with companies that I love, that have products that I really use and believe in!

Check out their social channels for mountains of inspiration:
3M DIY Pinterest
3M DIY Facebook
3M DIY Twitter
3M DIY Website
3M DIY Instagram
Up next? Tile!!


I hope you realize this project is forcing me to choose between refinishing my hardwoods (needs to happen) and buying a vintage camper (really want to happen). #diyproblems
I am so sorry!! (choose the fun one!)
xo
m
Looking great! As for the chippy polish, that’s why mine are rarely done! I know the second I do my nails, there is going to be primer or wall compound attached to ’em! And thanks for the info about the patch with primer, I never knew that existed!!
Keep being awesome,
Stephanie
Awesome! I love how much work you’re doing with it. We still haven’t found the perfect camper for us to restore.
Love this series SO MUCH!
I never knew about the 3M patch with Primer! Next run to H.D. I’m getting some-I have lots of “flat” spots on my walls and hoping this will solve that problem as I am about to do some serious painting soon, and i have lots pf holes to repair. Thanks for all the good info. I look forward to seeing how the Nugs is coming along!
So cool! Excited to see what you guys do with this thing!!
I love that tip on the caulking gun! Here is a question in case you have another answer: how do you keep caulk from getting all caked up and gummy so that you can use it another day (i.e., does not harden in the tube)?
The trick i use for that is to take a galvanized nail (large one) and insert in into the tube. when you are ready to use the caulk again remove the nail, and squirt out a little of the caulk surrounding nail. sometimes it will have rust color on it. then you are good to go. 🙂
I am loving watching this project. It’s probably the coolest I’ve ever seen!
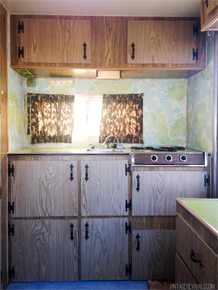
I have to say, I grew up in a 1972 double wide and that sanding picture with the faux wood paneling and the hippie flower paneling really took me back! That is literally what was in my bathroom and kitchen growing up. I wonder if the Nuggs had the same orange linoleum hahaha!
love. love. love. your blog. I think that the humor and attitude that you write with makes you more of a “real person” to me than a blog post. I find myself laughing along with the “don’t touch my stuff” husband rules because it’s my every day! Imagine paint splattered everywhere except for a 5 foot space of neat and tidy around the hubster. Thanks for keeping my mornings fun and creative! 🙂
Is the diy macramé headboard coming?? I really want to do this for my room. <3
Firstly, LOVING this camper series! It’s going to be invaluable to folks for many years to come who are thinking about embarking on getting and renovating/updating a camper. When you normally see these types of camper re-dos online you don’t normally get this level of detail with play-by-play of what to look for, what to do, what you did, and why you and Court made the decisions you did. Thank you!
That said, Mandi can you explain what the long-term plans for The Nugget are? Based on some of your renovation decisions like no Port-A-Potty, no re-installing the bunk (for say kids sleeping) I am thinking you guys are not planning on using it for serious family road trips? Is the Nugs going to be for VR marketing/retail where you take it fairs, markets, and such?
Just a quick tip on the caulk – and i’ve gone through hundreds of tubes during 2 home renos – don’t use a paper towel to wipe off the excess caulk – even if it’s silicone. lick your finger and then glide it over the caulk. Then wipe your finger off and repeat. it gives it a crisp finish with no lines or marks. 🙂
Oh the joys of renovating a vintage trailer 🙂 I started mine at the beginning of the summer and is nearing completion!! It has been so fun, and challenging and, well endless! Ha! The before and after photos are worth it alone! I will tag some photos for you too see soon. Can’t wait to see your finished camper!
A tip for caulking – you actually go in the other direction, pushing the gun forward and leaving caulk behind you. This way the caulk is forced into the gap rather than leaving a bead on top whichyou then push in with your damp finger.
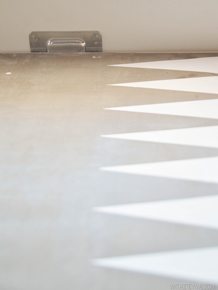
THANK YOU SO MUCH FOR POSTING THIS! I am currently elbows deep in my own 70s camper revamp. I quickly became attached to your blog and The Nugget as soon as I saw it. It totally captured the vibe I am going for and am so excited to get past all the prep work and have a beautiful blank canvas to artistically dive into this summer. Am at this point were I need to make a decision on the ceiling before throwing color and love on everything else. We had to redo some sections due to water damage and my better half patched it up. Unfortunately the fix is rather “piece-y” and simply painting it would show every gap and flaw. The boyfriend suggests wall paper but I’m not a wallpaper pro (aka Ive never wallpapered) and I think all the gaps and bumps will still show. Your triangle floor mosaic sparked an idea- covering it in something a bit more heavy duty and easy to work with. How crazy difficult do you think that would be on a slightly rough and uneven RV ceiling? Ah! Any suggestions???
Hi there! I love what you have done with Nugs! So cute! We just bought a 1968 Aloha camper and are just in the planning steps to restore it, wondering what did you end up doing with the ceiling? Paint? Ours has some chips and seems to have a couple layers that we will be sanding down- and tips would be awesome- I can send pictures? Oh wait I just read the post above mine- seems we have the same question!!! Thought about using aluminum flashing on parts of the ceiling- what do you think?!
It looked way better before. You basically rned a beautiful vintage trailer and turned it into a kitsch salon on wheels.