Man, we are cruising through the tutorials from Dylan’s Dream Room! As chevron has been on its way out over the last year I think many of us have been waiting with baited breath wondering what will take its place as the Pattern King. Ikat seemed to be a pretty great contender for a bit, and then I was seeing spots (well polka dots to be exact) everywhere but I am going to throw my money on the Hexagon.

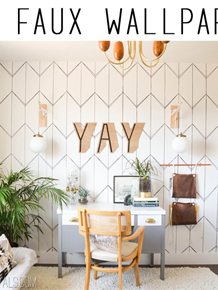
I knew immediately that I wanted to do a Hex wall in Dylan’s room (and even though it didn’t work out right the first time) I knew it wasn’t the hex pattern that was the problem. I know what you are thinking. That wall must have taken years. And while it did take time, it is for sure not as complicated as the wow factor would assume.
Please remember that this tutorial was shot with the first room design, that is why the colors don’t match up to the final room shot!
I am not a math genius. AT. ALL. But I am a DIY till I die kind of girl and if I want to do something I am going to work at it until I figure it out. Luckily for you guys there will be no math involved (unless you want a certain # of hex’s on your wall, then your on your own.)
I knew the size of hex that I was going for was about yay big. So that was where I started. For this project I used 10’ 1×2”s. They are crazy cheap (like $.98 each!!) and you will need a bunch. I went through 37.
The biggest thing that you have to wrap your brain around is the adjoining angles. Each piece connects to 2 other pieces. so your angles have to be right or the entire thing is a crapshoot.
If you are going to paint the inside of your hexagons, this is the point that you will want to do it. Push all of your boards together and roll them. You will have drippage, the easiest way that I found to fix is is not in the prevention but in a quick sanding job after.

Now its time to cut. Don’t be nervous. Set your miter saw at 30 degrees to the left of center. Cut off the very end of your piece.

Now before you make any more cuts you are going to set up a jig. A jig is basically a way to precisely cut each piece the exact same way. To make this jig I mounted my saw onto a piece of MDF (you probably wont need to do this if you have a saw table!) Then I rotated the piece that I just cut so that the longest side was against the saw and measured how long it needed to be from long point to long point. I used some scrap wood screwed to the MDF and mounted them with the correct angle so that my piece fits perfectly inside.


Now you are really ready to cut. Keep your saw set at the 30 degree angle and rotate your piece of wood, its much faster!
Each piece that you cut should look like this, with a long side and a short side.

This is the part where you are going to become a master cutter. Make this cut over and over and over again.

Done? Good. Now its time to set up a second jig to finish off our piece.
Rotate your saw to the 30 degree angle to the RIGHT of center. Use the clamp on your saw and secure one of your pieces on the LEFT side of the saw blade. You should have your long corner in the path of the blade.

Now place a piece end to end with your guide.

When you cut it you will end up with this (I pulled the scrap triangles out of the way so you could see the angles)

This is where each saw is different and you need to adjust your jig according to your blade width to get a perfect point.

Then you are going to line up your pieces to be cut with your jig, making sure the long angle is through the cutting path.

Now do this about 7 billion times. Making sure every 20 or so cuts that your jig hasn’t jogged. Ha. I am funny.

Now is the REALLY fun part. Mounting them to the wall. You will absolutely need a nail gun for this part.
I started on the left side of the room to mount mine, going back I think I would start at the ceiling, just so that I had a better way to mark the level line. Again, one of those do as I say not as I did teaching moments.
To do this you will need a trusty roll of painters tape and a level.
Start by taping a few pieces up on the wall (make sure that they are level vertically and level horizontally with the pieces around them. The reason we are taping and not nailing is because when one angle is off, it throws off the entire hexagon. If we tape them in place then we can adjust the angles to make sure they are right before we are totally committed to that spot
") .
.
Once your hexagon is fantastically fantastic use your nail gun to secure the wood to your wall. I used one nail in the center of each piece.
Then using your painters tape build off from there (making sure that everything is level!) You can also use a laser level to line up your horizontal hexes if you are smart like that.

And then you just go.
This project is time consuming but its not hard, its just a lot of repetition.
When you are done it is totally worth it.
The painting portion (or should I say repainting *snort) tutorial will be up next week! Happy hexing friends!


You are fantastic! This is just incredible.
i’m not ready to let go of chevron yet…. 🙁
but i do LOVE the hexagon! 🙂
Just amazing!
So amazing! What a cool project!
Emily | Sparkle Meets Pop
Beyond fantastic, incredible and amazing… it’s stupendous! You have a tremendous amount of patience, girl!
I saw a link to your blog from Bower Power the other day and am totally in agreement; hexagons are the next in thing. I’ve been stocking up on them for a while now in anticipation 😉 or because I’m a weirdo and I love them. This wall is fantastic. I might be trying something similar to make a wooden headboard mounted on our wall. Great tutorial.
Yeah I’m never gonna do that. I have NO patience. But it turned out amazing!!
I was thinking… Do I really have to cut all of that wood? Can’t I just use tongue depressor sized craft sticks? Yes, I know there will be smaller hexagons but it is certainly a LOT less work.
Hey Mandi,I can’t tell you how much I love this… Seriously you should audition for HGTV Design Stars or something! Love your blog & you!
<3 Hannah http://www.welivedhappilyeverafter.com
I agree! You could win design star easily on HGTV:) I need to sleep, but am getting lost in your amazing blog lol
a new fan,
Joey
This is so cool! I love how it gives so much dimension and flair to the wall! The colors you chose are pretty awesome too!
evon
evon von
OK- that just looks amazing! and I know you say it wasn’t that hard- but you lost me at “a jig”;)
I have ALWAYS loved honeycomb shapes! I am so glad they are popular now. This wall is gorgeous!
I ever got on the chevron kick but loving the honeycomb!
Love honeycomb!
Lots of work but it paid off! Love the pattern and colors!
I totally agree with Hannah Hathaway…you should audition for HGTV Design Star. This is White Room Challenge winning material! Thanks for the tutorial!
adore adore adore this!!! I may have to do this!
Everyone around me is still chevron, chevron!! I have been waiting for it to pass…..I love the hexagon or maybe the quatrefoil? Your wall looks AmAzing!! Reading through the tute makes me want to do it!
This is AH-mazing! I would absolutely love to do something like this in our Master, but we do not have any of those tools :(. Definitely pinning this for inspiration in hopes of someday…
Holy Moly, girl! That is a LOT of work! But it payed off BIG TIME!!! AMAZING!!!!!
How long are the individual pieces? Do you remember how many you got out of each 1×2? Also, how big is the wall you did the hexagons on? Just trying to gauge how much material I need to purchase to do this project for my wall!
OOOoo I really want to do this honeycomb ombre on my bedroom wall. I might tape off the honeycomb shapes instead of the wood because I am in an apartment and don’t want to have to fill a ton of tiny combs. But one day….I will commit to the wood part as well. Can’t wait til spring to paint!! Thank you and your brilliance!
EXELENTE TRATAMIENTO DE PARED! FELICITACIONES! YO ESTOY RECICLANDO UN MUEBLE ANTIGUO Y TENIA PENSADO APLICAR UNA TRAMA A UNA PARTE DE EL! ESTO FUE UNA BUENA IDEA! MUCHAS GRACIAS!
Did you style this or did they copy you??????????????????????????????!!!!!!!!
https://twitter.com/TargetStyle/status/446670047306461184/photo/1
Absolutely love this idea and the colours you’ve used! I would never have the patience to do this project though 😉
Looks great! But that one crooked Hexagon has my OCD going crazy! That’s why I know I could never do this with the boards as you have. I applaud your bravery! ^_^ I think I will be going the “painted flat on the wall” route. But, your tutorial has definitely been a help in getting me started! Thanks for posting it. ^_^
I just HOPE I don’t mess it up!.. lol! 😀
Hi, I want to do this for my baby’s room. May I know what was the length of the wood you used to make the sides of the hexagon?
This is so beautiful. I want to do this in my daughter’s room. Keep it up and never stop creating beautiful diy stuff!