You guys!! I have been wanting to post this tutorial for.ev.er. When I was working on Cara’s Office a year ago we did this to one of the walls and while the technique was awesome, the fabric choice made it look like Angela Lansbury’s summer cottage. It was bad.
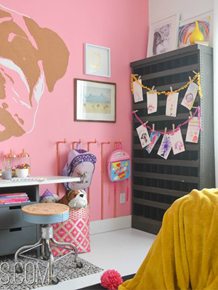
I finally recreated the project In Ashy’s Room (but did it differently so that I can offer opinion on the 2 most popular options!).
 vintagerevivals")
Sticking fabric to the wall is nothing new. It is perfect for those that rent (like Cara did) or for those that like to change things often (like me). There are 3 main techniques for sticking fabric to the walls in your home. 1. Staples (like YHL did here) While I am sure this works out great, its not one of the things I am going to be talking about today. When I say sticking to the wall I mean, it looks like actual wallpaper sticking.
A quick Google search brings up 2 options 1. Corn Starch and 2. Fabric Starch. In Cara’s office we used Corn Starch, and in Ashy’s room we used fabric starch. Here is how you do both:

Bring about 4 cups of water to a boil, mix 1/2-3/4 c of Corn Starch in a bowl with a small amount of room temperature water. Take the boiling water off of the heat and add corn starch mixture slowly, stirring the entire time.

While the mixture is cooling use pushpins to attach the fabric to the top of the wall by the ceiling.
When the mixture has cooled use a paint brush or a small roller to apply it to the wall, then smooth your fabric down over the top of it.
If you have big globs, they will discolor the front of your fabric by making it a little lighter and chalky when it dries. So a nice even coat is what you want.
And here is the best part! Because we didn’t keep the fabric, I can tell you all about removal too! Taking the fabric off was relatively simple. There was a good amount of washing to get the corn starch off of the walls before we could repaint, but it wasn’t horrible!

Fabric Starch is the method that we used in Ashy’s Room. I found this awesome Nate Berkus fabric at Joann’s (its new, seriously go and check it out. That Nate hits it out of the park every time!)
We started by pinning the fabric to the top of the wall. We poured fabric starch (you can get a gallon at Walmart for $3.00) into a paint tray and used a roller to apply some onto the wall.

Then we smoothed the fabric down. The biggest difference between the two methods is at this point. Next, you use your roller and roll over the top of your fabric, saturating it with the starch.


So while both techniques work well, if I had to choose one I think I would go with the fabric starch. It is easier to work with and has less prep. Also your room smells like laundry when you are done, so that is nice. We obviously still need to finish it off, but I thought you would love to see what we have been working on!
Have you tried either of these methods? We all would love to glean wisdom from your experience!!


YES!!! Stinking fabulous! I have been searching a bit obsessively every day this week, looking for options for an accent wall. I think I’ve come back around to fabric and love your review on the starch options. I’m going to look for this Nate Berkus fabric too. I just love him and all his things. The room is looking great!
This is a fantastic tutorial on how to use fabric as wallpaper. For those of you that want this the EASY WAY, and would like to have your fabric prepared for use as a wallpaper, my company in Atlanta does this.
You just send your fabric to us, and we apply a special backing to the fabric and send it back to you. The process allows your fabric to be more sturdy and easier to work with. It also adds a moisture barrier, so that the wallpaper paste does not seep through to the face of the fabric, which can ruin your fabric, especially if you are using something like a fine silk fabric.
Here’s a link, for anybody interested:
https://www.fabricback.com/wallpaper-backing
I like the idea of doing this at home by yourself, using Mandi’s method. But not all of us are so handy. If you are like me, this is a good alternative. I would be happy to answer any questions.
I am so glad you tested those two methods! My partner and I are in the middle of choosing fabric for an accent wall and I was torn over which method to try; I am so stoked you posted this right now!
I have used the liquid starch a couple of times. I love it! I don’t roll it though, I just put the starch in a bucket, dip the fabric into the bucket of starch, ring it out and hang it. Usually holding it in place with straight pins until it dries. I learned the hard way to not trim the edges until it dries though! Oops!
Love that fabric choice!
That is so HAPPY! Great idea, I cannot wait to see the finished room!
Hi there~
Thanks for the tips! I am going to try it with the liquid starch.
Question… what does removal entail?
Dee
Simply wet with a sponge, and peel as you go. If changing to another pattern, you don’t have to wash wall. Otherwise so ooo ooh much easier than even thinking about wallpaper, or even painting over a stencil
Hi I have a question – I am renting in a home that is freshly painted however the color is awful and very beige. If I use a fabric like the one you display (white and blue / saturated colors) should I be concerned about the colors bleeding on the paint during the installation process?
Loving this technique and your pattern choice. We are in the process of removing the years and layers of wallpaper in our home now. So, I am bending like a pretzel to even think of adding anything other than paint lol. As a designer you know that’s a fib but for now paint will work, with a stenciled pattern ha!
Nicole
I cannot wait to try this in our tiny little powder room. To me,t’s infinitely easier to find cool fabric than cool wallpaper. Thanks for the rundown of the different methods! It looks fantastic.
Hi! First, I just want to say this is so awesome! Second, I have a couple questions: can this be done over wall paper, or does it really only work over plain paint? also, can the fabric be taken down and washed and reused, or is it pretty much a goner after being starched onto a wall?
brilliant!
I love this and everything you do! Where did you find this over-the-top-amazing wallpaper? I must have it!
I did do this treatment before! I had this fab blue and white old toile fabric with african animals. It was calling for a cool place. I ended up starching it to my kitchen walls. One day while making a fresh tomato sauce, I turned on my food processor and tomatoes went flying all over the walls. No worries. I simply peeled a corner of the fabric and pulled it easily off the wall. I threw it in the washing machine and let it air dry (since I hadn’t washed it before, I couldn’t count on it not shrinking!). Later that day, I starched it back up — good as new. Try that with wallpaper. I think not!
I have 2 questions. I Want to cover two small window panes in my front door. Will it work on glass? Also I’m using a medium heavy weight fabric. Will cornstarch hold it?
Sorry, not constarch. I plan to use liquid starch. Would that hold a somewhat heavy fabric?
I didn’t know you could do that 🙂 cool! I am about to be a renter so that would be fun since I won’t be painting a wall anytime soon. So it does come off without ruining the current paint job?
Love this!
Did you use one large piece of fabric or multiple pieces? I’m curious how the seams would come out.
Also, any tips for cutting the fabric straight to the corner?
I did the liquid starch method in a bathroom. I put it around the ceiling for a decorative design. Instead of using a roller I just put the fabric in the starch and squeezed most of the starch out and put along the ceiling. When we moved it was still their. No problems with it and the moisture in the bath. I
I have also done this on cupboard doors . I wanted to change them up. It also was in the bathroom. Not a problem. When took off the cupboard it did not eve leave a residue.
God. This is why we love you. So brilliant, so thorough. Im a renter & am scared of ruining what’s not really my own, but this is SUCH an amazing option. I’ll be laying awake tonight, thinking of all the possibilities!
Amazing! This is such a neat way, without all the hassle of actual wallpaper! I will have to try it!
I’ve used spray adhesive when I’ve put fabric on walls or in the back of bookshelves. Super fast, and the over spray is easy to deal with as long as you wipe with a damp cloth as you go. It holds beautifully but will releas easily when the fabric is slightly dampened.
What kind of spray adhesive?
that is so awesome! what a genius idea
This is awesome. I’m thinking of doing something similar and was so unsure of the cornstarch method, seemed messy and to much to grim later. Anyway, I wondered if you had any comments on fabric choice for this diy?. I’m imagining something the thinner the better?. Going to give fabric startch a go!
looks great! I am using this fabric for a pair of chairs-love it on the walls
Looks great, I’m sure the skirting boards will set it off nicely. Never applied wall paper, looks to fiddly for me 🙂
Mandi, I’ve been hoping to find a solution for a bedroom wall in this rental home we are in that would not be permanent, thank you so much for the fabric starch idea.Connie from bradshawshouse dot com.
I did this to my kitchen cupboards. I used paper and starch, and covered the fronts of my cupboard doors. It has been very durable, and looks great.
You are KILLING IT, on this room makeover!!! I saw this Nate fabric in person the other day, it is beautiful!!! I love all the graphic details you are incorporating…. It’s going to be spectacular!!
I tried the fabric starch on a wood paneled wall but used the “soak the fabric in starch, ring out, press on” approach. It didn’t adhere to the wood very well. I’m not sure if it was my technique, the heavy weight of the upholstery fabric I used, or the wood wall. Reading your post makes me want to try again, so thank you for the tips and inspiration!
Mandi, I’ve used the corn starch on smooth-finish drywall before, but am curious what your surface was like? Any experience applying over orange peel? Btw-LOVE that Nate Berkus fabric!
I’ve been using starch to stick fabric to things for more than 40 years. First project was the inside of a steamer truck – did all the drawers and inside the lid. It stayed like that for 20 years or so then I peeled it off and put on a new fabric. It was a tip from my design professor at ASU in 1972 or so.
I rent this cute old apartment with a built in vanity and built in cabinets and drawers. Unfortunately being old it also needed a lot of love (super dirty) and with the cabinet being the place I planned to put my clean towels and with a glass door I decided to use the cornstarch method to spruce it up and separate my clean towels from the grassy gross on the wood. Its been almost a year and it still looks new.
I can vouch for this technique. I did it on my foyer walls and it wasn’t that hard. I used two Target tablecloths~one centered and one split in two for each side. Very cost effective. Don’t worry about slightly frayed edges on the seams and edges as the starch really smooths them out.
Two tips 1) Get HELP! This really isn’t a one woman job. Mine would have turned out better if I had someone to hold up all that fabric while I was rolling the starch and smoothing. I used thumbtacks in the crown molding to hold it up.
2) Pick an all over patterned fabric your first time. Geometrics or linear patterns are tough. Or buy a house built in the last 100 years that has smooth, plumb walls!
It bugs me that it is not level/perfect but the fabric has a similar hand blocked geometric like yours so I call it character.
Question: my house is so new my bedroom walls are barely plastered, no paint on those babies (yet). Will this work, or do I need to paint before wallfabricking?
Thank you!!!! I’ve been looking for an accent wall for my room and this is awesome.
I LOVE this… but I worry about a large wall- how would you put the seams together??
Doesn’t most fabric have the ‘dead’ white 1/2 inch on either side without pattern? Did you just cut that part off? Will the fabric fray? Maybe that is just upholstery fabric and regular fabric doesn’t have that?? I don’t know- I am just now starting the DIY lifestyle!!
I guess I’m asking how you butt two seams together? 🙂
I would love to know how to do the seams in a more efficient way as well. This is a legit question Evonne and I had this exact issue. The way the light hits my wall the only thing I could see were the seams and it was driving me nuts. I went back in and meticulously peeled back the overlap and used an exact-o knife to make the seams fit right up to each other without an overlap. It was a pain in the butt and still isn’t perfect. Additionally, you need to be aware of the match of a pattern and make sure you have enough fabric to line up the pattern as well. In my opinion this is not a one person job and having a family member help, who will still love you even when you get mad, is a key to the project.
Hi, great tutorial! I’ve been wanting to try this, however, I’m not sure if it’ll really work out well on my walls. I live in a darling mcm building (rental) and the walls have a crazy texture. Although I’ve embraced the texture, I am planning a huge wall feature (to include bookcases, wall hung tv, art, etc) and would LUV to have the fabric wall as my backdrop. Any words of wisdom when applying fabric to a textured wall?
Thanks – Cheers!
Andrea
I have 2 questions. I Want to cover two small window panes in my front door. Will it work on glass? Also I’m using a medium heavy weight fabric. Will liquid starch hold it?
I am looking for temporary fixes in our home till I can really go all out, but until then I’m loving this idea. I’ve seen several questions that have the same content, but no answers, how do you line up the seems and when you do, will the cut edges fray, do they need to be turned under, how do you do the corners, etc.? Thanks, I’m excited for a little update in our bedroom!
I am looking for temporary ideas to update my house until I can really go all out and I love this idea! Like others I have the same questions, how do you line up the seems, does it fray or look funny when you cut them, and how do you do the edges, do you fold the fabric under or does it look okay to just cut it off? Thanks so much, I’m excited for some updating!
I am wanting to do this to the ceiling in my entryway. With your experience do you think it would hold up on the ceiling?
Was the fabric starch any easier to remove from the wall? Also, in your instructions, you didn’t really say if you dipped the roller in the starch and then rolled it on top of the fabric. ???
Can’t wait to try this great idea for rental housing! Thanks!
How did you remove the fabric that was attached with fabric starch? Did you have to repaint? I’m a renter and would love to try it!
Hi Ashley,
Did you end up doing this? Have you tried to remove it yet? I’m renting a place made in the 70’s, with its original paint. I’m trying to not mess up the walls since it will be tough to find a replacement.
Did you find that getting walls wet messed them up/left water marks permanently?
Thanks for your help,
Dawn
I have never tried this method of covering a wall in a rental, but my husband is a retired military veteran. In 23 years we moved 27 times. I used a staple gun to attach fabric to a whole accent wall. I only wish that I had heard of the starch method long ago. My husband & I are both retired now. I still love to re-decorate & I am all ready to try this method with the help of my son-in-law. I am now 71 and still trying new ways to change my surroundings. My philosophy is if you adventure by trying new ways of doing things, you become stale.
Have starch, will try it soon, LoreC
I want to use the fabric starch method. I rent a house with would paneling. Is it safe to use on it? I really want to cover the hideous paneling! Help!
my question is for the fabric starch, how hard is it to get off? Or is it the same as the cornstarch?
Amazing .. thanks.. will definitely try this …
Have done the starch multiple times. Prefer treating it like wallpaper and soak in the starch and use a small squeeze or a credit card to smooth , just put an old towel on floor. Great for borders that can be changed out for holidays!
What a great idea!! What kind of fabric can I use? Does this work on wood?
Brilliant! Wondering if you can share the source of the fabric?
can I put some kind of varnish over fabric to make the cleaning part of the fabric easier?
How do you put the fabric around windows so it looks nice? Do you put fabric against fabric to make a nice seam? Can I hang it over wall paper? Can I use a shear colored fabric with a design! I see bolts of that kind of fabric on the sale shelf! Do you think something like that would work? I have a friend who lives in an apartment and they won’t let her paint! I was thinking of gifting her the fabric and my two hands! Totally unrelated do you think if I put peel and stick tiles on an old orange fermica counter top It could be removed easily and use as aback splash in the kitchen? She is dying to spruce up ! She can’t afford to move everything is out of her price range? If these options could work I think it would brighten her life!
I meant to say, would liquid starch hold a medium heavy weight fabric to glass?
How well does this work in a bathroom? Would the steam from the shower affect it adversely and make it peel?