I have had a few pretty major room makeovers using Board and Batten. It is my FAVORITE way to bring white walls into a room and still give it visual interest. I wasn’t planning on doing a tutorial on this but I have had SO many emails about it I thought I would share a quick tutorial. This is the cheapest, easiest way I have found to do Board and Batten. And cheap and easy are a pretty great combo…

The pictures are going to be a collection of the last 3 Board and Batten projects that I have done, so if they don’t match that is why! This is also a great case of do as I say not as I do.
Head to your local Lowes or Home Depot. In the lumber section they have big 4×8 sheets of MDF. MDF is a really dense particle board that has a flat smooth finish. I have encountered 2 different types; one has a little bit larger pieces of wood in it (like you can actually see the particles) and the second looks really similar to cardboard. The first one is the one that I prefer. It takes a cut cleaner and doesn’t seem to soak in the paint as badly on the cut edges.
There are quite a few different thicknesses of MDF. I usually get the 1/2” but in Hailee’s Room Makeover we used 3/4” and it looked awesome. Its just going to be a personal preference yo.
Ok so now that you have your giant sheet of MDF you need it cut. Home Depot and Lowes have huge saws that will rip cut it into pretty perfect pieces. Just tell them the thickness that you want it to be. I prefer something between 3-4”. So you will end up with a bunch of pieces of MDF that are 4”x8’.

Now the order that you put everything together is what is hard sometimes. I have tried it 5 different ways and this is the way I prefer to do it.
Start by painting your wall the color you want it to be. It is MUCH easier to roll on the color without a bazillion corners. Because we were going to have someone come and spray Hailee’s we didn’t do this but you an see how we took the top wall color down far enough that we didn’t have to go back and touch it up.

When you are figuring out the measurements for your Board and Batten take the width of your wall and subtract the total width of your boards, then divide it by the # of sections that you want That will give you your spacing between boards.
For example:
Lets say our wall is 5 feet (60 inches) and you want 4 sections in your Board and Batten. You had your pieces cut to 3”wide strips and you are using 4 so that is 12” total width , your math would look like this: (60-12)/4. Each of the spaces between your boards is going to be 12”.
So the next step is to cut a guide piece that is 12” long. That way you can perfectly space your boards all across the wall.
Start by putting your cross board (or boards depending on the length of the wall) up first. If you are doing an entire wall floor to ceiling then place it right against the ceiling. If you are starting the B&B partway down the wall use a laser level to place your board.

Once your cross piece is up you will start putting your first board up. This would be the board right against the edge of your wall. Make sure that it is level ALL THE WAY DOWN. The easiest way to level it is to start in the middle with one nail then go down and level and nail the bottom. Then go up to the top and do the same. Then secure it more with a few nails in between. And don’t be surprised if your walls aren’t level, just make sure your boards are. You can go back and fill the gaps with putty.
Continue this for the entire wall.

If you are doing cross boards now is when those are installed. Cut a guide piece and do it the same way you did before but this time it will measure vertically instead of horizontally. The white board in this picture is my guide.

Now I am going to tell you a little secret. Some of you might hate me for life but, you gotta do what you gotta do.
At Hailee’s house there was NO WAY the boards were going to wrap perfectly from her hallway entrance over to her kitchen entrance. I mean that is like a 1 in a million chance. So we started at the hallway entrance and went 1/2 way across the windows and stopped. Then we went to the kitchen entrance and went the opposite way and stopped 1/2 way across the windows again. The reason is because of the curtains and the couch were always going to be there (yes, even if she moves the couch you can’t tell that a board is missing) That way it looks perfect and the wonky is hidden! (You can see where we skipped the board in the picture below)
![]()
Once all of your boards are up it is time to putty. I prefer to use drywall spackle. There is a special kind that you can get that starts pink and turns white when it dries. Fill in all of your seams and nail holes.

While that is drying its time to caulk. If you want it to look legit you wont skip this step. It makes such a big difference.

You can buy white or clear caulk, it doesn’t matter, just make sure its paintable. I like to use the smaller squeeze bottles of caulk because the caulking gun hurts my hand… Cut the tip at an angle, there is a guide on the tip of the caulk on where to cut it. With the long tip on the top gently squeeze a line of caulk into the corner where your board meets your wall. Then with a damp rag over your fingertip wipe all the way down the caulk line. This will get off all of the excess.
This next step is extra fast if you have a palm sander. Take a piece of fine grit sandpaper to the drywall putty once it is dry to smooth it out. I also run it along the edges of all of the boards to soften them just a hair.

Take a damp washcloth or a piece of tack cloth and wipe off all of the dust. You need a clean surface to paint.
If your board and batten ends on an exposed corner and the corners of you wall are rounded you will need to fill in the huge gap. Just use the same drywall putty as before and know that it will take a while to dry. It doesn’t have to be perfectly smooth but just make sure that it doesn’t dip below where your edge is. You will lightly sand it when its dry and it will be seamless!

We also had to do that on this corner because of the curve in the wall.

Now its time to paint! I 100% recommend using a Purdy White Dove Roller. It will give you a much smoother texture than a regular roller and last for SO much longer.
You can prime the MDF if you want, but I usually don’t. I just use a paint and primer in one. You will probably have to do a couple of coats on the edges of your boards because the MDF soaks it up. Especially if you got the MDF that I hate. I use a Purdy brush for this because it holds a lot of paint and lets face it, Purdy brushes make you look like a better painter than you really are.


So which style do you like better? The full wall or the partial wall?
And you can check out the full before and afters by clicking the pictures!


If you have any questions let me know!


Awesome tutorial. Seriously! Thank you!
I love the partial wall board & batten. I would love to do this in a bathroom &/or bedroom. So pretty & very visually interesting. Yours looks lovely. Thank you so much for the tutorial!
ooohh…nice tutorial Mandi. I’m looking forward to doing my hall someday soon. I’m hoping you are going to show up and help me! xoxo, Jilly
I’m so happy you posted this! I’m dying to try the partial wall somewhere in my house. Now to figure out where…
Great tutorial, Thanks for sharing.
~Mrs. Delightful
ourdelightfulhome.blogspot.com
all your walls look terrific. You make it sound so easy but I know you put in a lot of blood sweat ad tears. Great job and thanks for the tutorial.
I say BOTH!!!! I am a big lover of all board & batten. I wish I could “borrow” your brain for one hour in my front living room so you could give me lots of good ideas. But for now I will keep drooling over your awesome work girl!!!!!
Keep it up! 🙂
Great tutorial Mandi!! Question…I assume it’s cheaper this way then using 1×4’s?? I can’t wait to do this…hopefully in my bedroom!
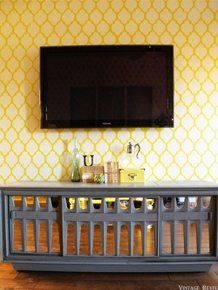
I am loving the partial wall because it makes the top color so dramatic.
Thanks for sharing this. I keep telling my husband that I want to do this someday. (We rent right now) I like the full walls better for myself, but love both. Just another example how something simple can make such a HUGE impact in a room. 🙂
Thank you so much for this tutorial! Someday I plan on doing this and I will be praising your name! I love the partial wall. It is great to have the white wall and then the pop of color on the top!
beautiful!
you are fraggin amazing! i showed this to the guy i married (and live with) and he is even sold! maybe my budior will one day be awesome and stuff. (partial wall by the way..)
I am loving all the board and batten. Maybe we’ll actually get around to doing some eventually. But I am also loving the gray color on the top of the wall. By any chance do you remember what its called? I neeeeeeed it in my house!
I love both the half and full wall.. anywhere we can add a little architecture is great! Our house was built with ZERO!
I love the half wall because it breaks up the room and is visually more appealing to me. I might just have to try this in my house somewhere.
You are fun to read and you do great projects. So impressed by YOU!!
I love the look of board and batten. I would love to do it in my bedroom but the walls in my house have a ton of texturing. I just don’t think I’m up for all the sanding that would be necessary on the drywall.
You could get something thin, like luan (I don’t know how you spell it) to use as a backer before putting up the boards.
I’m starting to officially stalk your projects because they are all so awesome. Question, did you use the existing baseboards or put new boards in along the floor? It looks like you put in new boards. I don’t see how the vertical bards would line up with the tops of my baseboards. Thanks for all the design inspiration!!!
Mandi,
I have the same question as Carey about the vertical boards lining up with the base boards, and also the walls in the board and batten (the white parts), they look smooth in the pictures. My question is do you do anything to them or is there no texture on the wall? I have texture on my walls, would it look good to just leave it that way just painted over, or do I need to cover the walls….???? Thanks!
I wondered the same thing. Did you ever figure it out?
Hi Mandi,
Looks wonderful! Question for you. Does it matter what type of nails you use to attach the boards to the wall? Is it best to rent/buy a nail gun or just do it the old fashioned way with a hammer? Also, did you use any type of adhesive on the boards when attaching to the wall before nailing? Thanks!
Mandi-
Love your work! I saw you on Nate twice and have been following you since! I have the same questions about textured walls and the mdf lining up with the baseboards. What do you think? Thanks so much! Keep up the awesome work-you’re such an inspiration!
Kimberly
[email protected]
This is not board and batten. This is block wainscot.
Saw this on pinterest and had to stop over because I think we have the same comforter! Love it! Fun to see how other people style the same item differently!
I love this tutorial! I’m just about to attempt in my Master Bedroom so I’ll have to show you the finished product thanks to your detailed tutorial!
Question.. Do you just nail into the drywall?