Epic Room Makeover Giveaway 2012 Room Reveal

By Mandi | 10/12/2012 | 114 Comments

WHEW. What a whirlwind month this has been! 2 weeks ago I had no clue who the winner of the Epic Room Makeover would be, where they were living, or what their room would become.

Vintage Revivals-Epic-Room-Makeover-Horizontal

I have spend the last week in Peoria AZ completely overhauling Kelsey’s Master Bedroom with my 4 BFF’s and let me tell you, we had a BLAST! After the first Epic Room Makeover last year, I knew that I would need some support to get it done this time and my girls did not disappoint. But we can talk more about this later. I know what you are REALLY here for.

Just to refresh.

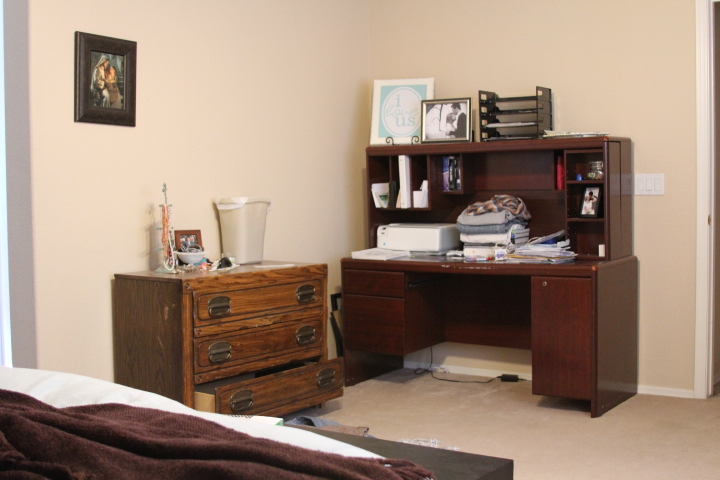
This is what Kelsey’s Bedroom looked like Before:

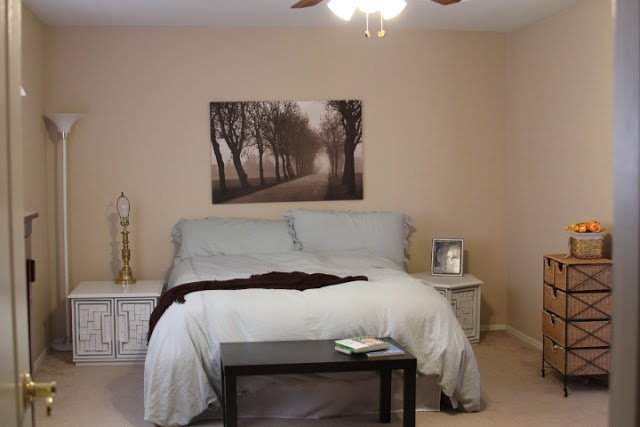
Super neutral and preeeeety boring.

This is what it looks like now:

Epic Room Makeover Giveaway Contest 2012 Vintage Revivals

Funky Bedroom Seating Area vintagerevivals.com DIY Home Decor Blog

I know.

Its amazing.

I am calling the style Industrial Global Modern. I am SO excited to share all the tutorials and info with you guys over the next few weeks, some are simple like the rug or painting the nightstands with Krylon:

Geometric Wall made with wood vintagerevivals.com


And some are not for the faint of heart, like the Orange and Wood Ombre 3D Cube Wall (but it was SOOOO worth it!):

Geometric Wall vintagerevivals.com

I think that the most important decorating advice that anyone should ever take is to make sure your home feels like YOU,  not like a catalog. So guess what that meant? Showing up in AZ without ANY sort of design plan.

I wanted to meet Kels and get to know her a little bit beforehand so that their house was theirs and not mine. So let me tell you a little bit about this cute couple.

Kelsey and Spencer

They are so incredible, I mean can you imagine how that would be? To have a strange group of people show up at your house to overhaul it and be willing to let go of the control? Kels and Spencer are some of the funnest and kindest people I have ever met,  it is so apparent that they love each other and their son more than anything in the world. Kels is “I want to put you in my pocket and take you home forever” cute and has such a fun personal style. The problem that she was having a hard time bringing it into her home. So this room is a reflection of what I perceived Kelsey as amped up with some Mandiliciousness.

We hit up every Homegoods in the valley and of course found some killer deals, like our modern tufted couch for $350

Modern Couch Glitter Pillows vintagerevivals.com

If you follow me on instagram you got a sneak peek at the headboard when we hauled it home from Ingo’s house. We updated it by painting the upholstery (tutorial on painting fabric to come!)

How to paint fabric or upholstery vintagerevivals.com


One of the most impactful projects was hands down the sliding barn door and Royal Design Studios stenciled bathroom:

Sliding Door How To Stencil Wall vintagerevivals.com

Then of course there is the HUGE canvas art. We found that giant baby at Restore for $20 and updated it with some paint and lettering:

Sure is fancy how you love me canvas

The one request Kelsey had for her room was hanging lamps over their nightstands (which I was VERY excited about!)  So we rounded up two vases from Homegoods and made some. And guess what?! We shot a video of the ENTIRE thing! So you will be able to see in real life how to drill through glass and not die! EEEEEEE!

261

Speaking of videos. You guys have NO clue the excitement that is in store for you. Would you like to see how to play Lets Make A Deal and negotiate the price of something you love? Good. Cause we are SO doing that.

Oh, and you wont want to miss us crashing the Lowe’s morning meeting and doing cheers with the entire staff, I was never meant to be a cheerleader, lets just put that out there.

So I will shut up for a few so you guys can check out the rest of the room.

How to style a nightstand vintagerevivals.com

Color Dipped Mid Century Dresser vintagerevivals.com DIY Home Decorating Blog

Color Dipped Furniture Mid Century Dresser vintagerevivals.com

Mid Century Dresser Graphic Wall - Vintagerevivals.com DIY Home Decorating Blog

Master Bedroom Makeover Vintage Revivals

Industrial Yellow Light Fixture vintagerevivals.com

Sliding Barn Door DIY Pipe

Sliding Door Stenciled Wall Heart Art vintagerevivals.com

Small Thrifted Vase vintagerevivals.com

Stacked Wooden Bowls vintagerevivals.com

Chindi Rug Flokati Rug vintagerevivals.com

How to create a sitting area in your bedroom vintagerevivals.com

Yellow Industrial Light Fixture vintagerevivals.com

Industrial Floor Lamp Custom Art vintagerevivals.com

DIY Ombre Quote vintagerevivals.com

DIY Hanging Light Fixture out of vase vintagerevivals.comOmbre Wooden Wall DIY vintagerevivals.com

industrial lighting white bedding - vintagerevivals.com

This entire event wouldn’t be more than a dream if it wasn’t for the incredible sponsors that put their faith in me and gave me the opportunity to makeover Kelsey’s room. Blogging with integrity is something that I am so passionate about. Relationships with these companies were built on my love for them first. I cannot even put into words the gratitude that I have for them. I would love it so much if you would click over to their Facebook pages and give them a pat on the back. I would love to do this contest again and so we need to give them a virtual hug so they will too!! Just click on the image!

DIY_STARTS_HERE_FINAL9422

HG_Logo_no_tag_193_LRG64222

Lowes-logo64222

krylon_logo54222

Royal-Design-Studio-Logo54222

I am so beyond thankful for my amazing friends that helped me execute the room. Mia and Jilly are 2 of my most FAVORITE people in the entire world, go and check out their blog, you will be totally inspired and I cant wait to see where our adventures go from here!

039

Hailee is pretty much the reason this whole thing went down. I needed someone who would go with me wherever it may be and she was totally willing. I am pretty sure there is no better friend than that. She is everything that I am not and we are the perfect DIY match. This pic was taken after we missed the turn to AZ and ended up in Cali. Cause we are awesome like that.

012

We had so much fun shopping and going to lunch the first few days that we were in a mad crunch to finish. Lindsey from Better After, Jamielyn from I Heart Naptime, and Kendra from My Insanity showed up and took a good day off of our work load. Love those girls!

037Jilly, Mia, Hailee, Me, Jamielyn, Lindsey

There is SO much I cant wait to share with you guys!

066

The ladies in our 3M DIY Starts Here safety gear. We are hot.


Vintage Revivals Epic Room Makeover Giveaway 2012 vintagerevivals.com

p.s. this is my biggest post series of the year and I would LOVE if you would share, pin, stumble, etc. because MAN I worked my butt off…hahaha!

Love Your Guts, Mandi


Follow Vintage Revivals on Pinterest! Lets Be Friends!!  Vintage Revivals on Facebook! Tweet Me!!  Vintage Revivals on Twitter! Image Map


Crickets

By Mandi | 10/10/2012 | 7 Comments

Chirp chirp.

Finishing Kelsey’s room today!!! Be back soon! Xoxo

AZ Girls Night Out Details!

By Mandi | 10/05/2012 | 15 Comments

If you live in AZ and want to come and hang out with the FUNNEST people EVER then you want to come to our Girls Night Out TOMORROW (10/6) at Freestone Park in Gilbert AZ!

Freestone is a giant park so in order to not get lost forever make sure you park at the baseball fields and walk across the bridge. You should see a covered pavillion with lots of sexy mamas, that would be the party.

It starts at 7:00 and goes until everyone is ready to head home to their families!

Bring something yummy to share (it doesn’t have to be dessert) and come ready for the time of you LIFE!!

Love Your Guts, Mandi

Bye Bye Beam: How To Demo an Annoying Architectural Element

By Mandi | 10/04/2012 | 39 Comments

Yo yo! So once upon a time there was this girl. And her name was Mandilicious. She was buying her first home and looked and looked for just the right one. Finally she found it. Nasty carpet, dead cockroaches and all. But aside from all of that there was one thing she thought was super intriguing, these beams in the doorways. (Yes, this is the REAL MLS listing on my house.)

Living Room Before 2

She,  I mean, I had never seen something like that so I thought it was out of this world cool. I have thought and thought about things that I could do to that little space, but everything I came up with just made the doorway seem so low and tiny on the high walls.

162

This little beam was the reason I decided to stripe my hallway, because it emphasized it.

Fast forward to now.

I hate the beam.

The beam had turned into a jungle gym, because of the beam there are wall footprints.

194

The beam was dead to me.

It had to go. So it did. And here is how we did it.

Start by getting the right safety gear for the job. You need an eye protectant and a mask for starters. Doing simple safe things like wearing a mask will prevent things that are not fun down the road. Have you ever had spray paint boogers? Case closed.

3MDIY.comis a great tool to know exactly what is available and what safety gear you need for the job.

Mask Collage

Then you call in the brains of the operation to help you. If you are as lucky as me it would be your husband.

219

Make sure you check out the video at the end of the post to see the whole process time lapsed into about 5 seconds. Because he may be the brains of the operation, but I am the muscle.

243

Once your beam is safely demo’ed the fun part kicks in. Time to make it pretty.

Casing out a doorway is SIMPLE. I PROMISE!

We use preprimed 1×6’s (the wood kind, not the MDF kind).

Start by lining the inside of your doorway with the wood. Make sure that it is the same thickness as your doorway (or it could get  a little awkward for ya.)

How To Case Out A Doorway

Once the inside of your doorways is framed, its time to take the operation to the outside. I LOVE the custom look that you can get just by pulling your frame back an inch from the edge of your inner casing. We used preprimed 1×4’s for the sides and 1×6 for the top apron. Also remember this post where I told you my ceiling wasn’t painted all the way? Good. So don’t judge.

260

270

Once everything is cased in its time to caulk, putty and paint!

Normally I use the kind of putty that starts pink and then dries white. Which is fine. But on this project I used Patch Plus Primer and I LOVED it. The reason? With the primer already in it you don’t get the variation in sheen the way you do with regular spackle. It was really easy to use (a little bit dryer than normal putty) and I was super impressed with how there was no pitting/sinking when it dried.

Patch Plus Primer

I used Sherwin Williams Pro Classic Enamel in Tricorn Black (satin) to finish it off.

How To Case In an Entry

Black Doorway

How To Demo and Case In A Doorway

Bet you didn’t think the ENTIRE hallway was getting a makeover did ya? Tutorials to follow!!

No one can believe that it is the same height doorway because it is SO much taller. Finally I feel like you can sense the height of the ceiling and the best part?! NO MORE FOOTY WALLS!!

Oh wait. HERE is the best part. And awesome video where you get to see me being strong, getting interrupted, and dancing. Pretty much a match made in DIY video heaven. And while you are over there subscribe to my YouTube channel


I hope this post inspires you to realize that your house and the design of it is only limited by yourself. If you have something like this that you hate, don’t be afraid to tackle it yourself. Just make sure you are doing it the safe way!


Love Your Guts,  Mandi


I teamed up with 3M DIY Starts Here for this post. All ideas, opinions, and video of me yelling at my children are 10000% mandilicious.

I Like Big Maps and I Cannot Lie.

By Mandi | 09/28/2012 | 23 Comments

The never ending game of musical furniture that happens at this house is pretty epic. I mean,  its so good its down right joyful.

I have this spot in my living room that is sort of hard (not like “CRAP! What am I going to do here!?” hard  but you know, still a little complicated.)  My living room is twice as long as it is wide, which makes for interesting furniture placement. I made you a little diagram of the way the furniture is placed so you can see what I am talking about. The TV is mounted on the wall above Vicky. There is no where else to move it. So the furniture needs to be centered on that wall.

Living Room Layout

That leaves a really great space between the chair and the wall with windows that isn’t really used.

You have to sort of treat it like its own little area because anything that goes on that wall needs to be centered above the couch. Does that make sense? Cause it makes sense in my head.

So just like most of my good stories begin I was at the thrift store…(yes, I really do stop by most days. And no, I don’t always find stuff). I was making my rounds and stopped in the “big art” section and saw this incredible gallery wrapped map of Dixie National Forest. The best part is that it was only $12. Booyah.

Now back to the opening paragraph about musical furniture.

This little chest has lived in my hallway for the better part of a year. But since that has been totally overhauled (reveal next week!) I found something else to live there.

White Chest

I love this little white guy because its not very deep, so it can sort of go anywhere. And anywhere it went. Right under the Dixie National Forest Map.

I love how its small enough that the map can drop down behind it and still be seen, but it doesn’t look strange.

Map Decor White Chest Wooden Bowls


295

286

Perfect fit! (well, for now anyways….)

Are you a musical furniture type girl or do things have a home and live there eternally?


Love Your Guts, Mandi


Follow Vintage Revivals on Pinterest! Lets Be Friends!!  Vintage Revivals on Facebook! Tweet Me!!  Vintage Revivals on Twitter! Image Map


The Chair Debacle is Solved.

By Mandi | 09/27/2012 | 14 Comments

The last few weeks Vintage Revivals has been full of the Epic Room Makeover Giveaway posts (Congrats again Kelsey!!) and you guys, I have been SUPER hard at work on my living room…(yes, I know Ivie’s room still isnt done, but its lots further along than I have revealed)

So basically what I am saying is that I need to get you guys semi up to speed so that I can start sharing the awesome crap that is going on here!!

Our story left off with these chairs.

004

I found them in Salt Lake, the price was good ($35 each) and I loved the shapes/arms. I was planning on painting the vinyl because the color was just too much like the orange couch, but I didn’t even get that far. In the living room they didn’t really seem super retro the way they look alone. They seemed really dated southwest. Which is fine, I still love them and have somewhere else to put them but they just couldn’t live in the living room.

I am not going to lie. I was bummed. And honestly what better way to drown your décor dilemma than a trip to Homegoods? While I was there the heavens parted and angels sang and a chair that I had seen weeks before and loved had suddenly duplicated.

The color is amazing and I love that they are leather (HELLO cleanabilty) the only reservation that I had was the price. They were $149 each and that is more than I usually spend. So I walked around the store and thought and thought and then I instagrammed it and asked everyone’s opinion. Because that’s what friends do right!?! I got a resounding yes so I did it. And you know what? I am SO glad that I did. They are PERFECT.

Gray Blue Barrel Chair


097

And for like 5 seconds can we discuss this instagram mystery?

That would be the coffee table. For $45.00. That is also perfect.

098

It so fun looking at these pictures because everything looks SO different now!! Cant wait so share the rest!

Love Your Guts, Mandi


Follow Vintage Revivals on Pinterest! Lets Be Friends!!  Vintage Revivals on Facebook! Tweet Me!!  Vintage Revivals on Twitter! Image Map


And The Winner Of The Epic Room Makeover Giveaway Is…..

By Mandi | 09/25/2012 | 63 Comments

I know that no one is reading this part anyways so how about a little alksdjofiekfnbk;jsdlkfosaidotuaklkdfalsjdf.

Vintage Revivals-Epic-Room-Makeover-Horizontal

But for those that are, thank you for coming on this awesome journey with us!! This contest has been a year long planning extravaganza and I am SO excited for the winner, she completely deserves it!!

So without further adieu,

Congrats to Miss Kelsey and her Master Bedroom!! Kelsey brought in over 1,500 votes! That is some serious rallying,  Mitt should hire her, don’t you think?

Kelsey Collage copy

Hailee,  Jilly, Mia,  and I are on our way to sunny Peoria, AZ in 9 days (EEEEE! I need to start packing!!)

Oh and did you notice my entourage grew?! Jilly and Mia joined the crew and I am FREAKING EXCITED about it! They are my 2 fave DIYers in the entire world! Kelsey has no idea what is coming. None. Consider yourself warned lady.

Thank you EVERYONE who voted and cheered on your fave contestants,  even MORE thanks to those that entered, you have made this beyond successful,  I wish that everyone could win,  I am beyond humbled at the outpouring of support and excitement that the contestants showed. It was so fun to get to know you all better and make lifelong friends!! And of course the HUGEST thanks of all goes to the incredible sponsors! I would love it if you jumped over and said hi! (Just click their logo!)

DIY_STARTS_HERE_FINAL942

HG_Logo_no_tag_193_LRG6422

Lowes-logo6422

krylon_logo5422

Royal-Design-Studio-Logo5422

You guys are all wonderful and AZ girls get ready for a party!! Deets to follow!!

And the best part is that you guys will be included in the entire process from thrifting to painting to cruising the isles of Lowe’s and HomeGoods,  so make sure you are following along on Facebook! And the plan is to post a video every day here so that should be fun…

I am off to work on my living room a little bit more! xoxo

Love Your Guts, Mandi

Follow Vintage Revivals on Pinterest! Lets Be Friends!!  Vintage Revivals on Facebook! Tweet Me!!  Vintage Revivals on Twitter! Image Map