Hey Guys!! I hope you had an awesome weekend, I cant handle the fact that it is already November. Yesterday was the first really chilly day that we’ve had and I would have enjoyed it so much more if I wasn’t outside working in it!
We have T minus 3 days to get the Nugget finished. Wednesday is the day, and I feel like we just might make it!!
The plan was to paint the exterior before we installed the windows and door. But Mother Nature had a different plan. We couldnt paint because of the rain/wind the last 2 days, so instead of sitting around looking out the window and wishing for sun, we decided to put them both on. It is crazy how much adding the windows changes the look of the interior, its super retro-y with the aluminum and I love it SO.MUCH. The weather is supposed to be good from here on out, so today and tomorrow are painting days.
I have been waiting MONTHS to see how awesome this door/knob situation was going to turn out and it is better than I could have hoped for. Little details (like the hexagon knob) are what really makes the whole thing come together. And it doesn’t hurt that the door is to die for.
I’ve also finished the light and plant shelf, and I LOVE them so so much!!
Northern Utah gals, you get to see it first at Pinners Conference. (if you come use the code VINTAGEREVIVALS and you will get $5 off. You can even use it at the door if you are not the ticket ordering type!) The Nugs and I can’t wait to meet you!
Ashy’s room is FINISHED! I just need to shoot it! I know I seem to say this every time, but it’s my favorite room makeover to date. Here is a little sneak peek for ya:
Ok! Time for me to get my painting pants on and get to work! See you tomorrow!!
You guys!!!! We have laughed about this for days and I am DYING to share with you the costumes that we made for our 2 Boston’s Wallace and Gertie. (If you are unfamiliar with Tight Pants, you will most definitely want to watch this video.)
You might remember that we are planning having a tight pants Halloween themed parade during our trick or treating adventures.
…so of course the dogs needed a Tight Pants costume too.
To make this costume we used:
;
A thrifted T shirt (striped of course)
Baby Tights
A hair scrunchie. Made out of hair.
Liquid Stitch (or a sewing machine)
Black Elastic
Start by cutting the front piece off of your T shirt and fold it in 1/2 hot dog style.
I eyeballed a dog shirt pattern and cut out this shape, making sure to preserve that awesome mock turtleneckiness of the collar.
Then I Liquid Stitched the front piece of the shirt together.
The elastic was tied onto the scrunchie in 2 spots to make a little hat.
And the feet were cut off of the tights.
Then we laughed and bribed the pups to sit still long enough that I could get a picture.
FYI, Mayor Grimble just declared these pups the hippest in the land!
What started out as an ugly duckling with a lot of potential (if you closed one eye and squinted the other) is fast becoming a swan. With as much work as the little Nugs needed, we have learned a lot (multiple times) so I thought it would be fun today to share 7 of the most necessary products to fix up a trailer, or really any space!
1. ScotchBlue™ Painter’s Tape. Lets just start off by acknowledging that ScotchBlue™ is the mothership when it comes to DIY support. Everything from help protecting the awesome floors from caulk, to getting a super sharp paint line, to taping off the outside pattern (eeeee!!) It is #1 on the list for a reason.
2. 3M™ Patch plus primer. We made a lot of small holes. We also had a lot of small holes to fill. Patch plus primer is hands down my favorite patching product, because it sands so smooth and doesn’t have a completely different sheen when you paint. The proof is in the pudding on this wall that we had to patch.
Can you believe that this is what that wall looks like now!?
3. 3M™ Advanced Abrasives So maybe sandpaper should be my #1…hmmmm. Literally every.single.surface in this trailer has been sanded more than once. From the drywall, plaster, stucco and wood, to the floors. I’ve learned that a little 3M™ Patch plus primer and 3M™ Sandblaster™ Pro Advanced Abrasives can really fix just about anything
4. 3M™ Sanding and Fiberglass Respirator. So much sanding, so many unknown treasures on the walls. Taking care of our lungs is critical because let’s be honest, who wants lungs full of mold and sawdust? Not this girl.
5. Eye Protection. I had a pretty crazy experience while I was cutting the moulding for the cabinets. A piece of wood the size of a matchstick broke off of the piece that I was cutting and flew up and hit my eye. Or what would have been my eye had I not been wearing 3M™ Chemical Splash/Impact Goggles. I have never had that happen before, and I was so glad that I didn’t injure an eye and my sanity working on this thing. Sanity eventually comes back, right?
6. Hearing Protection. When in the presence of power tools (and children) ear muffs are crucial.
And last but not least #7. Court’s favorite thing to come out of the Nugget. 3M’s Auto Electrical Repair Kit. Update on this post he still wont let me use it.
Looking back through my computer to find the pictures for this post made me a little astonished at just how far this little trailer has come! Holy cow. I cant wait to see it when it’s all finished!
I am proud to be a 3M- sponsored blogger, and, as part of my responsibilities, I get the opportunity to evaluate products from 3M DIY. Opinions are my own and additional product used in the project were selected by me.
You guys. This is serious. I cant stop making things with copper. I don’t want to stop. It is such a pretty and inexpensive material and is everything that my hopes and dreams are made out of. **sob
So before you guys schedule an intervention, I thought it would be prudent to point out that I am not the only one that loves copper. EVERYONE loves copper. (Do you know where this is going?!) Yep, it’s time for the Fall Color Challenge!!
If you are new, you are in for a treat. Me and 5 of my blogging besties team up quarterly to inspire you in every area of your life with one common color. This round? You guessed it, COPPER!!
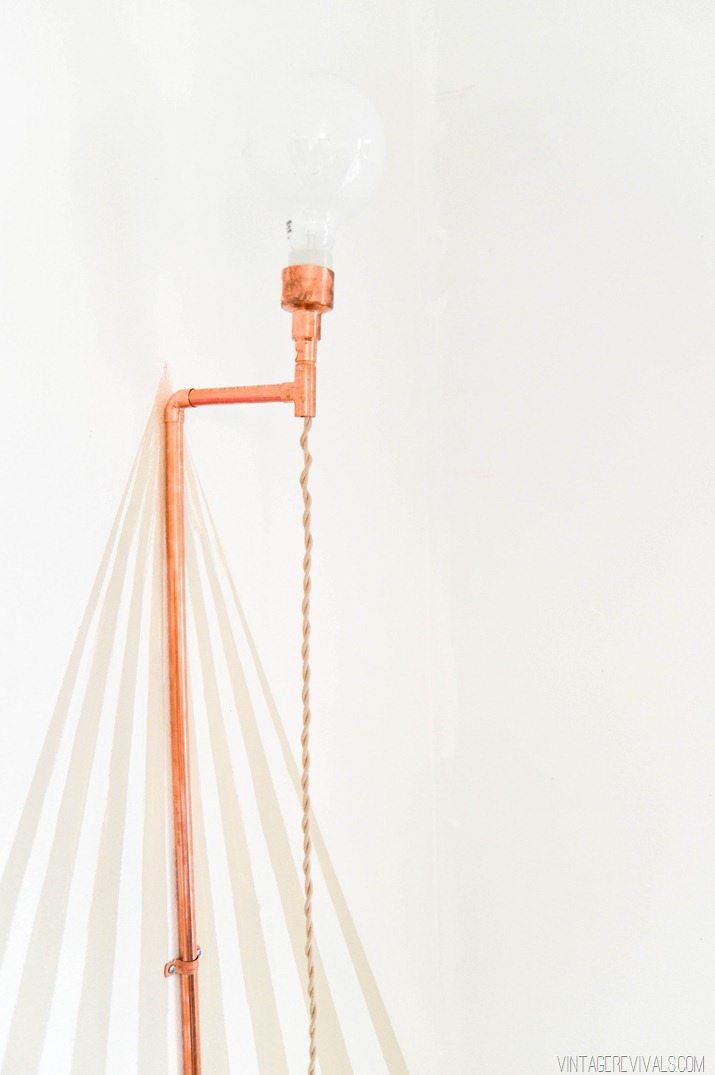
A little later this week I will be showing you a fun weekend paint project that we did in Ivie’s room, but today you get a little sneak peek and the most basic light building tutorial on the planet!
I had a few left over parts from the wood and copper chandelier that I made for Ashy’s room, so I thought it would be a good idea to use them before I lose (errrrr….lost?) them.
This project is totally inspired by these copper sconces that Courtland made on Design Star. I just love how simple and pretty they are!!
You just need a few supplies:
1/2” x 3/4” Reducing Coupling
3/4” x 1/2” Fitting Reducer
1/2” 90 degree elbow
1/2” T
1/2” Copper Straps
10’ of 1/2” Copper Pipe (its much cheaper if you just buy a 10’ piece!) cut to:
5”
2”
8’ (or the desired height of your light)
Pipe Cutters
Wall Anchors Lamp Wire
Porcelain Socket
Plug
5 Minute Epoxy
Start by connecting your Reducing Coupling to your Fitting Reducer. (Use a small amount of Epoxy to stick them together.)
Take your porcelain socket apart and glue the bottom metal piece to the inside of your Reducing Coupling.
Then add your piece of 2” pipe into the fitting reducer on one side and the T on the other. (Make sure to glue this!)
Glue the 5” piece into the middle of the T, and add the elbow downturned onto the other end.
Glue this onto your 8’ piece (or however long you choose to make yours)
That is IT!
Freak yes it is!!
Wire your light socket (more detailed instructions on that can be found in this post!) Thread the wire through the open hole on your T, underneath the socket.
If you are lucky (or smart) the holes that are in the copper straps will line up with a stud. If not, you will need drywall anchors. This will hold your light tight against the wall without any sagging or loosening.
I CAN.NOT. WAIT for you to see this whole project!! But until then, you will most definitely want to check out what the other ladies have been up to!
Feel free to confess your love for copper below, it will make me feel better about the problem I am having…
This post is sponsored by Honeywell. I received a Lyric thermostat and compensation in exchange for coverage. All opinions and thoughts about this product are my own.
Technology is amazing isn’t it? When we really stop and just look at what is not only available, but easily accessible and affordable it is a little mind boggling. THE (yes, all caps and italicized)favorite new gadget in our house is Honeywell’s brand new thermostat the Lyric.
Honeywell has been in the thermostat business for over 100 years (how did thermostats 100 years ago even work?!) and they were the first company to create the round thermostat, which I am sure was just as mind boggling to people in the 50’s as technology is today.
Court is LOVING the Lyric because it’s cool (he is a gadget kind of guy) and because it is saving us money on our electrical bill. I am loving it because it is cool (even for non-gadgety people) and it is SO pretty.
I mean, look at what we were working with before. I get it; it’s not hard to improve on that situation, but holy, SUCH an improvement.
There are SO many cool features on the Lyric. Not only is it completely beautiful to look at, but everything can be controlled with an app on your smart phone or tablet. Now I just need a Rosie and my Jetsons’ dream life will be complete!
Lets talk about geofencing. Never heard of it? That’s ok, its pretty revolutionary. Basically, you can program ANYTHING into your Lyric and set a perimeter around your house, so for example, if you want your heat to kick on to 78 degrees when you are a mile away from your house, all you have to do is set it into your smart phone. Then the Lyric uses geofencing technology and when you cross the “fence” your thermostat kicks in and your house is toasty warm by the time you pull in your driveway. (Now if only Geofencing would work for alerting me when Girl Scouts selling cookies enter the neighborhood!)
Another thing that just completely brings out a geeky side that I never knew I had is the Fine Tune feature. Living in Southern Utah our summers are hot, with like 0% humidity. Travelling to Atlanta in July was a completely new experience (to say the least!) but the craziest thing was that indoors I was always freezing because of the humidity + overdrive A/C unit. Fine Tune compensates for the humidity inside and outside your home and makes adjustments so that 72 degrees actually feels like 72 degrees, whether you are in Utah or Georgia.
Do you know what the last thing on the planet I think about is? (I know it’s on your list too!) Changing the air filters. Guess what? Lyric alerts you to things like upcoming filter due dates and even extreme weather situations.
Now, lets talk installation (because how awesome would it be to give your hubs one for Christmas and have it all installed and ready to go!?!)
Piece. of. cake. Here is what you need:
Yep, that’s it. Your phone, a screw driver, and the Lyric. I did it all on my own, in just under 20 minutes (high fives for lady power!) The Honeywell App tells you step by step how to do it.
Not everything needs to be controlled with the app though, you can set temperatures and situations on the Lyric itself. It has a really awesome weighted dial that smoothly glides around the screen.
All in all the HoneywellLyric gets 2 thumbs WAY up!! Its a life changer for sure.
Dun dun dun dun dun dun duuuuuuuun! I feel like these cabinets have been the biggest saga of my whole life. So many failed attempts, so much frustration, but we finally came up with something that I LOVE. Taking a step back for a bit gave me a chance to see with a clear mind what I loved and didn’t love about what was going on. I came to this conclusion, I loved the handles. I loved the white. I loved the exposed hinges. I didn’t love all of the other things.
So armed with the knowledge of love, the situation then became, finding a way to make the teeny handles a bigger part of the design. So that they didn’t look like an undersized afterthought like they did before.
Undersized afterthought just isn’t a good look. Not for outfit choices, and not for cabinets.
That is a fun visual.
My first few new ideas were to put something behind the knobs to make them seem bigger. Guess what? I was hating all of those things, and I couldn’t put my thumb on the reason. Then I had a come to Jesus with myself (and I wish I could have had it with the company that made the trailer.)
Literally every single door was a different size (even the ones that were supposed to be the same!) It was just adding unnecessary activity to the already small space. (Also, just to clarify because there were some questions on the old cabinet post, we hadn’t installed the tension locks on the doors so they weren’t shut completely tight, that is why they look so wonkfest.)
The solution was apparent. We had to make new doors.
Son of a #$(*.
Insert wailing and gnashing of teeth. Followed by standing up, brushing off my paint covered sweats, drying my eyes and telling myself to shut up and get back to work.
This is what square one looks like.
Before we could build, we needed to make some important adjustments so that we could remake doors that had the same measurements. The center board needed to be wider so that the doors on the left could be made smaller and not have a giant gap. We glued/nailed a new piece of wood in and widened the entire thing, instead of taking out the existing piece and moving it over (it was supporting the front of the countertop and honestly, who wants to find out what happens when that comes out? NOT ME.)
Then there was the ceremonial ritual of putty, sanding, more putty, more sanding and paint.
The doors themselves are made out of MDF because I wanted them completely texture free. We cut them down to size on the table saw and glory, they were SO much better.
So now that we were starting with an evenly spaced blank canvas, we can go back to the door design.
At this point I had given up on the idea of putting something behind the knob, I just wanted it to be part of the door.
I got this idea of using 1/2 round moulding to follow the outline of the door + knob and it just would not leave. I wasn’t 100% sure of it, and Court thought it was a horrible idea (his suggestion was to leave them plain and get new pulls) but I had to try it. Home Depot doesn’t sell 1/2 Round in store, but they do sell it online and I was super shocked at how inexpensive it was! So I ordered it and mocked one up. (Don’t mind the fridge door. It has a mind of it’s own.)
I didn’t hate it. Court didn’t love it. But I thought that it had some serious potential. So I decided to just go with it, and if we had to flip the doors around and use the other side for cabinet door build out #193094 then so be it. (Jumping a little ahead of myself but notice the piece that the top doors are resting on, we used this to evenly space every gap. It is a lot easier to fill a few nail holes after the doors are installed than to get a divorce because YOU MOVED AGAIN!?! …
Because this design was full of freaky angles, a protractor was an absolute necessity. I started by figuring out the angles that I needed by measuring the diamond shaped back plate. Once I knew what angle I needed, I then divided it in 1/2 (because 2 pieces meet to make up the angle). Then (this is super important) remember that on a miter saw 90 degrees is 0, so you have to subtract the angle that you need from 90, and then set your blade there. For example, the center angle that goes around the pull is 125 degrees. Divide that by 2 and you get 62.5. 90-62.5 is 27.5, so you set your blade at 27.5.
I used a guide to mark 1 1/2” all the way around the door. Then I traced the diamond shaped back plate and marked 1 1/2” on the inside of that for our notch. This made it so that I could measure and line up each of the pieces of trim.
After they were glued on, we puttied, sanded, primed, and painted them. A screw driver worked best for getting the putty out of the hard to reach corners.
And while this was one of the most technical projects that I have done (it had to be PERFECT or else it would stand out like a sore thumb) I have to say that I am pretty proud of how great they turned out.
The one hiccup that I had was, when I designed the idea, I was using the lower cabinets as my template. I loved that there was a short piece on the outside before it notched in, and that was how I was anticipating all of the doors looking. When I started working on the cabinets that were shorter I found out that to keep the angles (and the 1 1/2” cushion around everything) that those small pieces just couldn’t exist. (It has to do with how teeny they would have to be and the fact that we were using 1/2 round).
One other small update was taking the tarnish off of the brass pulls. I am a huge fan of mixing metals but mixing this finish with the brighter brass on the lawyer shelves, just made them look like such an addition. And not in a good way. I used Brasso and an old washcloth to remove the tarnish and it worked like magic!
All in all I am THRILLED with how everything is coming together over there. The new backsplash looks awesome, and the cabinets are full of the vintage-y charm that I was going for from the get go.
And Court? He loves them. In fact every time we talk about them he says and I quote “Those are the most legit thing you have ever made”. Which makes me happy and gives me a complex all at the same time.
When we bought our little vintage trailer, we were lucky enough to have not one, but two glorious faucets. The original faucet was a hand pump that had stopped working and had been connected to a small electrical pump that pumped the water from the small water tank that lives under the sink. The other faucet was connected to a copper pipe that ran to the outside water hook up. I am pretty sure that changing out the faucets was the first thing I touched on when we were talking about fixing up the Nugs.
My original thought was to just have one faucet (the sink is SO teensy) that connected to the water tank and not have one for the outside water hook up. There was just no way that I was going to put 2 faucets back in.
In the middle of the night I woke up to (what is most likely) a very obvious solution, that I just didn’t see. A faucet with 2 handles can utilize BOTH water pipes. But instead of being hot + cold, it would be outside + inside. So the hunt for a great faucet began. I had one requirement. Brass.
Have you ever shopped for a small brass faucet that isn’t hundreds and hundreds of dollars? It kind of doesn’t exist. After looking for a few days, I narrowed down my search to a bridge faucet which unfortunately increased the price. Whyyyyyyy?!!
There was no way that I was going to spend more on this faucet than I spend buying the entire trailer. That just doesn’t seem like the smartest move.
So I did what I do in every situation where I want something that just doesn’t seem to exist. I went to Home Depot.
There I found a few things, a laundry faucet that had a brass neck, and John, the master plumber that worked there. I explained to him that I wanted to build a faucet and he was AMAZING and spent the next little bit coming up with solutions for the problem.
So here is the ingredient list.
(1) Laundry Faucet
(1) Soldering Kit
(1) Roll of Thread Seal Tape aka Teflon Tape
(2) 1/2”x3” Chrome Brass Pipe Nipple **Have the employee at Home Depot thread these pieces as pictured above, that way, whatever the thickness of your countertop, you will be able to tighten the faucet down.
Assembly is really simple.
Start by replacing the handles on your Stop Valves. I used a little bit of 5 minute epoxy to make sure they stayed on really well.
Each of the nipples need to be wrapped with teflon tape before attaching them to their components.
The Hex nipple will attach to the bottom of the elbow.
Then the Stop Valve attaches to the other end of the Hex Nipple.
The brass nipple goes into the other side of the elbow.
Then the T is attached to that.
Lastly, the 3” pipe nipple that you had threaded attaches to the bottom of your Stop Valve.
Repeat for the other side.
Your copper male adaptor will attach to the top side of the T, and the brass faucet arm should fit fairly snuggly on that!
Next is soldering. Now. I know how you soldering virgins are feeling. I too was a soldering virgin. But it is not hard to do at all. And the best part is that you can start over as many times as you need to (you guys know how much I love that.)
Before you solder, start by scrubbing the inside and outsides of the pieces that you are joining together.
Brush on the flux (this is the magic ingredient that sucks the solder into the pipe)
Heat your pipe up so that it is nice and hot (all of the instructions for soldering are on the package of the kit, and I am sure there are hundreds of awesome videos that explain this much better than I do.)
Then it’s time for the actual solder. I don’t have a picture of this because molten metal, but it was really cool to see it disappear into the joint.
Obviously you will want to let it cool off before you get all manhandly.
Before you install, put the washer caps over the holes in your countertop. Because plumbing is different for every situation, take pictures of the underside of your sink, and head to your local HD. The plumbing expert will be able to help you get exactly what you need to connect your pipes.
The picture below is of what ours looks like. PVC nuts that tighten the faucet to the sink, and adaptors that screw onto the nipples and have a place to push into the new pipe. Home Depot has every kind and size of connector that you will need.
I cant wait to report back on how it works once we get the battery hooked up, the tank filled and the whole thing going!! But until then, lets just look at how pretty it is, shall we?
And if you are wondering if this would be good in a house, I am going to give you a resounding…I don’t know yet. The stop valves (where the handles are attached) are a type of gate valve, which basically means that it is a moving gate that blocks the water (or lets it in). Its not going to be as simple as lifting a single handle, but I think it would be gorgeous AND amazing. I will keep you posted!


")
")

")


")


