Favorite Things 2013: Fish Foam

By Mandi | 11/27/2013 | 5 Comments

So there is this thing about me that you may have picked up on.  Or maybe not if you are a skimmer.  Whatevs. When I love something I LOVE it.  Like I might need a tattoo,  tell everyone I know (lucky you!), forsaking all others love.    So I thought, with the Christmas season upon us it might be fun to share some of my favorites!

I know that a cleaning product isn’t the most glamorous thing of my life to love.  But you guys.  Fish Foam is THE BEST glass cleaner that I have ever ever used.  I just had to add it to my list of faves.

I was introduced to Fish Foam a few years ago and have been obsessed with it ever since.  No other cleaning products have my loyalty like that (except Magic Erasers).  This stuff if the real deal.

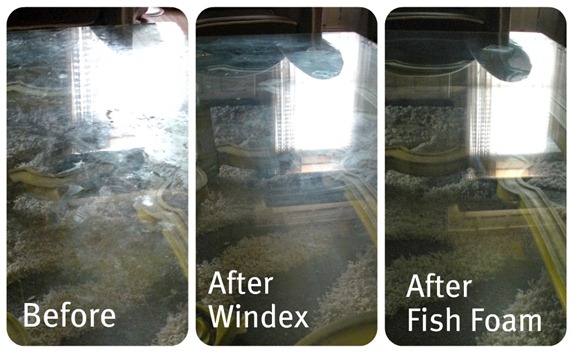
I took a few pictures of my glass window so that you guys can see just how awesome it is.

Fish Foam Collage

One thing that I wish the Fish Foamies (get it like homies?! HA!) would do is an auto ship program.  Like the butter of the month club, but with less cholesterol.   That way you just always have it.

Fish Foam

*Please excuse the dent in the can.  I was singing “Hit Me Baby One More Time” last time I was cleaning and my dance moves may have gotten a little out of hand.

This pic is from my first experience with Fish Foam.  I had to use again as a comparison.  I would have loved to reshoot the test again (and make it a little prettier!) But I couldnt,  because I dont even keep other glass cleaner in the house anymore!

Fish foam

Lets just talk for a minute about WHY it works so well. 

It is Drip Free,  which is HUGE especially when you have kids helping you out.

It is an alcohol based product.  There is no ammonia, or wax.

That’s right I said WAX dudes.  That what is in most other window cleaners.  No Wax= No Streaks and No Fogginess.

A few weeks ago I was going through old video on my phone and found an infomercial that my girls made for Fish Foam.  It was HILARIOUS, but alas Dylan was only wearing underwear so I cant share it with you.  The selling points they had were:  (you have to say the last word all sing-songy)  It sprays so foamy.  The red bottle is so shiny.  And that it makes the glass so smoothy.

Smoothy glass. Every has that dream right?

A 3 pack of Fish Foam will run you about $18 with shipping, and will last around 3 months.

You can order it here

I hope you guys have a WONDERFUL Thanksgiving tomorrow and I will be back on Friday with my FAVORITE THING IN ALL THE WORLD!!!!! 

Love Your Guts

Favorite Things 2013: Glossy Grams

By Mandi | 11/26/2013 | 10 Comments

So there is this thing about me that you may have picked up on.  Or maybe not if you are a skimmer.  Whatevs. When I love something I LOVE it.  Like I might need a tattoo,  tell everyone I know (lucky you!), forsaking all others love.    So I thought, with the Christmas season upon us it might be fun to share some of my favorites!

One of my favorite things about blogging is getting the chance to meet new people.  I “met” Sarah a few years ago and she was instantly one of the coolest people I knew.  You know those people that are just cool,  like in ways that are effortless and they are totally unaware.  Meanwhile the rest of us are clamoring for a fraction of their hipster status?  Yes.  That is Sarah.

Sarah just launched a brand new business (like it still has the umbilical cord attached!) called Glossy Grams.  They say that this is the most photographed generation in the history of the world, but everything is stored on our devices.  I have hardly any pictures of my girls printed out.  This my friends is a problem, and I know I am not alone.

Glossy Gram Collage

The way that Glossy Grams works is so simple.

All you do is upload your favorite Instagram pictures and a few days later they show up on your front porch looking like actual works of art!  (You can upload from your phone or desktop!)  The user interface is SIMPLE and really cute and easy to use.

image


You can use a few by themselves…

Bar.jpg


Or make an entire gallery…

Bedroom.jpg


Or incorporate them into an existing gallery…

SalonWal.jpg


Each picture is hand cut and mounted to a piece of pine.  Then coated in a special UV blocking resin.  They are SO pretty.  And glossy glossy.

P1410212.jpg


And so on sale! 

Head over to Glossy Grams and order one for $12  or 6 for $60 and use the coupon code HIGHFIVE for 10% off your total order.

If you are ordering in time for Christmas make sure that you get on it so that they have time to ship your order before the holidays are here!

As for me I am off to prep my kitchen counters

Love Your Guts

Boston Update & A Rally

By Mandi | 11/25/2013 | 8 Comments

Ok everyone that is praying for Boston, I have some good news and some great news so I wanted to update you on it!!

Boston just completed his 28th day of treatment and he is officially in remission!  WAHOOOO!  This is the goal at the end of the first 28 days.  So he gets an A+.  The next round of treatment involves Chemo that Amanda (Boston’s Mom) has to give him every day.  She said it makes her a little nervous to give something to her child that can only be handled with gloves and comes with huge warnings, but that she knows it is helping him so they’ll keep at it.

She also said that because of the steroids Boston is eating like a teenage boy.  Dont you just want to bite his cheeks?!

Boston just had is PICC line removed and had a port put in.  This is GREAT news! 

Before surgery very excited and a little loopy:


As for the donations, you guys are so amazing it makes me cry!  As of last count we have raised over $6,000 for the Pace family.  And there are still 5 days left in the month to donate!!  I know that not everyone is in a place to donate, but if everyone that saw the picture of Boston’s chubby cheeks and smiled donated just $.50,  we could match our $6,000 in a matter of hours. 

A few incentives:

The PS I Adore You girls are so amazing.  They are running a special giveaway for everyone that donates to Boston this month.   If you donate at all you are automatically entered to win a $250 Gift Card to the PS I Adore You online shop.  It is chock full of adorable treasures!

100% of the proceeds from the sale of this adorable coloring book will go to Boston.  It was designed by Roxie Marj.  Oh, and just sticking in a bit of a design tip (sorry I cant help myself!) can you imagine how cute these pictures would be printed out and hung gallery wall style in a bedroom or playroom?  Um…obsessed.   Where else can you get an entire wall of art for $5?

Alphabet Coloring Book - 100% Goes to Boston

50% of the sale of these adorable sequin and fleece headbands will also go directly to Boston.  I mean, I might be feeling a little baby hungry but does that little girl come with them?  She is so cute!

Sequin and Fleece Earwarmer

Huge thanks and love to everyone that reads this post.  You will never know how much your thoughts and prayers mean to me or to Boston’s family.  There are not words that are adequate enough to describe the gratitude that we have for you!

MUAH!!

Love Your Guts

The Most Embarrassing DIY Fail in the History of the Internet. (I can say that, its mine.)

By Mandi | 11/22/2013 | 52 Comments

I feel like this post needs to start off with an explanation.  You know the kind that your 10 year old gives, when you ask her, well anything.  The kind that has a lot of “But I’s” and “Ya, but…’s” in them?

As you have seen this week, DIYing is not all sunshine and Pinterest pictures.  Sometimes it is really great ideas horribly executed, or in the case of the worst fail in the history of the internet,  it is a HORRIBLE idea perfectly executed.

Which I was reminded of a few weeks ago as I was going through the files on my external hard drive.  When I came across the pictures from the first few months that Vintage Revivals was alive,  I was overcome with emotion.  And not the good kind.

Please enjoy.

This DIY fail is from the infancy stages of Vintage Revivals. (I would say August/Spetember 2010.)  When I started my blog I literally had no previous experience with design/decorating.  None.  Finding your own style and voice takes practice,  none of which I had.  The first blog that I ever read was All Things Thrifty.  Brooke’s style is bright colors and glazed.  I thought she walked on water.

I spray painted and glazed EVERYTHING I could get my hands on.  Because I loved it.  And I didn’t know anything different. 

(So basically I am pleading ignorance.)

When we moved in our kitchen had no backsplash.

Can you see where this is going?  Its like watching a kid fall off of something,  slow mo and all the while screaming “noooooooooo!” and then they still eat it.

Doing things a cheaply as possible was my reasoning for everything.  The cheaper the better. 

What could get cheaper than a $12 roll of paintable wallpaper?

IMG_0795

Which isn’t the most horrible thing.

But then.

You guys.

I cant.

(breathing into a paper bag)

I decided it would be AMAZING if I spray painted it ORANGE!

  IMG_0840

For the love of everything that is good in the world WHY was this a good idea??!!

But what there’s more.

I decided to “tone it down” a little with black glaze.

Obviously the fumes from SPRAY PAINTING INSIDE MY HOUSE were messing with my mind.

Because I ended up with this:

IMG_0842


IMG_0841

I know.

Even if.  Even if this had been executed perfectly, it was a HORRIBLE idea.

It looks the the back kitchen of a bad Mexican restaurant.  And by bad I mean, failed 5 out of 5 of their last heath inspections.

Bad like you probably caught e coli just looking at these pictures.  (sorry for that!)

Luckily I could see that this was just not a good result.  So to fix it I took the obvious approach. I SPRAY PAINTED IT WHITE.

WHYYYYYYYY?!?!?!

Why did I spray paint it again?!

Why didn’t I just painted it normally?

It is obviously Brooke’s fault for not telling me I could use regular paint.  When she said “You can spray paint everything!!” I clearly took that as gospel truth.

Now, normally I would apologize for the horrendous picture quality but the fact that I took them on my 3rd generation iPhone is what saved them from the hard drive crash of 2011.  So you are welcome.

So glad to have learned this lesson a few years ago.  This time around, the kitchen overhaul is going to be MUCH different.

Now.  Do you feel a little bit better about yourself?

I for one am feeling very naked.

Love Your Guts

My Favorite DIY Gone Wrong Reader Submission

By Mandi | 11/21/2013 | 22 Comments

So, you know how you meet people and you are like “Um…hello, why are we the same person?”

This is EXACTLY what happened when I was reading Morgan’s submission. It was like seeing into my own creative mind. That is a scary thing my friends.

See Morgan loved this Anthro Amethyst Crystal lamp.

It is so pretty right? But unfortunately it was $500.

What is a girl to do?

How can you make this lamp yourself?

Um.

Obviously growing crystals on a thrifted lamp is the answer. (Doesnt this totally sound like a Mandilicious project!?)

I will let Morgan take it from here…

I did a little googling and found an awesome Martha Stewart tutorial for growing crystals using water, dye, and a spice called alum. Her tutorial was for easter eggs, but I thought I could totally multiply it by ten and get a crystallized lamp.

6134_041311_egg_geodes.jpg

So, I found the coolest cut glass lamp at goodwill (it was destiny!)

_MG_5115


I unscrewed the base, and covered it with the glue & alum and then soaked it in the dye/alum mixture…. for two days.

_MG_5158


It came out VERY purple. And not a crystal in sight. I ended up letting it sit for 9 days (I thought maybe it would take longer?)

_MG_5279


But no, now I have a purple, lumpy lamp. That, needless to say, looks nothing like the anthropologie version.

_MG_5629

Ok its me again. Still laughing! Dont you love the thought process?! Seriously Morgan, I think we are sisters.

I need to give a HUGE thank you to everyone who submitted their DIY’s Gone Wrong. You guys seriously rock my world, and have totally made me feel like I am not alone in my failures.

So tomorrow is the day.

The day I share the worst DIY fail I have ever had.

You may think I am being dramatic. You may think I am exaggerating. You my friend, are dead wrong. It is horrifying with a capital WHAT THE H.

Stay tuned.

Love Your Guts

DIY Gone Wrong: Pinterest You are SUCH a liar.

By Mandi | 11/20/2013 | 26 Comments

So tempting, so tantalizing, so NOT REAL. Pinterest is the mother of all modern urban legends. You cant help but be sucked in by the beautiful pictures and mindlessly simple solutions. But of course it has a dark side. All of today’s DIY Gone Wrong features are Pinterest inspired fails.

Up first we have Deborah.

It started so innocently. I love those little bleached bottlebrush trees and there’s a million pins out there how to DIY bleach them, so yeah, I’m gonna do that.

I bought a couple of cheapies at Walmart, and because I didn’t like them all that well, ordered a Department 56 package set from Amazon for $10.

bottlebrush trees

I got out my plastic tub, bleach and trees and set to work. The first try, I left them in the bleach-water for the requisite 10-15 minutes and NOTHING. So I added more bleach and left them in a little longer (an hour at least). Some green bleach-water, and not much else.

I dumped it all out, filled the tub with just bleach, threw the trees back in and left it all for the rest of the day. Here’s the result:

IMG_2964-001s

The Walmart trees were obviously made from green plastic; no amount of bleach was going to make them anything other than green. They also had a kind of “flocking” on the branches and some “snow” substance. The flocking partially disintegrated and the snow must have been a glue of some type because it just became extremely gummy. I managed to get most of the gummy off the larger tree but just left the smaller trees alone. And a lot of the “needles” are falling out – the top of the larger tree is just wire. Fail #1. Oh, but those other trees. Goodness me. They are kinda beyond words. The branches of the larger trees stuck together, so they look sorta like Italian cypress trees if you squint at at them, and like blonde drowned rats if you really look. The needles bleached out fairly well, but the snow on the ends is a day-glo mint green. And the wire rusted, so even the really small trees that might work have big blobs of rust. Fail #2.

IMG_2970-001s

AND, there are chunks of branches falling out. Like, my trees have alopecia, or more accurately I guess, just went through chemotherapy.

So mangled, so hilarious.

Christine from Lets Get Crafty gave birth to a project that was inspired by not one but 2 Pinterest ideas.

This button bowl:

and the penny countertops that are taking over the world:

I love the look of pennies and they’re everywhere so finding them would be easy. What could possibly go wrong?

At this point I was already running into trouble. I realized I put too much of the glue on which created a balloon slip-n-slide for the pennies. After awhile I just wiped off the glue and put a light layer back on but waited for it to become tacky and then stuck the pennies on. The sliding was at a minimum and I was coasting right along.

I let the penny bowl dry overnight before coating it with the glue. Then I waited. And I waited.

You can still see a glimmer of hope in my eyes at this point that all would be well with my penny bowl but alas she was never meant to be…

Again, here is the bowl..er…sculpture of pennies that just sagged and appeared to be melting until it finally came to rest.

Christine has a video on her blog of the moment she pulled it out of the mold and it is a little bit hilarious watching it melt. But she is just so cute about it makes you say awwww!

I think that this is a really cool project that would totally work if you used something more rigid than Mod Podge,  maybe some sort of clear epoxy?


I loved everything about this fail submitted by Dani, and instead of paraphrasing her post, you just need to click over and read it,  it is super funny.

Tomorrow I am featuring my favorite DIY Gone Wrong submission (because it is TOTALLY something that I would have done.)

Love Your Guts

DIY Gone Wrong: Can of Worms

By Mandi | 11/19/2013 | 3 Comments

There are times when you unknowingly start a DIY project thinking it will be such an easy fix. Then the DIY gods laugh in your face and make your life miserable for being oh so naive.

Most of the submissions that were a can of worms type projects were very long (because you get 6 projects for the price of one!) So I am going to send you over to read the whole post!

Up first is one of my FAVORITE bloggers in all the world. Ashley from Domestic Imperfection. She is as amazing as the day is long. But even talented DIYers have bad days (weeks).

Ashley decided to make her own chalk paint (does this ever work out?)  little did she know what she was getting herself into…

Check out her post here.

As I was reading Rita’s submission about her bathroom renovation from Satan there was one line that made me literally laugh out loud.

Right before Cane smashed this foot down into the cabinet, breaking the back apart, he shook his head, looked up at me and whispered, “Two leaky tiles.”

vanity 7 730x973 Simple bathroom vanity removal  hah!

Check out her whole post here.

See you tomorrow with a post dedicated to Pinterest…oh yes. We are going there.

Love Your Guts