Today is the official 4th birthday of Vintage Revivals.
I am having a hard time coming up with the next sentence because that just seems so utterly insane to me.
I mean, HOW?
I have learned so many invaluable lessons from this little blog and had so many experiences that I never thought a possibility.
My personality is one to move on to the next thing, and reach higher after each experience. Sometimes I forget to look back and see just how far the climb has taken me.
So lets have a little flashback shall we?
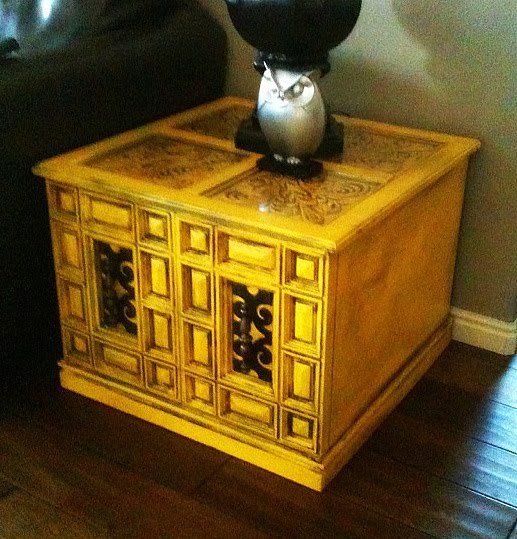
This was my first project:
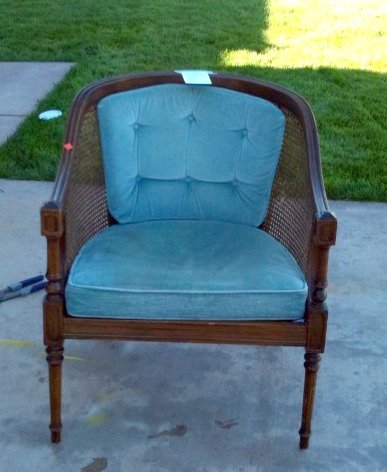
But it wasnt my first blog post. My first blog post was this little cane chair.
My first logo was designed exclusively in Picnik.
Over the years VR has had many faces (I would LOVE to know which ones you remember!)
Man how the projects have evolved too. Here are some of the most popular tutorials. You might want to cover your eyes…or swallow the liquid in your mouth before you scroll down to the first project…
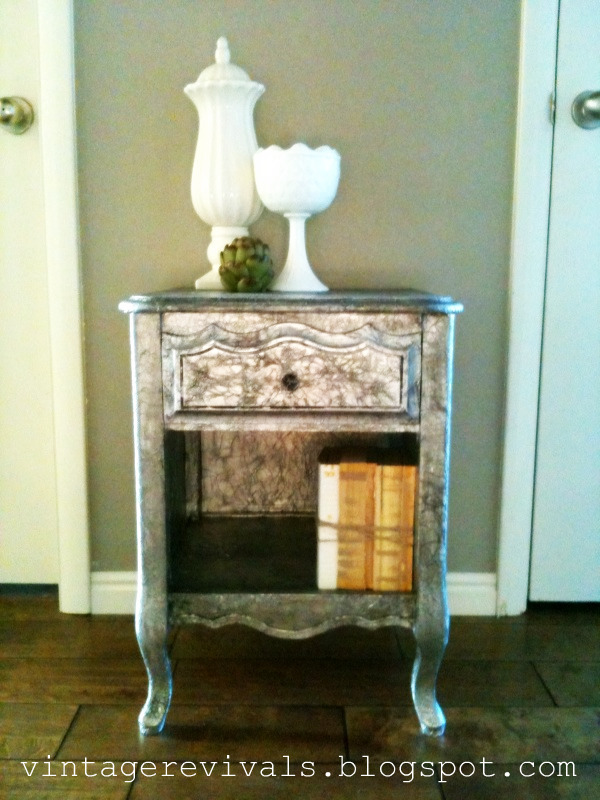
The infamous Tin Foil Nightstand. (Sept 2010) this project was polarizing, people either loved it or hated it. Strangely I didnt feel too strongly either way.
It is an extremely surreal feeling going back through old posts. Four years have gone by so fast, but at the same time, I feel like I have done so much more than what the blog shows. Must be all of the thought energy that goes into it.
Mostly I want to say thank you to each and every one of you. You guys have been with me through some of the craziest times of my life and I know it sounds so cliche, but, you really truly have made my life brighter.
Here is to 4 more years! I would LOVE LOVE LOVE to know what VR project brought you here or which one is the most memorable for you. Memory lane is a much funner road when travelled with besties!
The amazing desk in Alicia’s Office was not always so amazing.
I found it at the DI (Utah’s version of the Goodwill) almost a year ago. I love that it was metal and industrial and it was $18.
The rust, mismatched knobs, peeling veneer top, and chippy paint were doing this cute guy no favors.
It sat on the side of my house for months because I couldn’t part with it, but I didn’t have anywhere to put it (I know you guys feel my pain!)
When I teamed up with P&G and The Home Depot, this desk was my jumping off point. It was finally going to get the makeover it deserved!
The wood veneer top peeled right off, do you think it has anything to do with the Southern Utah heat?
It had been painted multiple times, and the paint was really thick. So the parts where it was chippy had some major texture issues. Sanding it down would have been an option, but I was really hoping that we could get a good metal finish patina out of it so I stripped it with Citristrip (just like I did to Macie’s desk).
The metal wasn’t quite right, but stripping it cleaned off all of the drippy chippy paint, so it worked out.
I started by priming the entire piece with Kilz. It is my favorite hands down. There are 2 things to remember when you are working with Kilz, shake it really really well, like for 3 minutes well. It has a super thick formula and separates in the can. And 2, you will need to lightly sand it with 220 grit sandpaper after it has dried. Because the formula is so thick the overspray is substantial enough that it leaves texture on your piece. There isn’t really a way to avoid it but just lighting wiping it off with a piece of sandpaper makes it disappear.
Once your primer is finished it is time to paint! I used Krylon Classic Gray. It is a really great medium gray that isn’t too blue or too brown. When you are using this color you want to shake it really well too. It seems to harbor little dark fugitive bubbles that completely change the color of the paint when they escape.
After your gray paint has had time to cure (usually around an hour) you are ready for the next color. Use Scotchblue Delicate painter tape and a few garbage bags to cover the base that you have already painted. The paint is still super fresh so just push the tape on lightly. I pushed it on so lightly that in the picture below the middle section fell off a little. Whoopsie. Just make sure that the part that you are spraying is covered.
Paint the drawers white and give them a chance to try too.
The piece had single screw pulls in all of the drawers and instead of patching them, I decided to just over them up with new pulls.
The ones that we used were bin pulls from HD. We gave them a quick coat of gold spray paint and let them cure.
**Most spray paints work really well on metal, but you have to let them cure the full time (16-24 hours) because you really put them to use. I have cursed many a metal spray painting project because I didn’t have to willpower to not manhandle it. Spraying pulls works fantastically, you just have to be patient.
(The screws on the front are fake, so you don’t need to worry about touch up after they are installed!)
As daunting as it can sound, painting a piece of furniture is one of the BEST things that you can do for your house. It is like an instant facelift!
You guys!!! I am home, and happy to report that Amy’s wedding was a MASSIVE success! I cant wait to show you everything, you are going to die at the beauty that we were able to pull off with a teeny budget.
I am sure that you have seen this. And, while I admit, that I have to watch it on mute because this song makes me want to hurt small creatures, I am over the moon in love with every second of it. Why did Soul Train not exist in my life until now? It makes me sad over all of those lost years!
New train of thought. I find myself thinking about all of you and the things that are going on in your project lives. Are you working on something really fun? Are you stuck? Do you need a little motivation? I want to see them! It will make me feel better about the neck deep project situation that I am living in….
So what do you say? Want to play along? Hashtag #projecttrain so I can give you a cheer of encouragement and possibly a kick in the pants if needs be!
Here is what I am working on:
It is getting real folks. I cant talk about it yet, because I have to get far enough ahead that it isnt 74 years between updates, but the dream (or nightmare) of a vintage trailer has come true in the Gubler household.
How about some adorable leather tassled luggage tags that are coming down the pipeline?
(Tim Riggins I love you!)
And just finished up this little sprucefest. It will be on the blog tomorrow.
Your turn to jump on the #projecttrain (woot woot!) (That was a train whistle woot, not a raise the roof woot.)
Everyone is in need of a stylish magazine rack, am I right? It doesn’t get more fantastic than this upcycled leather hanging rack that I made for Alicia’s Office Makeover.
For this project you will need:
Leather (2 pieces that measure 11”x21” each) My favorite place to find leather is from an old couch that needs a new lease on life.
(2) ¾” Grommets (get them at Home Depot in the Tool section! SO MUCH cheaper than at the craft store!)
(1) 24” piece of ½” copper pipe
(2) ½” copper pipe straps
(2) 6’ pieces of rope
Start by folding your leather in half. Mark the holes for your grommets by pressing them into the leather.
Cut the holes using a pair of scissors
Place your grommet. Make sure that it is going through both pieces of leather!
Once your grommets are placed, its time for the fun part!
Take your rope and fold it in ½. Place it over your copper pipe and feed it through the loop that you’ve created. Do this for both pieces.
Feed the ends of your rope through the back of the leather pouch (so that they are coming out of the front.)
Tie a knot and feed the ends back through the grommet.
Pull it nice and tight, and repeat for each of the other grommets.
Knot the ends
Hang it on the wall with the copper pipe straps. Step back and admire your handiwork.
Check out all of the projects from Alicia’s Office Makeover here!
I cant believe that it has been 2 weeks since the Hoard Sale. I feel like I am still trying to recover!
Every year I go through the same cycle. Look at all of the stuff. Feel good about the amount of stuff I have. See how many people sign up for the info (588 this year!) Freak out because I don’t have that much stuff. Eat a cookie about it. Decided that it just has to be good enough. Unload the stuff. Think that my garage must have Mary Poppins like qualities, because there is NO WAY all of that stuff could fit in such a small space. Enjoy the heck out of the actual sale, like its in my top 5 most awesome things. Die. (Repeat every year)
I am so glad that Brooke loves furniture as much as I do. There is not a better friend to team up with for an event like this.
Huge thank you to everyone that came out and joined us (except the guy that stole our signs because we wouldn’t let him in early). Meeting people that love this kind of stuff the way we do is the best feeling in the entire world. AND it shows Court that I am not the only crazy person that loves old furniture. I couldn’t believe how far some of you had come. Blogging is a little solitary so it is amazing to be able to put a face (and a hug!) to some of you.
We had Waffle Love join us all the way from Provo (4 hours away!) and it.was.life.changing. Have you guys tried a WaffLuv waffle? It is the stuff dreams are made out of. I am seriously excited/nervous that they are opening a truck in St. George. My girls are already asking about it.
The Dance Off was EPIC, and totally got everyone excited to party (at 8:00 in the morning!)
People who don’t take themselves too seriously are my favorite kind. And old people. I love old people.
There were a few pretty awesome things left so I have a really fun makeover series planned. Think Jenny Jones…
If you are planning a yard sale, totally check out these tips to maximize the success (and see the very first Hoard Sale, in all it’s tiny glory!)
The leather has been flowing like wine around these parts for the last few months. Ever since the life changing discovery that you can skin a leather couch and save thousands of dollars (and a puffy leather couch from the landfill for that matter!) everything is getting leathered. Like a lady addicted to the tanning salon. Except wrinkle free.
Here are of my favorite leather upcycles. They range from the most basic beginner (triangles and hot glue) to “Phew, I cant believe I pulled that off.” So you are sure to find something that suits the size of your guts.
First things first. You have to find a couch that needs saving. Watch thrift stores, and Craigslist. Look for real leather, the worn areas will give you color variation (which is freaking awesome.)
1. This safari sling bench tops my list of favorites. I was totally inspired by this Michael Arnoult chair that I found for $75 on Craigslist. Have a few days? Skin a couch and literally make this bench from scratch.
The good news continues. I just skinned another couch!! The leather obsession LIVES ON! MUAH HA HA HA HA!
I believe massive thank you’s are in order.
Domino magazine just named Vintage Revivals as one of their picks for the 17 Best DIY blogs (stuff like this makes me feel like I am pulling a fast one on somebody. It is just too weird!) You most definitely will want to pop over and check out the blogs they recommend, there is some massive talent over there and a few new to me blogs that I cant wait to check out!
Find me one person on this planet that doesn’t love a good sliding barn door. Go ahead. Its just not possible. They are like puppies. Impossible to resist.
The sliding door in Alicia’s Office was the first must have element that we decided on. Bi-fold doors were not her friend, and they aren’t yours either.
There are 2 main problems that people run into when lusting after a sliding barn door. 1. The hardware is expensive. 2. They are heavy. Like watch your toes if you want to keep them, heavy.
So after a late night brainstorm sesh I came up with the idea of a sliding screen. When I tell you this thing is light, I mean, me, the weakling with chicken arms can pick it up myself. Easily.
The secret is that behind that awesome fabric is just a frame. Nothing solid. When I say nothing solid, I don’t mean sturdy, I just mean not full of wood and weight.
Here is what you see:
And here is a sketch of what it looks like behind the scenes.
Its like magic!
Now, no 2 houses are the same, so I am going to tell you exactly what you need to know to make your own, and custom fit it to your space.
To start you need 3 measurements.
The width of your wall (or how far you want your door to be able to slide) stud to stud.
The height of your ceiling.
The width of the closet opening.
Supplies you will need:
Tools:
Miter Saw (or chop box)
Drill
Stapler (doesn’t need to be fancy!)
Nail Gun with Finishing Nails
Supplies:
**When you are buying your lumber, get the length that is most compatible with your ceiling height. For example our ceilings were 8 feet high so I bought 8’ boards. But if your ceiling is 11’ high and you want the door to go all the way up, you will need to buy boards that are at least that long.
1×2’s for the inner frame. For a door that measures 86×55 we used (10) 8 foot boards. These boards are extremely inexpensive (we are talking $2 each) so it is better to buy an extra or 2 than to have to go back.
1×3’s in Premium Grade wood. This type of wood is located by the molding and is more expensive, but it is much nicer quality that building grade and it is going to show. For a door that measures I bought two 8’ boards and two 6’ boards.
Fabric. I used an old table cloth and some clearance muslin from the fabric store. You can buy upholstery fabric (it usually comes in wider widths), a sheet, a table cloth, or a combo of all of them!
(3) Eyehooks
(2) 1.5” Fixed Rolling Casters
(2) 1/2×2”Pipe Nipples
(2) 90 degree 1/2” Elbows
(2) 1/2” Floor Flanges
(1) Length of 1/2” Conduit Pipe that is the same as your stud to stud measurement. You will most likely need to have this cut and threaded to the right length. Your friends at Home Depot will do this free of charge!
(8) 2” Hex bolts. These are going to attach the floor flanges to the wall. In all reality, 4 will connect to the studs and 4 will fill the other holes to make it look pretty. (Just keeping it real!)
Screws to build the inner frame work. We used Kreg pocket screws (without drilling the pocket holes) and they worked amazingly. Because of the way the threads are they don’t split the wood you are drilling into.
Ok! Here is how you do it!
Start by building the outside of the inner frame. You want your door to be at least 6 inches wider than the width of your closet (measurement #3) and be 10 inches shorter than your ceiling (this will give you a little bit of wiggle room during installation!) When all is said and done, the door will sit about 6” below the ceiling, not 10”)
Drill a pilot hole into the first board. Using self drilling screws, screw them together. It is a godsend to have 2 drills for this process. This is the technique that you will use for the entire build.
Once you have built your frame, you are going to attach cross pieces that run horizontally inside it. When you are measuring for these cuts, just make sure that you are measuring the inside of the frame, Double check that they are level (its not like anyone will see them, but it will make your job easier down the road!) We attached 4 boards, about 15 inches apart. Once again, unless you have someone living inside the closet you wont see these, so guestimations are a-ok with me!
Once you have attached your 4 cross pieces, you are going to attach vertical pieces inside them. If you guestimated the distance between your horizontal pieces just measure before you make these cuts. Stagger the vertical boards to give it more strength.
That is it for the inner frame! Pretty simple right?!
Next it is time to add your fabric. The design on my door has a large stripe in the center. So naturally it needed to be centered on the door. I marked the center point on the wood, and on the fabric, and lined those up before I started stapling (also make sure that your stripe is level!)
Staple a few in the center area on opposite sides, and then switch to the top and bottom and staple there. By rotating where you are stapling, (this is the technique) and doing the whole thing at once (as opposed to one whole side at a time) you will keep your pattern straight and help with bunching.
Trim off your excess. Just a side note here. I had a TON of excess fabric because it is easier to staple and then cut, than it is to measure, cut, and then staple, and then cut again. (You can see how much was left in the bottom of this picture!)
Once your fabric is on, it is time to attach the outer frame.
The outer frame is made out of the nice premium wood. Measure the short side of your door (top and bottom) and add 2” to that number. You are adding 2” to compensate for the width of the long sides . If you want you can miter your corners, but we didn’t, and it sort of looks awesome.
We used a piece of scrap 1×2” to fit the outer frame. By putting it on the front of the door, and then lining the outer wood flush with it, it gave us a 1” lip along the front.
Measure in 8” from each end, and 1 1/2” from the front of your door and mark. This is where your eyehooks are going to be placed. Drill a large pilot hole that goes through the outer and inner frames and screw the eye hooks into place.
Center your cute little fixed caster wheels on the bottom of your door. *Important little side note. You don’t want wheels that can turn and move. Your door will get wonky faster than you can say “I HAVE TO GO TO HOME DEPOT AGAIN!?!” So fixed guys are your friends. Got it?
To mount your door you will need a helper. Maybe two.
Start by marking where your studs are. Mark where the ENTIRE stud is. Both edges. I promise you will thank me later.
Start by assembling your advanced wall mounting device. Or brackets. Whichever you prefer.
*Just a friendly reminder, the fittings above are 3/4” because that is what I had on hand. You will be using 1/2”.
Put the pipe through the eyehooks and attach both ends of the pipe to the brackets.
Move the door into place.
Before you start attaching the hardware to the wall you need to make sure that the door is resting on the wheels. Not the eyehooks. The eyehooks guide it, but the wheels hold the weight. Make sense? Try to center the pipe in the eyehooks so that it is sort of floating there. It makes things quieter too!
Now this part is going to make you want to kiss me. Probably on the mouth. Its fine. Remember how you marked both sides of the stud? You are going to turn your floor flange until 2 of the holes are over the stud. Because pipe cutting and tightening are not an exact science (obviously you want it to be as tight as you can get it, but my husband can usually get a few more turns than I can) this leaves a little wiggle room. You just manipulate where the screw holes line up by turning the flange, as opposed to trying to cut the pipe 1/4” shorter. So smart right?! Pucker up!!
Mark where your holes need to be predrilled. Predrill (obvs) and then attach the brackets with hex bolts.
This is a FANTASTIC, inexpensive way to get the look of an on trend sliding door, without the cost, or the headache!
If you are wondering what it sounds like and see how easily it glides, check out this video. (Its near the end)


![[DSCN4780[3].jpg]](https://lh5.ggpht.com/_schtd5RphwI/TV7loRPRfOI/AAAAAAAADHo/p90wmS_3R-Y/s1600/DSCN4780%5B3%5D.jpg)


")


 vintagerevivals")